
33 Stunning Christmas Angel Crafts You Need to Try This Holiday Season
Most Christmas angel craft roundups hand you the same paper doily and call it a day — and that’s exactly why so many of us scroll right past them. Here’s the truth: the angels worth making in 2026 look nothing like that.
We spent serious time browsing Etsy, Michaels, Target, and World Market to bring you only what’s worth your glue gun, and we narrowed it down to 33 ideas that actually deliver — from $6 bead-and-paper ornaments to a $180 gilded topper. Inside you’ll find rustic birch and woven straw figures, vintage cherub toppers with gold starbursts, folded book page angels, delicate quilled paper, and a whole lot of soft pastel tulle. Budget and luxury versions are compared side by side, so you can see exactly where the extra money goes.
2026 is the year of the slow-made Christmas — thrifted books, natural fibers, and ornaments that look collected instead of bought.
📌 Save this to Pinterest for later — you’ll want it when you’re ready to shop.
1. Birch Bark Angel Topper That Glows From Inside
The whole ornament hangs on those bark layers. Take away the overlapping pieces and you’re left with a burlap cone, a rope halo, and a nice idea. It’s the way each pale birch piece sits slightly proud of the one beneath — edges dark and ragged, shapes uneven — that reads as feathers from across the room. Then the warm white string lights tucked between the layers catch the bark from behind, so the glow looks like it’s coming from inside the angel instead of from a strand you can see.
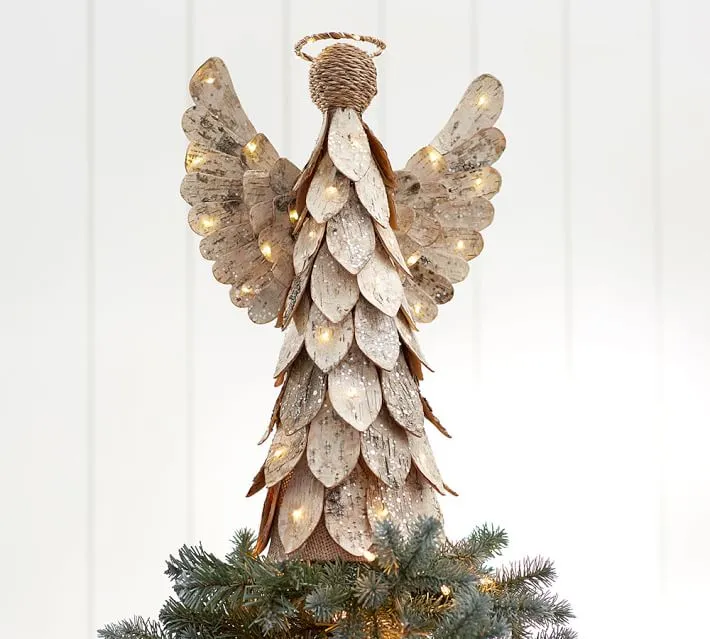
Cut your birch strips in three graduated lengths, roughly 5, 4, and 3 inches, and build bottom-up, overlapping each piece by about a third of its width. Less than a third and gaps show the cone underneath; more and the wings turn into a solid slab. Work in rows of seven to nine pieces, then save your two longest, curviest strips for the wings, angled up and out at about 45 degrees. A low-temperature glue gun keeps thin bark from curling at the edges.
2. Kraft Paper Angels With Navy Patterned Wings
Here’s the fold sequence for one kraft-paper angel, start to finish — about 25 minutes once you’ve made the first one.
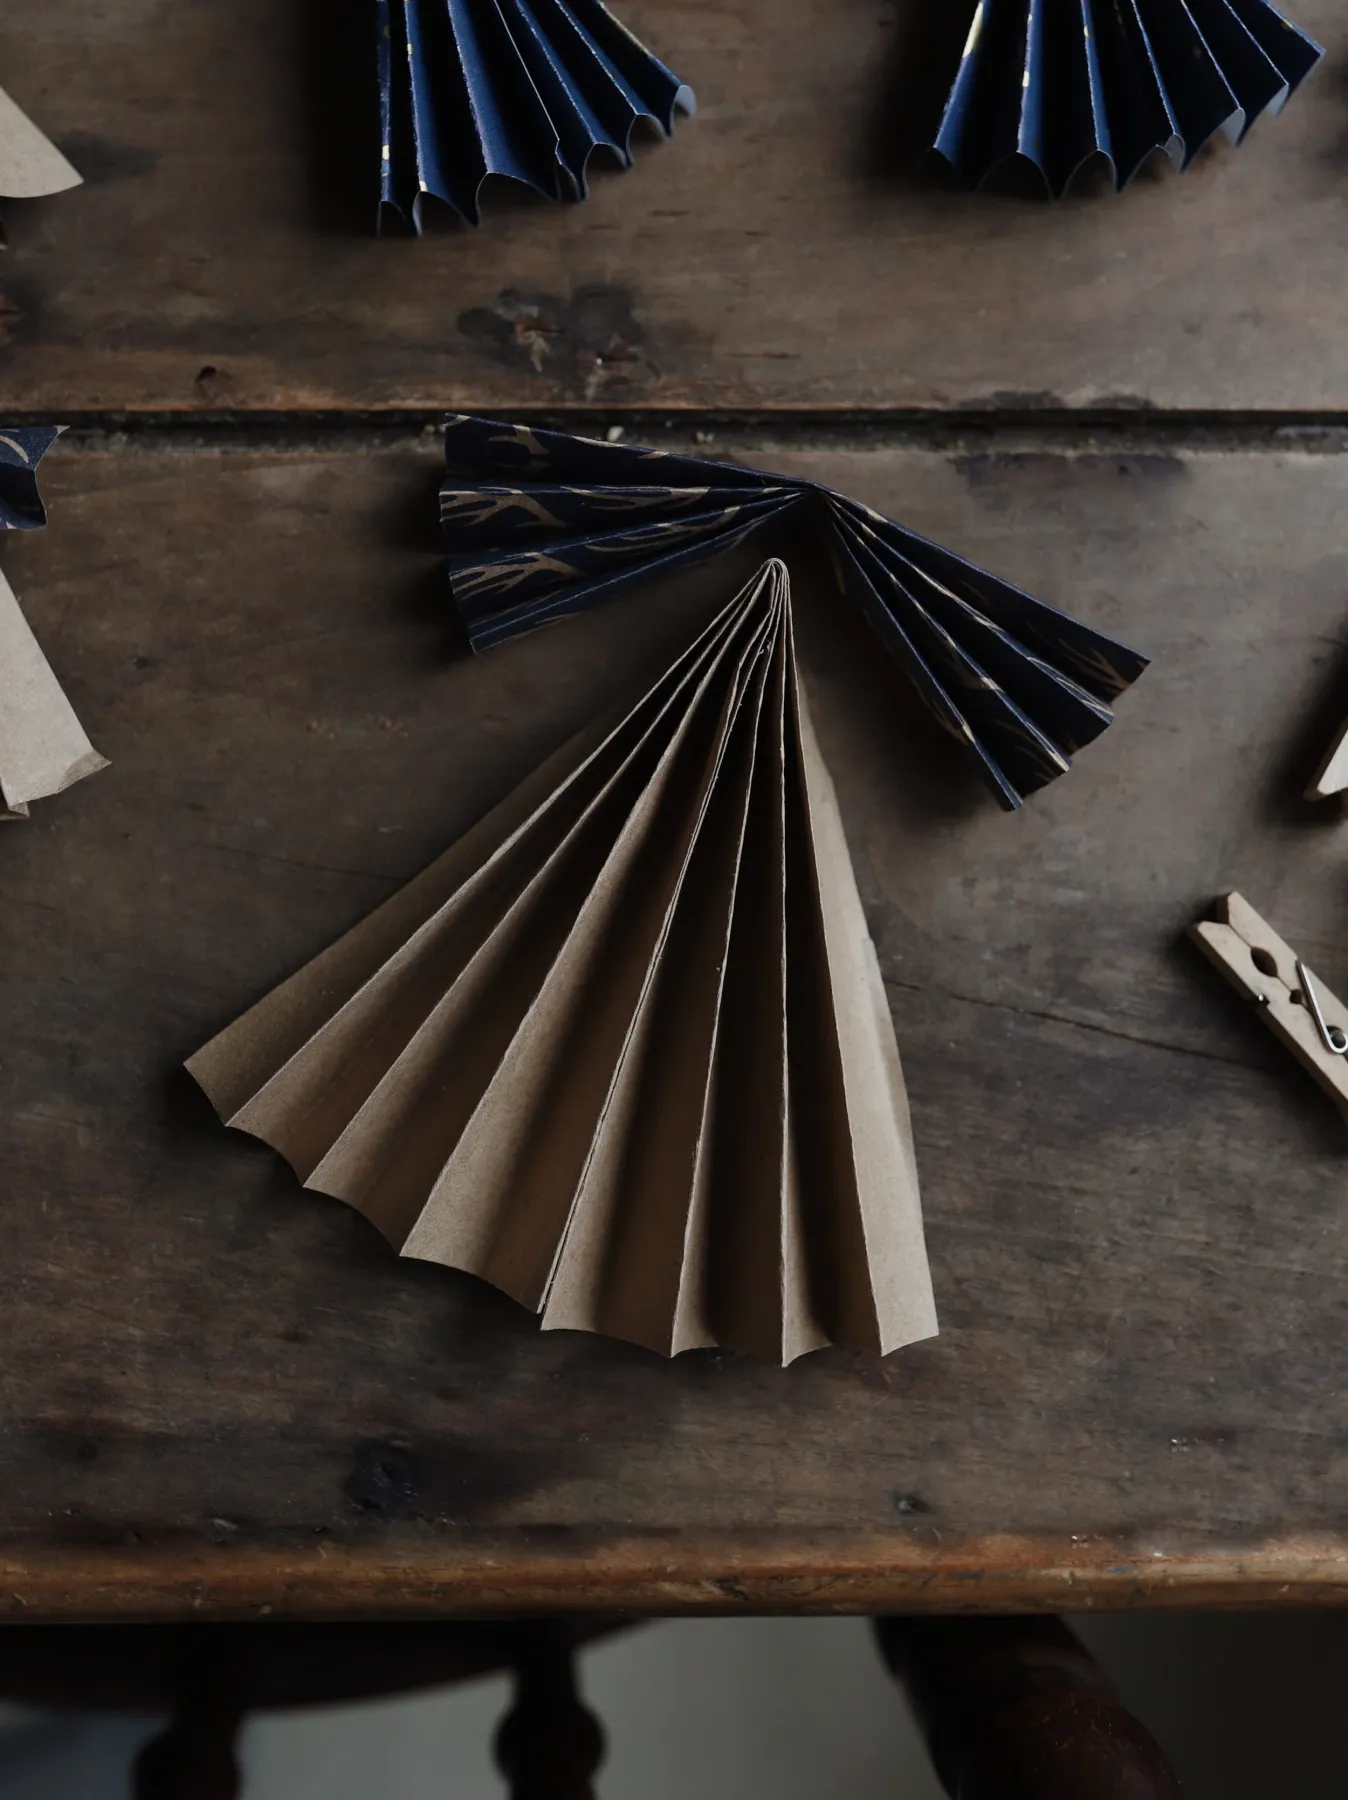
- Cut a 6-by-6-inch square of kraft paper and crease it diagonally, pattern side in if your paper is printed.
- Bring both outer corners to the center crease to make a kite shape, then flip and repeat on the back.
- Fold the top point down about an inch to form the head, then fold the piece in half so the wings splay behind.
- Fan the two front flaps open with your thumb until the skirt stands on its own.
- Clip a wooden clothespin at the waist while the creases set — about ten minutes — then slide it off.
Budget about $6 for a pad of kraft paper and $4 for a few sheets of the dark blue patterned stock.
Two decisions carry this craft. The wings are cut from dark blue patterned paper with fine gold detailing rather than the same kraft as the body — one swap, and you get contrast without introducing a third color. And nothing gets pressed flat. The folds stay crisp and slightly angular, and the raw kraft edge is left raw. Smooth the paper out or switch to cardstock and the angels start looking like they came off a printer instead of a kitchen table.
3. Folded Book Page Angel With a Rose Gold Head
Before you sacrifice a book to this project, run the list.
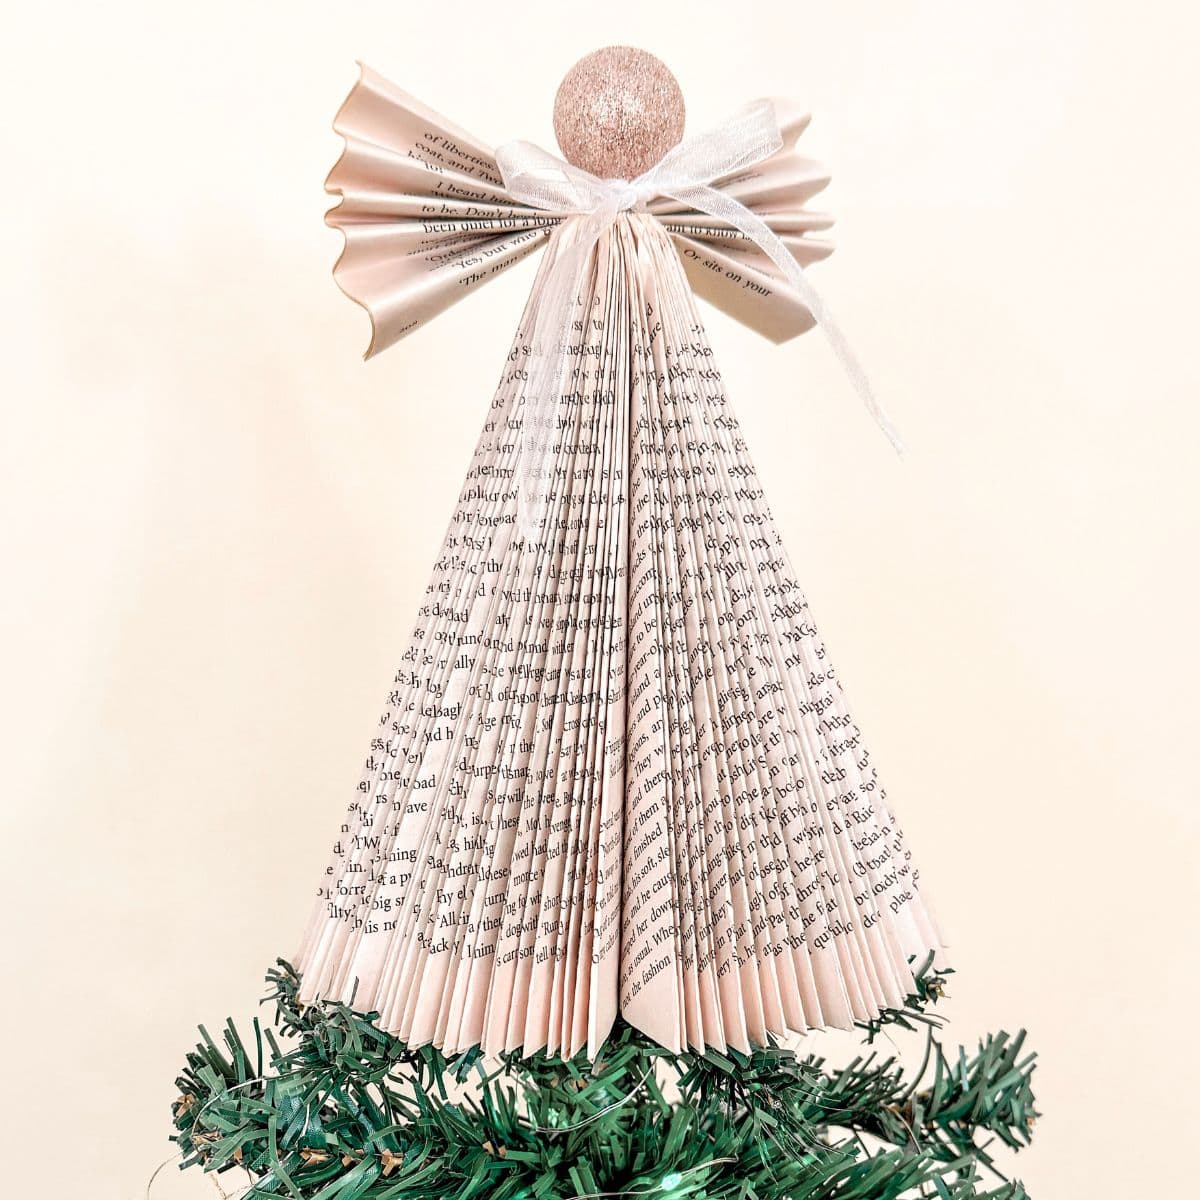
- Pick a book with soft, slightly aged pages — bright new paper folds stiff and shows every crease.
- Use a paperback or a thrift-store hardback, not anything you’d mind losing.
- Measure the top of your tree: a topper this wide needs about a 6-inch gap to sit without crushing the needles.
- Match the ribbon and sphere before you glue — rose gold reads warm against aged paper, harsher yellow gold can look brassy.
- Work on a dry, flat surface; damp pages won’t hold a fold.
Think of it as a ratio: roughly 70 percent aged paper, 20 percent rose gold glitter, 10 percent sheer white ribbon. That’s what keeps the topper delicate instead of gaudy. Trade the rose gold for matte copper and it turns warm and rustic; go pearl white and it reads fully vintage. The paper share doesn’t move. Once glitter creeps past a quarter of the visible surface, the angel stops looking literary and starts looking like a craft-aisle display.
4. Quilled Paper Angels With a Single Bead Heart
Three white quilled angels, three tiny beads, and that’s the entire idea. Each figure is built from rolled and shaped strips of white paper with the coils left visible, so the wings look lacy rather than solid. Then one bead — red on the first, blue on the second, teal on the third — sits at the center of the body. Take the beads away and you have pretty white scrollwork. Keep them and your eye finds a focal point from across the room, plus a color cue for telling the angels apart while you hang them.
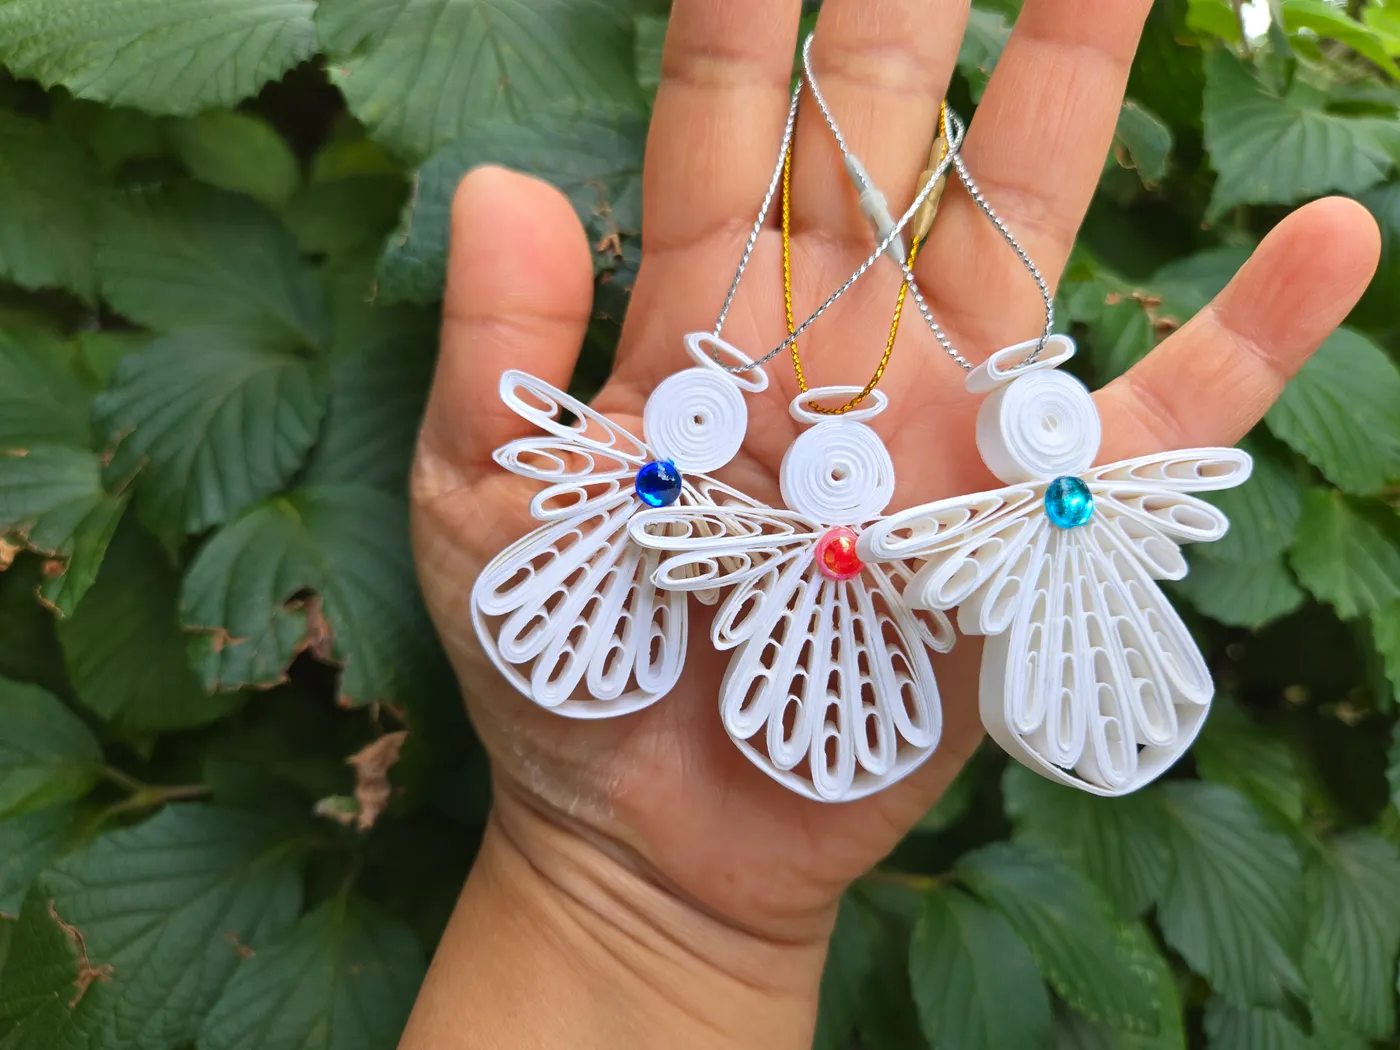
Quilling is beautiful and it is not durable. Rolled coils crush under a thumb, wilt in a steamy bathroom, and hate being boxed with anything heavier than tissue. Hang these high, where nothing brushes past them. Store them flat in a shallow box with tissue between layers, never stacked. The metallic hanging loops are usually the first thing to tear, so reinforce each one with a dot of glue before it goes on the tree.
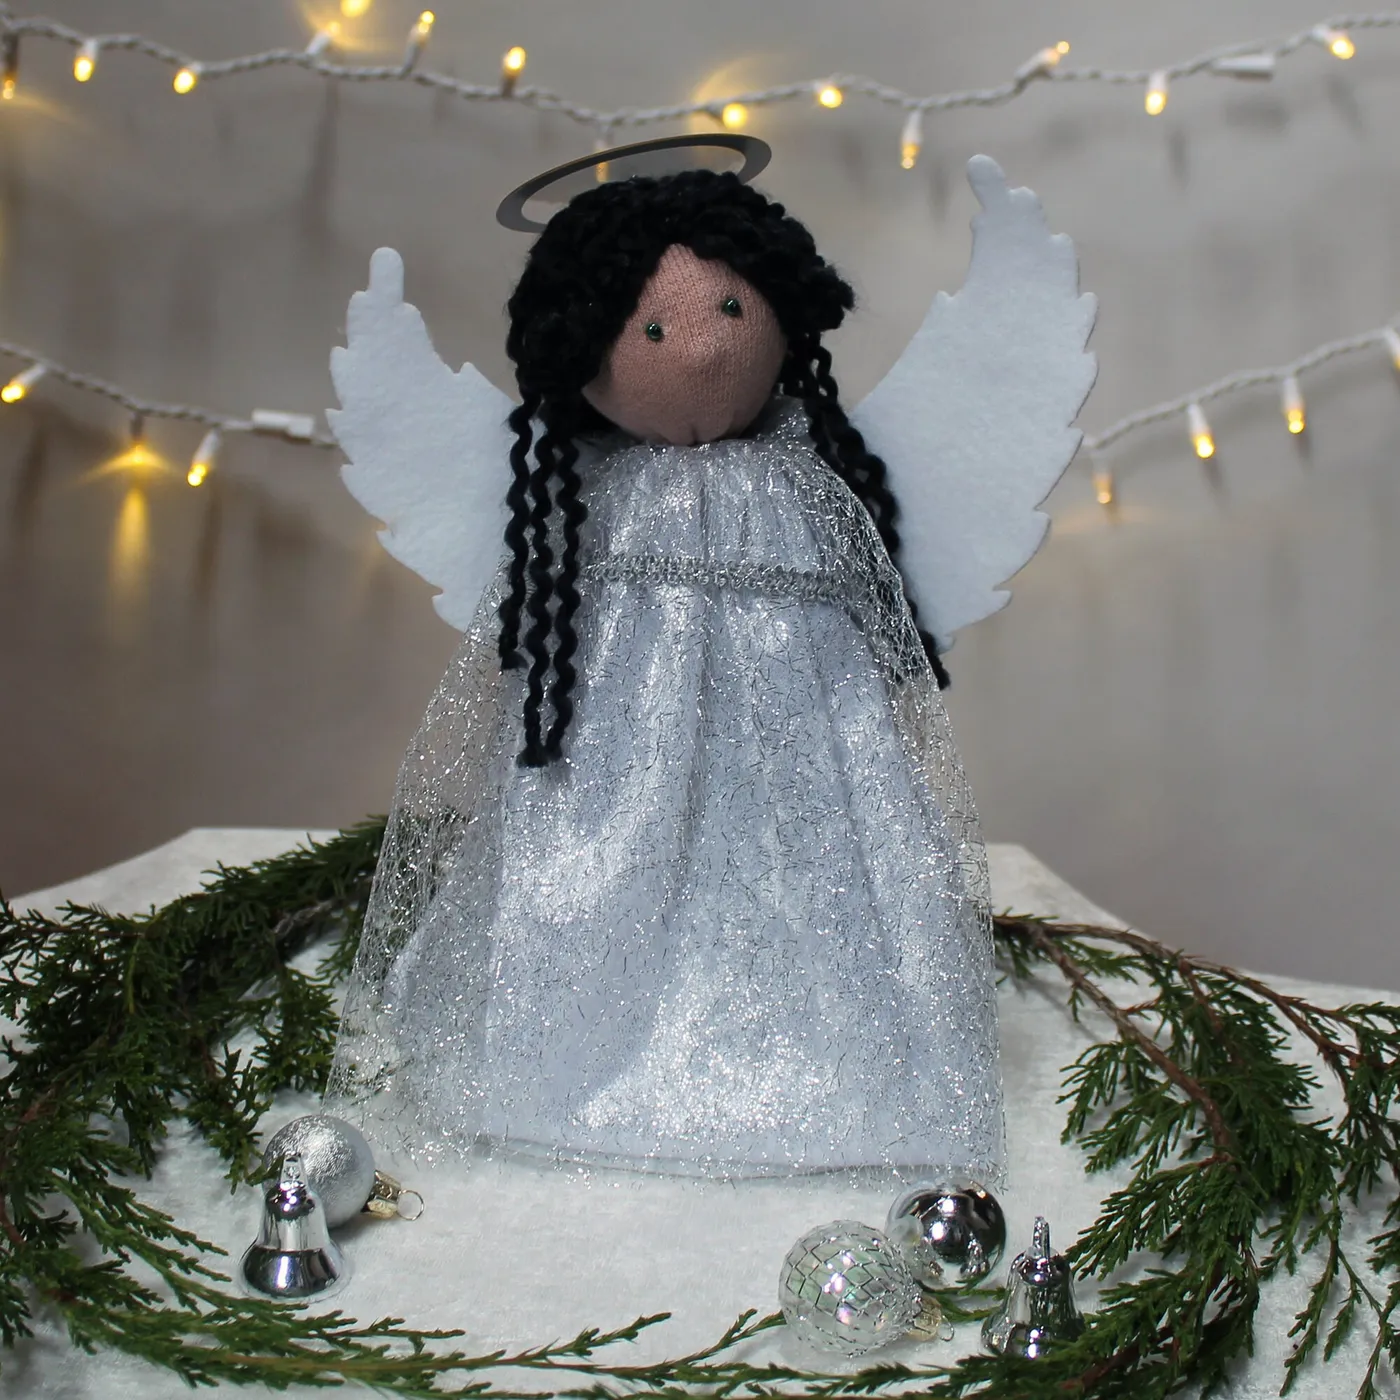
5. Silver Gown Angel Doll in Evergreen and Fairy Lights
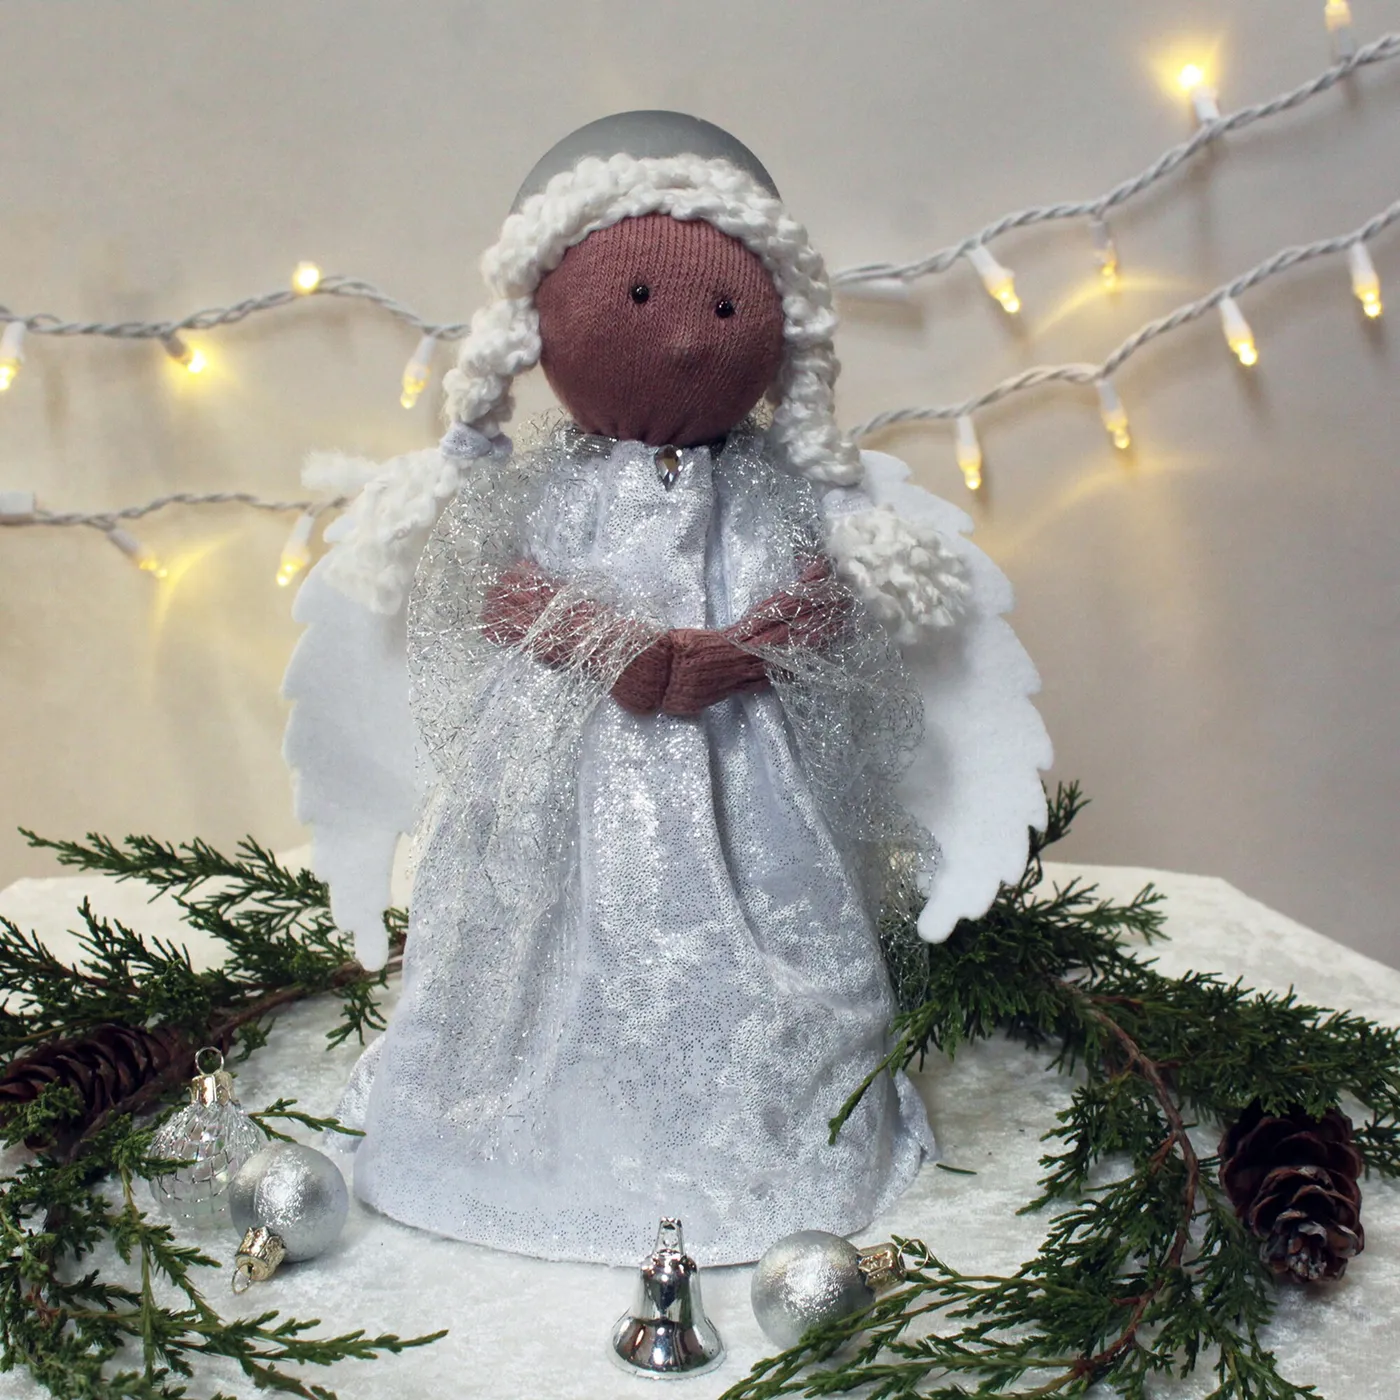
Rough numbers for a doll like this — fabric body, sparkle gown, felt wings, styled with greens and lights.
- Fabric, felt, and yarn for one doll: $12–$28
- Silver glitter tulle or sequin fabric, per yard: $8–$20
- Warm white fairy lights, 10-foot strand: $10–$25
- Silver ornaments and evergreen stems for styling: $15–$40
- Glue, thread, and stuffing: $6–$15
Total: roughly $51 to $128 for the doll and its display.
Skip the new ornaments entirely and use clippings from the tree you already have, and the project drops to about $35.
Felt wings droop within a day unless you deal with them. Sandwich a length of 20-gauge floral wire between two felt wing shapes, glue the edges shut, and bend each wing into a gentle upward curve before it sets — that keeps the silhouette reading as wings instead of flippers. Then run your fairy lights behind the doll rather than around it. Backlighting makes a silver gown shimmer and hides the wire; wrapping the strand across the front flattens everything into glare. See Idea #11 for the same doll scaled up with pinecones.
6. Woven Straw Angel With Bark Wings and a Star Halo
The palette is almost aggressively plain, and that’s the point: about 55 percent pale woven straw for the body and halo, 35 percent dark brown bark or wood for the wings and head, and 10 percent raw fiber for the hanging loop. Two materials, three tones. Swap the straw for pale rattan or bleached corn husk, or the wings for walnut-stained wood, and the formula still holds. What breaks it is any bright accent — a red bow, a metallic bead — because the whole charm lives in the near-monochrome.
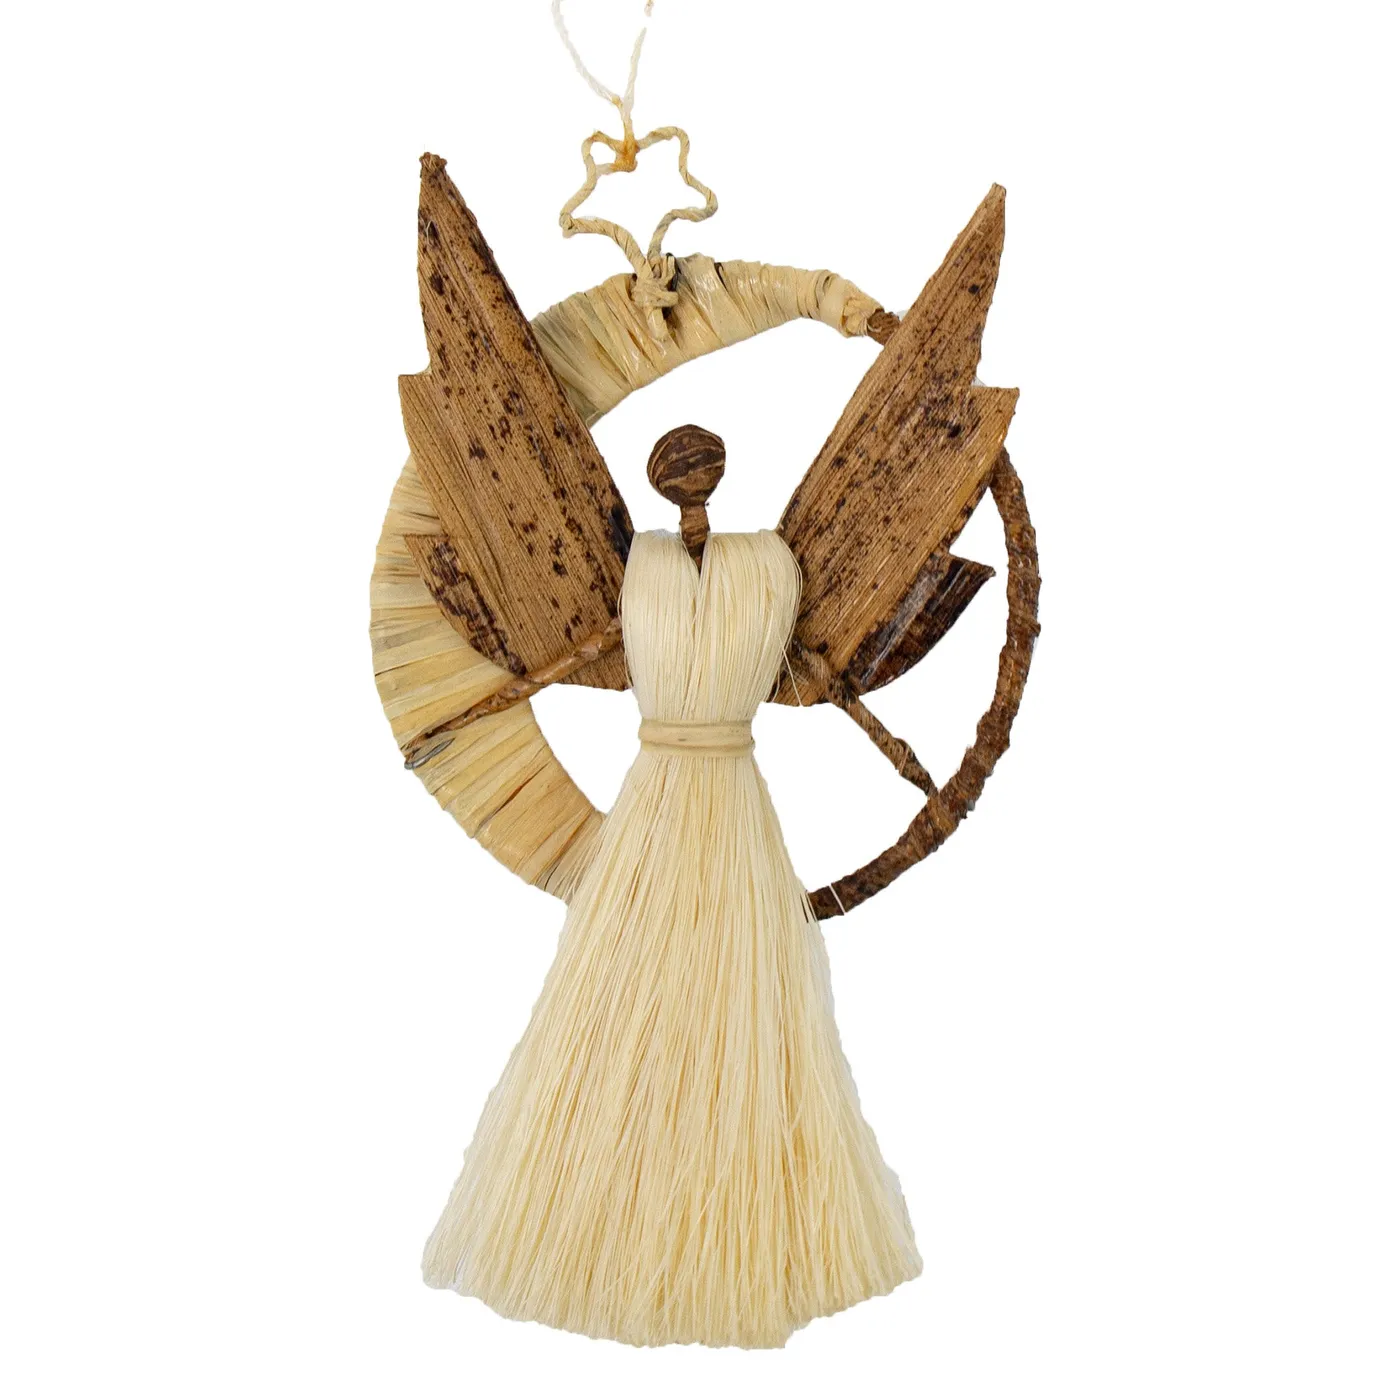
Nothing on this ornament is sealed, so it drinks up whatever’s in the air. Humid rooms soften woven straw and eventually invite mildew; forced-air heat makes bark wings brittle enough to snap off with one knock. Keep it away from radiators and kitchen windows, and never hang it outdoors — one rain shower and the straw loses its shape for good. A light coat of matte sealer helps, though it does dull the natural texture a notch.
7. Gilded Book Page Angel With a Gold Sphere Head
Spray in thin passes from 10 to 12 inches away, and do it before the head goes on. Two or three light coats give you an even gilded surface; one heavy coat pools in the folds, fuzzes the paper edges, and turns the printed text into a blurry smear. Let each pass dry about 15 minutes — the paper will curl slightly, then relax. Once the body is dry, glue the smooth gilded sphere in place and leave the neck bare, no ribbon collar, so the gold head reads as one deliberate shape.
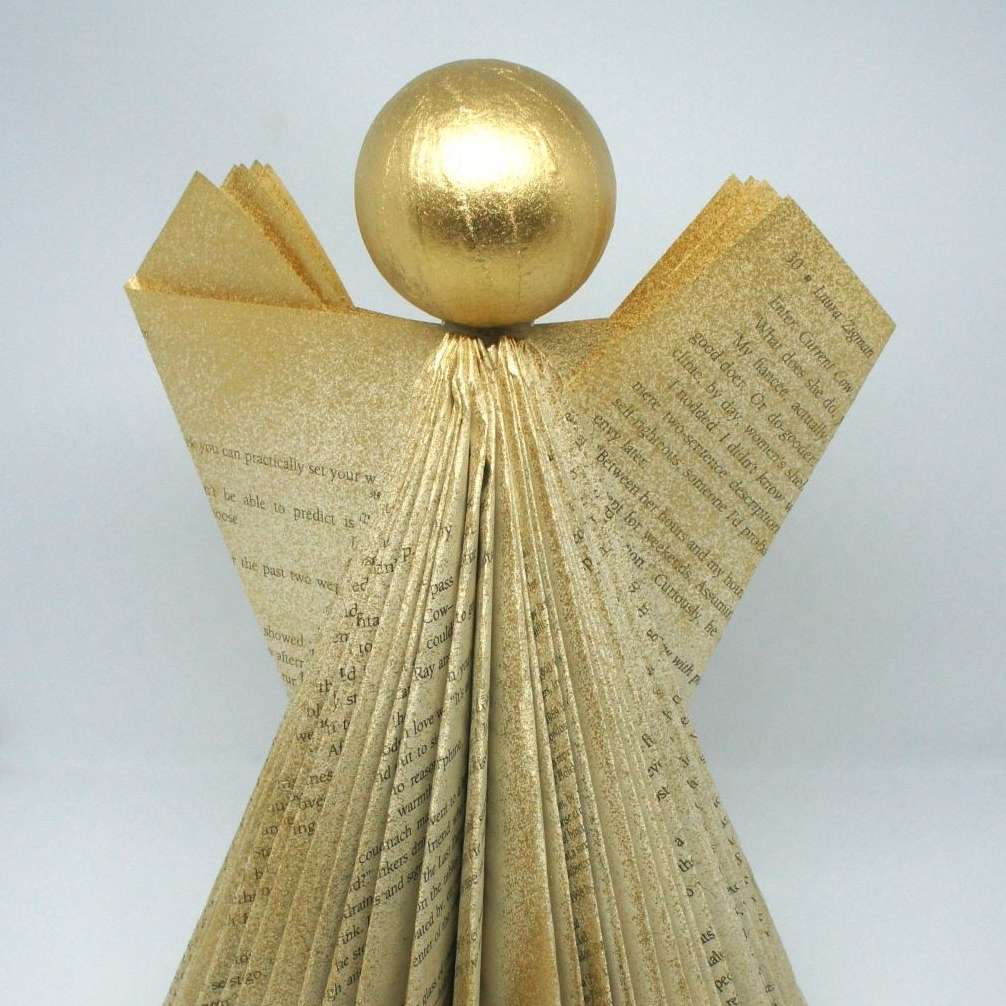
You don’t need a $30 can of designer metallic. A $7 gold spray from the hardware store, a 50-cent paperback from the library sale, and a foam sphere from a dollar store get you 90 percent of this look for under $15 total. The one place to spend: buy two spheres so you can pick the rounder one. The other upgrade worth considering is matte gold rather than high-shine — folded book pages have a soft texture that glassy gold tends to fight.
8. Vintage Cherub Topper on a Gold Starburst
Three things are doing the work here. First, scale contrast: a small tree with bright green needles and tiny red berries sits under a topper that’s almost comically ornate, and the mismatch is the charm. Second, the metallic gold starburst frames the cherub’s face the way a halo would, without actually being one. Third, restraint on color — gold, forest green, red, and pale pink skin tones, nothing else. The berries are the only saturated note in the whole arrangement, and that’s why you notice them.
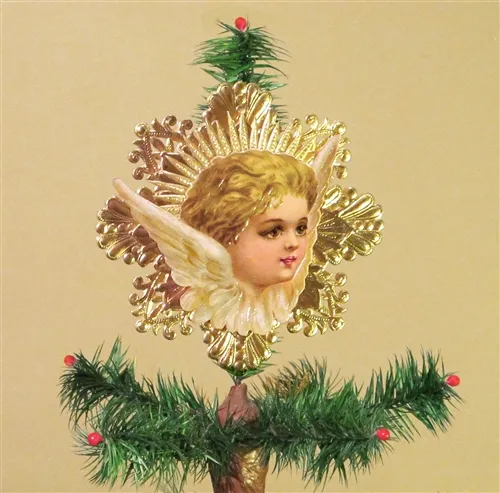
If you removed one thing, it would be the star. The cherub head and white wings alone are pleasant vintage kitsch; the multi-pointed gold starburst behind them turns the piece into a focal point you can spot from the doorway. That’s the part worth hunting at estate sales and antique malls, even if you have to build everything else around it.
9. Pastel Tulle and Feather Angel Ornaments
Roughly 60 percent pastel tulle — light blue, pale pink, off-white — 30 percent gold, and 10 percent feather. The tulle gives you volume and a soft haze, the gold stars and wing trim give you sparkle, and the feather accents at the skirt hem are what keep it from looking like a shower loofah. Swap the tulle for ivory and the gold for champagne, and you get a bridal version; go deep jewel-toned tulle and it turns into something closer to Mardi Gras. Keep the feather share small either way.
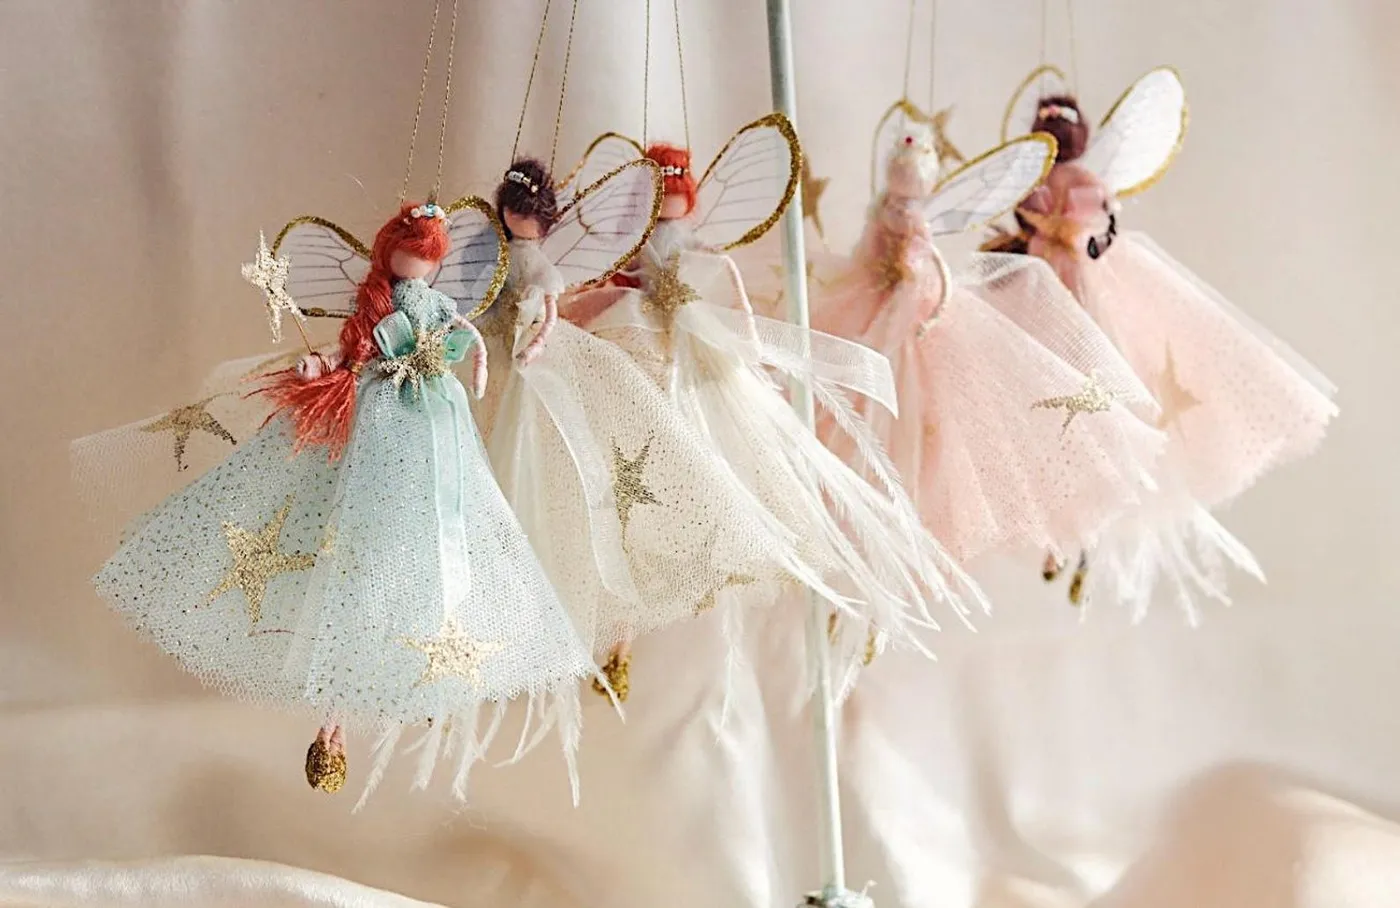
These are small ornaments, typically 4 to 6 inches tall, which makes them ideal for a tabletop tree between 18 and 36 inches or a display on a shelf or mantel. On a full-size 7-foot tree, a handful of them disappears — you’d want at least a dozen clustered in one zone. If you’re working with a big tree, look at Idea #16 for dolls that hold their own at that scale, and keep these for the small tree in the hallway.
10. Carved White Wooden Angel on a Lit Pine Branch
Wooden ornaments are having a moment, and 2026’s version is quieter than the chunky bead garlands of a few years back — carved, matte, unbleached, and hung one or two at a time rather than in matched sets. Call it the collected-Christmas look: a single pale wooden angel on a real pine branch, lit softly, photographed more often than it’s shopped. The upside is that these pieces never really go out of style, which is more than you can say for most ornament trends.
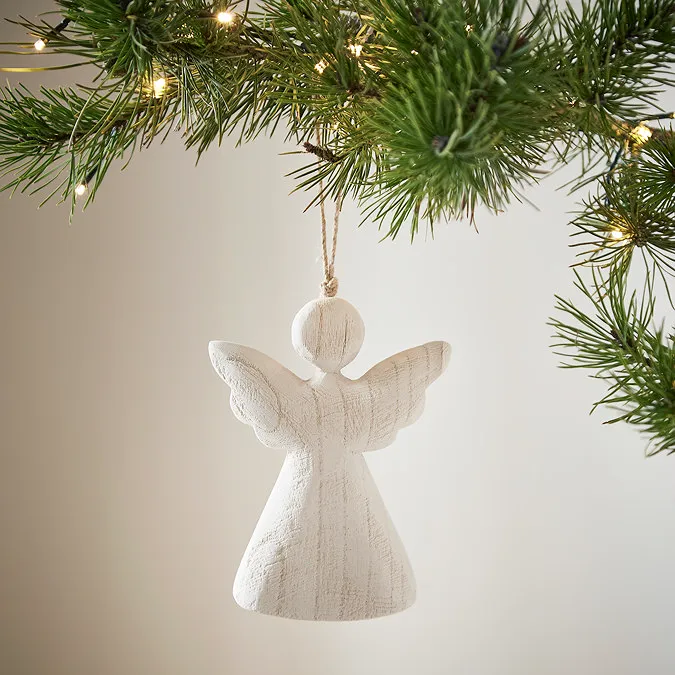
Fresh pine looks gorgeous and drops needles within a week indoors. If you’re using a real branch, set it on a plate or a piece of felt, keep it away from heat vents, and expect to sweep. Warm white fairy lights run cool, but check the cord anyway and never route it under anything flammable. And if the carved wood isn’t sealed, keep it out of direct window sun — light and condensation will grey the finish faster than you’d think.
11. Handmade Angel in Silver With Pinecones and Greenery
Cost to build one dressed-up angel doll with a styled tablescape.
- Doll body, fabric, yarn, felt wings: $14–$30
- Shimmer fabric for the gown: $10–$22
- Pinecones, real or preserved: $8–$18
- Silver ornaments, six to eight: $12–$35
- Warm white string lights, 20 feet: $15–$30
Total: roughly $59 to $135.
Buy the pinecones at a dollar store or gather them from a park and bake them at 200°F for an hour to clear out anything living in them. That one swap lands the whole display near $40.
This is the bigger, more dressed-up cousin of Idea #5 — same shimmer gown and felt wings, plus pinecones and a wide bed of greens underneath. If the $60 version isn’t happening right now, start with a thrifted doll for $4 to $8, re-dress it in a dollar-store silver skirt, and add branches as you collect them through December. Nobody has ever inspected an angel’s hemline.
12. Distressed White Wooden Angel With a Wire Halo
It’s the halo. A thin, matte black wire circle floating above a white distressed wood figure shouldn’t work — it’s too plain, too modern next to a jute bow and drapey twine — and that’s exactly why it does. Swap it for a gold star or a glitter ring and the angel slides right back into generic Christmas décor. The twine bow around the neck, with its strands trailing down the body, is the second-best thing here, and it costs about nine cents to replicate.
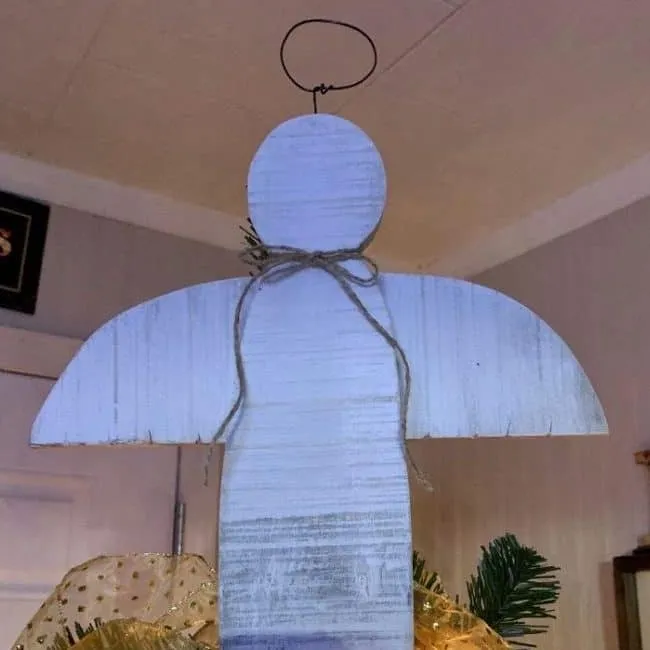
Make the halo from 16- or 18-gauge craft wire, wrap it around a soup can to get a circle roughly 4 inches across, and leave a 1.5-inch stem to push into the head. For the bow, tie three loops with jute twine and fray the tails by twisting each strand and pulling it across a scissor blade. Skip paint on the wire — matte black reads more intentional than a glossed finish, especially under warm tree lights.
13. Angel Doll With Blue Braided Yarn Hair
Those beaded eyes are the part to think about if kids or pets live with you. Small beads glued to a fabric face pop off — usually into a mouth, occasionally into a vacuum. If the doll will be within reach, stitch the beads through the fabric instead of gluing them, or embroider the eyes in dark thread and keep the beaded version up high. Same rule for the silver halo and any loose sequin on the gown.
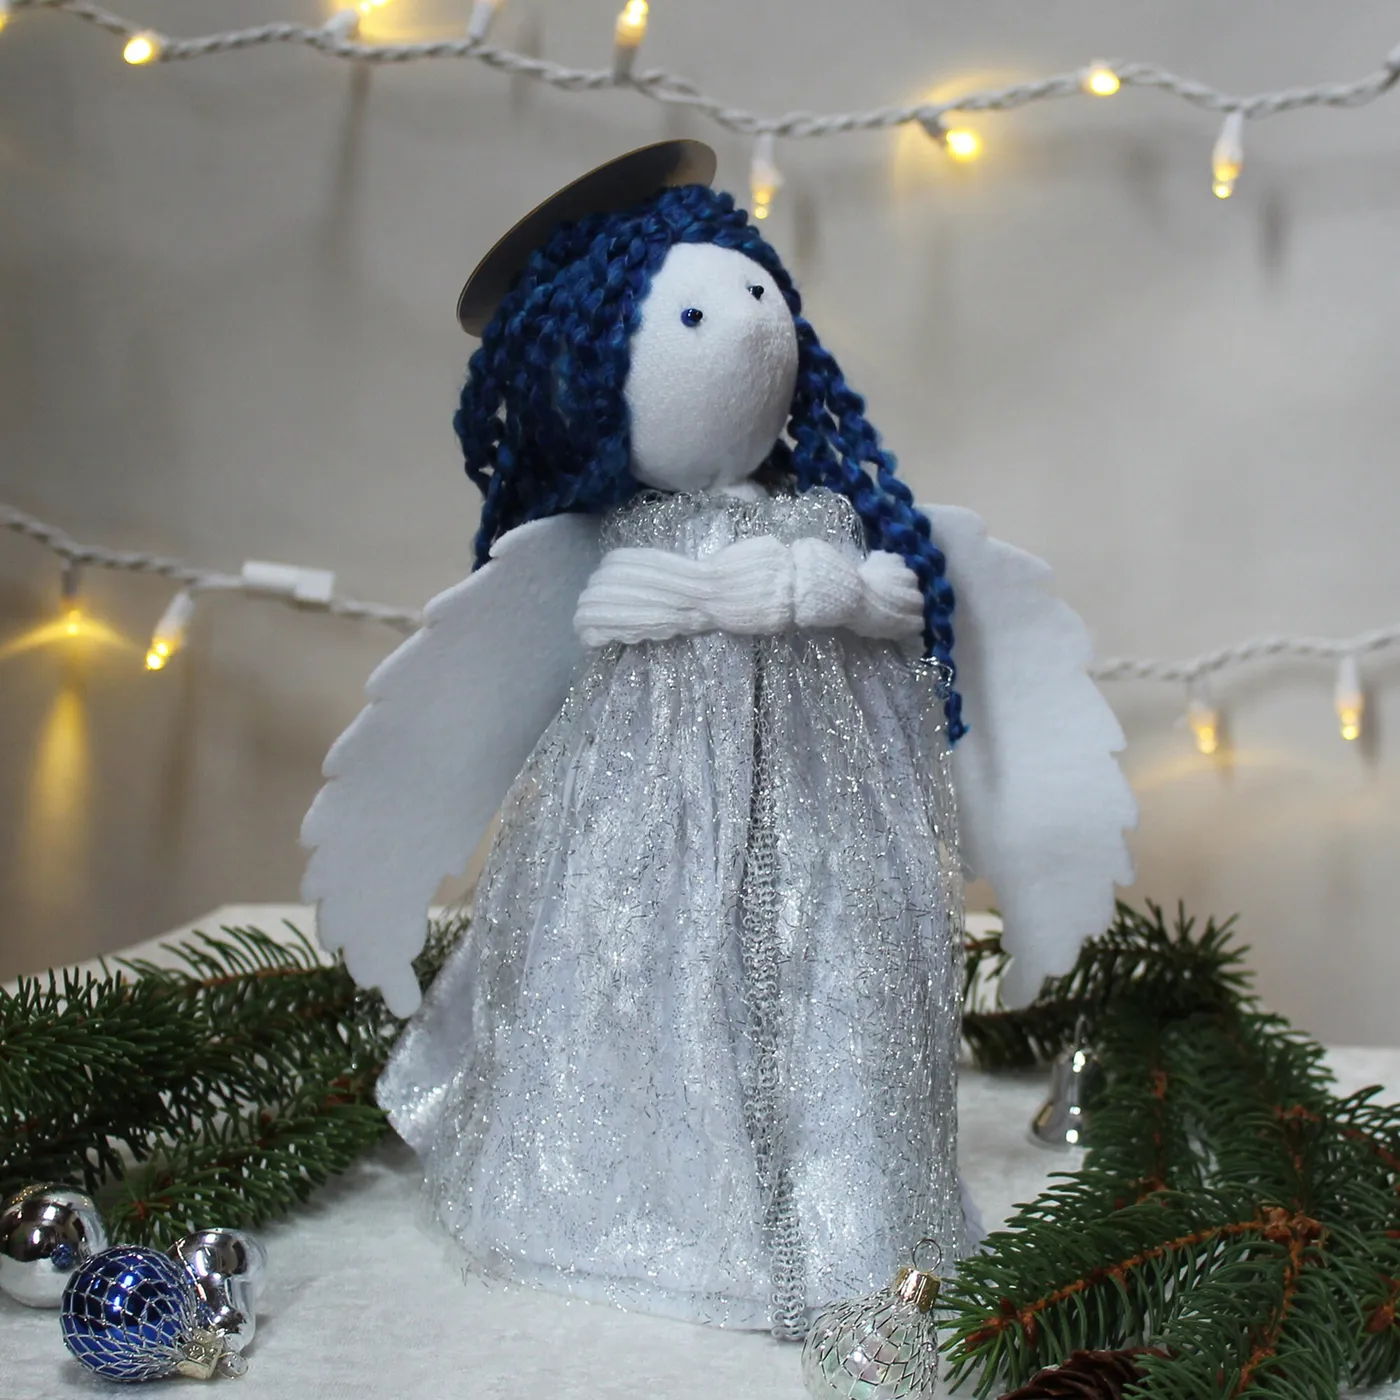
Braided yarn hair is quicker than it looks — about 45 minutes for a full head.
- Cut 36 strands of worsted yarn to roughly 18 inches.
- Divide into three bundles of 12 strands each.
- Braid tightly from the top, keeping tension even so the plait stays round.
- Knot each end, then trim the tail to about an inch.
- Coil the braid around the crown of the head, gluing as you go.
- Set the silver halo last, pushing the wire ends into the fabric so they don’t scratch.
Materials run under $8 — one skein of dark blue yarn, a bit of wire, and glue.
14. Wool Angel With Feather Wings and a Golden Bell
This one is a shelf figurine, not a centerpiece: think 8 to 11 inches tall and about 6 inches wide at the wings, so it wants a nightstand, a windowsill, or a narrow mantel ledge. Give it at least 4 inches of clear space behind it — feather wings look flat when they’re pressed against a wall, and that soft lavender backdrop is half the reason the white reads so cleanly. On a deep console, pair it with a taller piece so it doesn’t get lost.
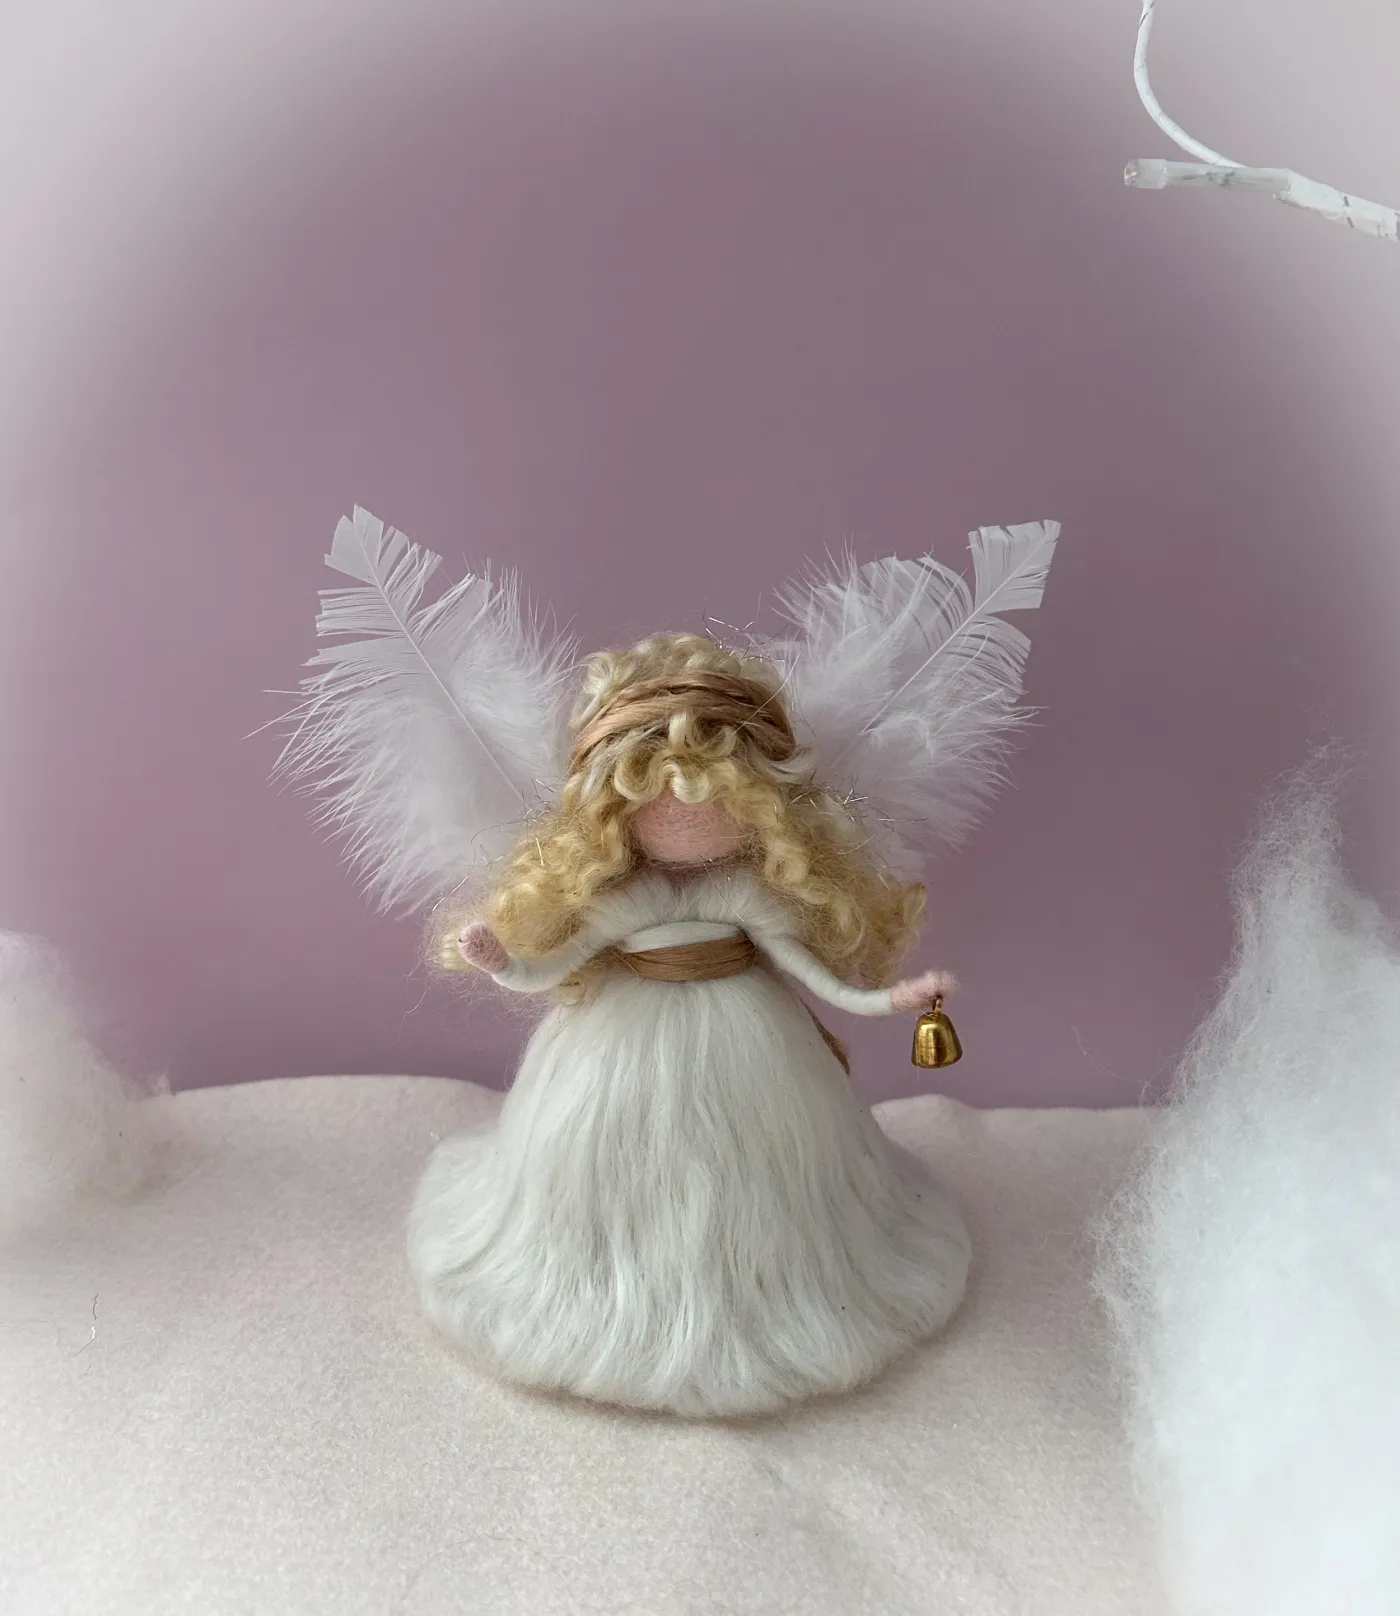
About 70 percent white wool and feather, 20 percent blonde yarn for the hair, 10 percent gold for the bell and the tinsel woven through. That gold share keeps it from disappearing into a white wall — one bell, one thread of tinsel, and stop. Swap the blonde for soft silver-grey and the figure goes quiet and frosty; use a warm honey yarn and it turns nostalgic. The 10 percent rule matters most here.
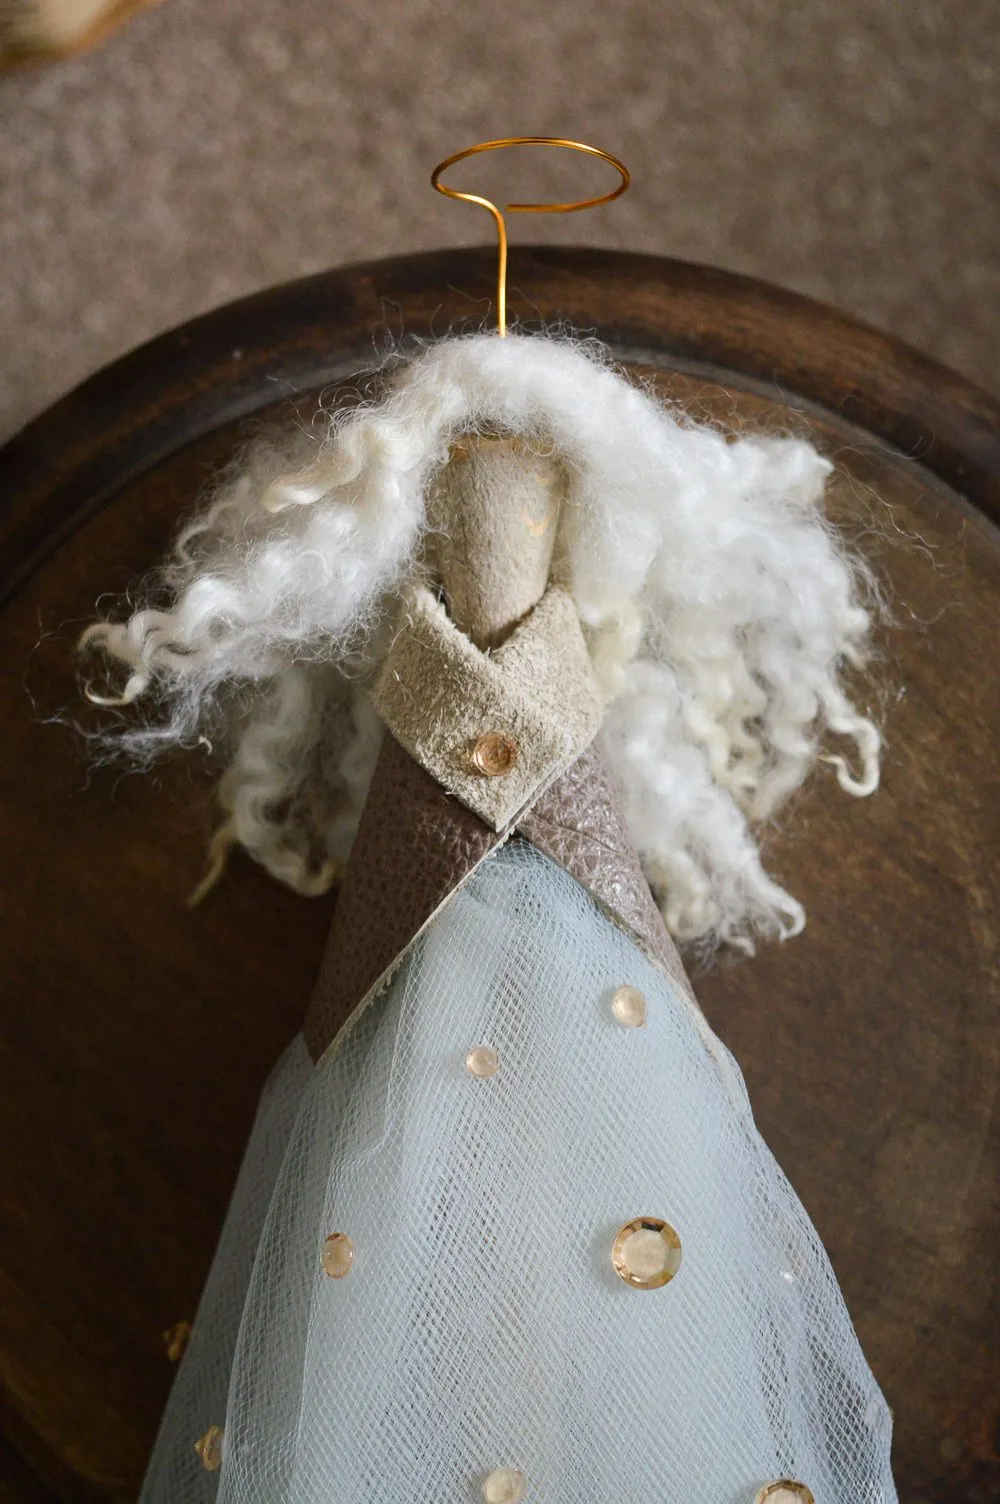
15. Angel Doll With a Net Skirt and Amber Gems
What it costs to build one doll from scrap-bin materials.
- Cotton or linen for the head and body: $6–$14
- Textured brown fabric for the collar and bodice: $5–$12
- Light blue net or tulle for the skirt, half yard: $4–$10
- Amber or glass gems, 12 to 15 pieces: $4–$9
- Gold craft wire for the halo: $3–$6
- White curly fiber for the hair: $5–$11
Total: roughly $27 to $62.
Pull the brown fabrics from an old skirt or a shirt you’ve stopped wearing and you’re closer to $20.
The scrap-stash aesthetic is genuinely trending, and it isn’t just thrift guilt — 2026 craft spaces lean hard into visible layers, mixed textiles, and ornaments that look assembled rather than purchased. Amber gems on a light blue net skirt is exactly that: an odd pairing that shouldn’t work, softened by a beige linen face and a plain gold wire halo. It photographs beautifully and it tells a story about your fabric drawer.
16. Fabric Angel Dolls With Glitter Skirts and Pointed Hats
Plan for 15 to 20 inches of doll. With the hats on, these pair well at the two ends of a mantel or flanking a console, and they need a solid 8 inches of headroom so the pointed tips don’t crowd a shelf above. They’re substantial enough for a floor vignette beside a basket of blankets, but too heavy-looking for a small side table — that’s where the smaller pastel figures do better.
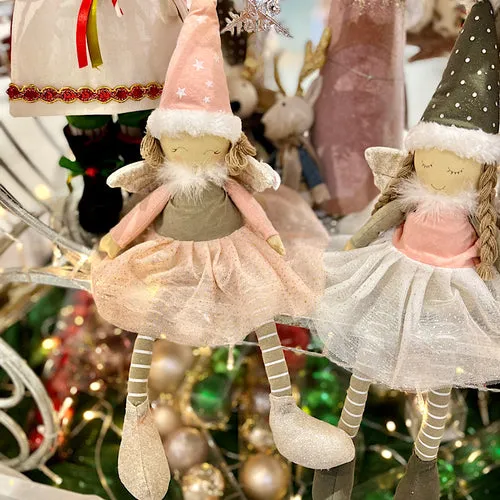
Layered glitter skirts shed. Every time you move one of these dolls you’ll find a little drift of sparkle underneath, and if you have kids or cats, the skirt will get handled. A light coat of clear craft sealer over the glitter helps a lot, and so does keeping a lint roller nearby. Also check the hat brim — pointed hats made from stiffened felt can crease permanently if they’re stored flat, so pack them upright. And if the dolls have wire armatures, don’t re-pose them often; the wire fatigue-snaps after a dozen bends.
17. Carved Wooden Angel With Silver Wings and a Star
Group them in odd numbers and stagger the heights — 4, 6, and 8 inches reads as a collection, while three identical figures reads as inventory. Keep the tallest piece about 1.5 times the height of the shortest so the group has a clear anchor. And notice where the red shows up here: one holly sprig with berries, one small ornament on the bottle brush tree. Scatter red across four objects and the calm wooden angel starts competing instead of leading.
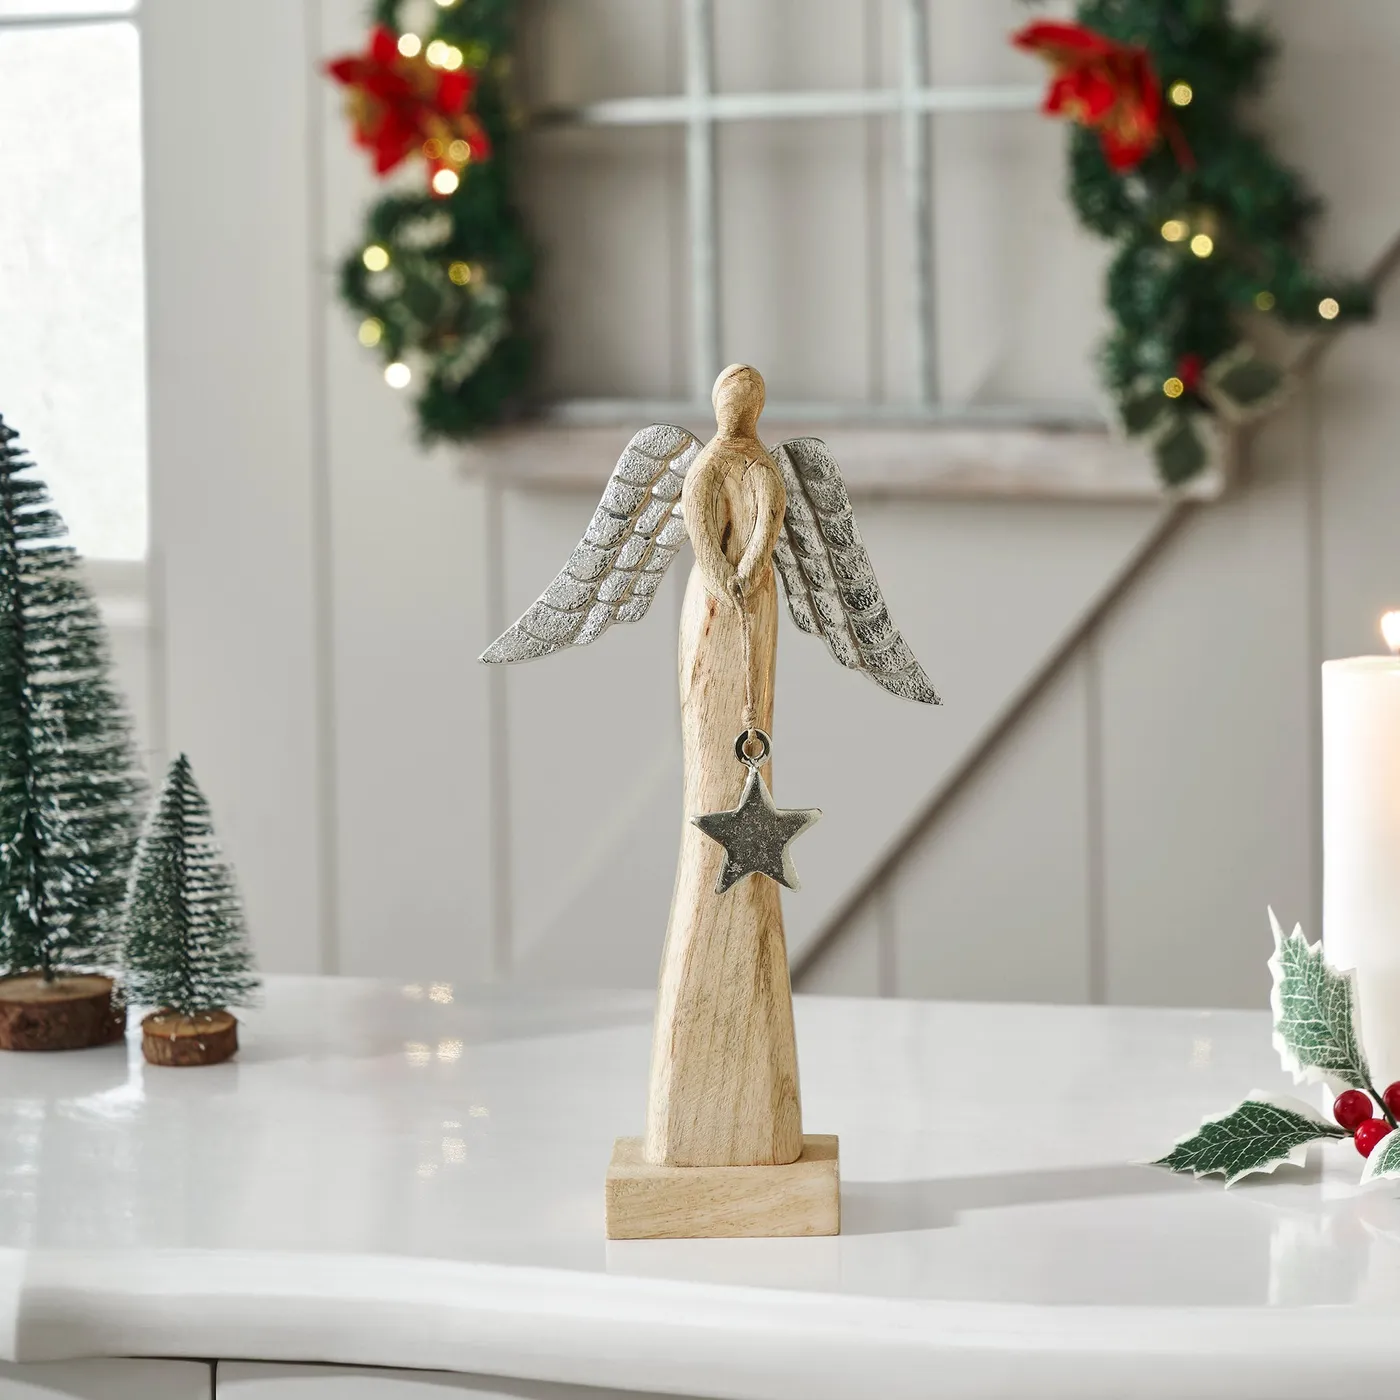
The contrast is doing double duty. Natural wood tone against textured silver wings is a warm-versus-cool pairing that keeps the figure from looking washed out, and the silver echoes the metallic star on the string — so your eye travels from hand to wing in one loop. Then the white pillar candle and snowy bottle brush trees lighten the whole vignette, giving the dark green garland behind it something bright to sit against. Remove the candle and it goes flat.
18. Layered Star Topper With a Nativity Center
The circular nativity scene in the middle of the star. Without it, this is one more layered gold star topper — pretty, forgettable, indistinguishable from a dozen others on the shelf. With it, the star becomes a frame for a tiny hand-painted scene, and you lean in to look. That’s what a tree topper should make you do. Everything else on the tree can be a $3 bauble; the topper is the one place to spend.
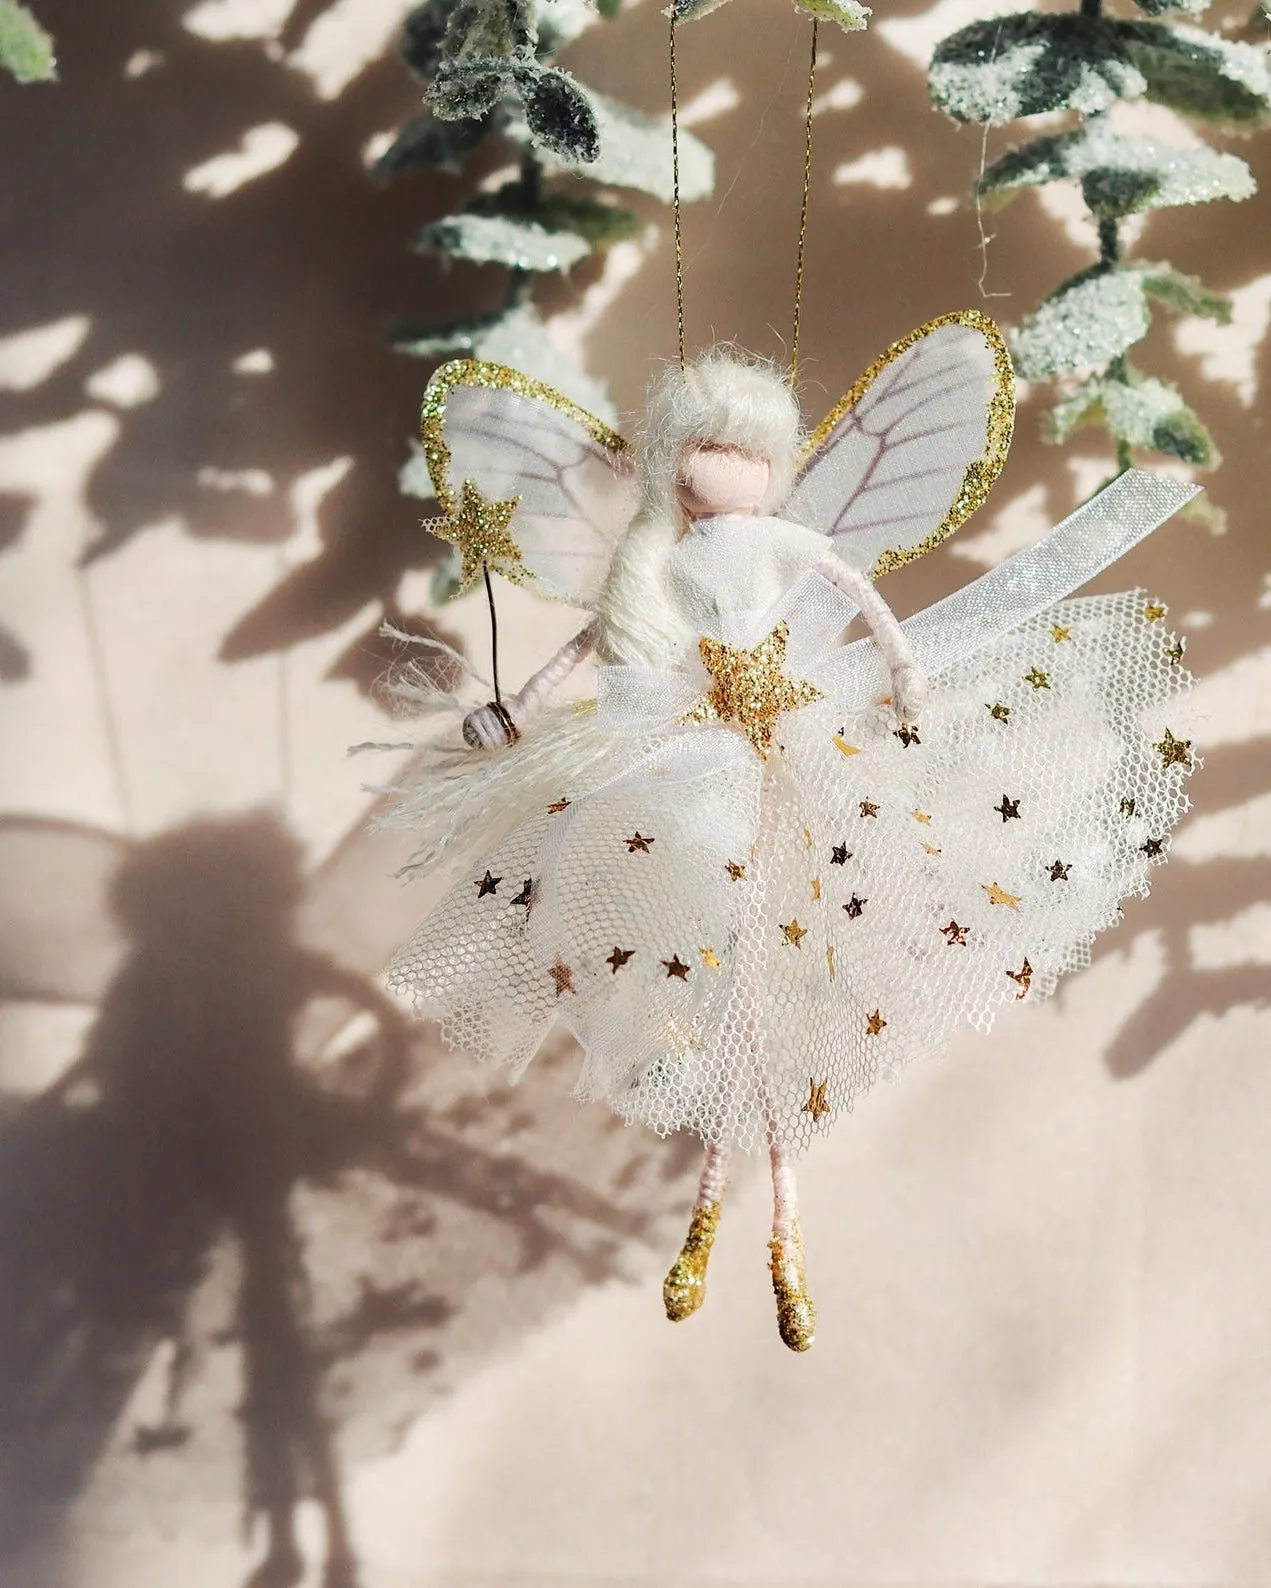
About 45 percent gold, 25 percent dark green from the tree itself, 20 percent red, and 10 percent sky blue in the star. The blue is what makes the scheme feel specific instead of generic — without it you have a standard red-gold-green Christmas. Trade the blue for deep navy and it turns formal; soften it to pale aqua and you land in a coastal palette. Either way, hold the blue to roughly a tenth of what’s visible, or the tree starts reading patriotic.
19. White Angel Ornament With Gold Stars and Frosted Greens
Cost per ornament if you’re making a set of six.
- White fabric and mesh, half yard total: $5–$12
- Gold glitter star shapes, 40 pieces: $4–$8
- Gold cord for hanging loops: $3–$6
- Fine glitter and glue: $4–$9
- Foam or batting for the body core, six pieces: $5–$10
Total: roughly $21 to $45 for the whole set, or about $4 to $8 per angel.
Repurpose a white pillowcase or an old mesh produce bag for the skirt fabric and you can shave another $8 off.
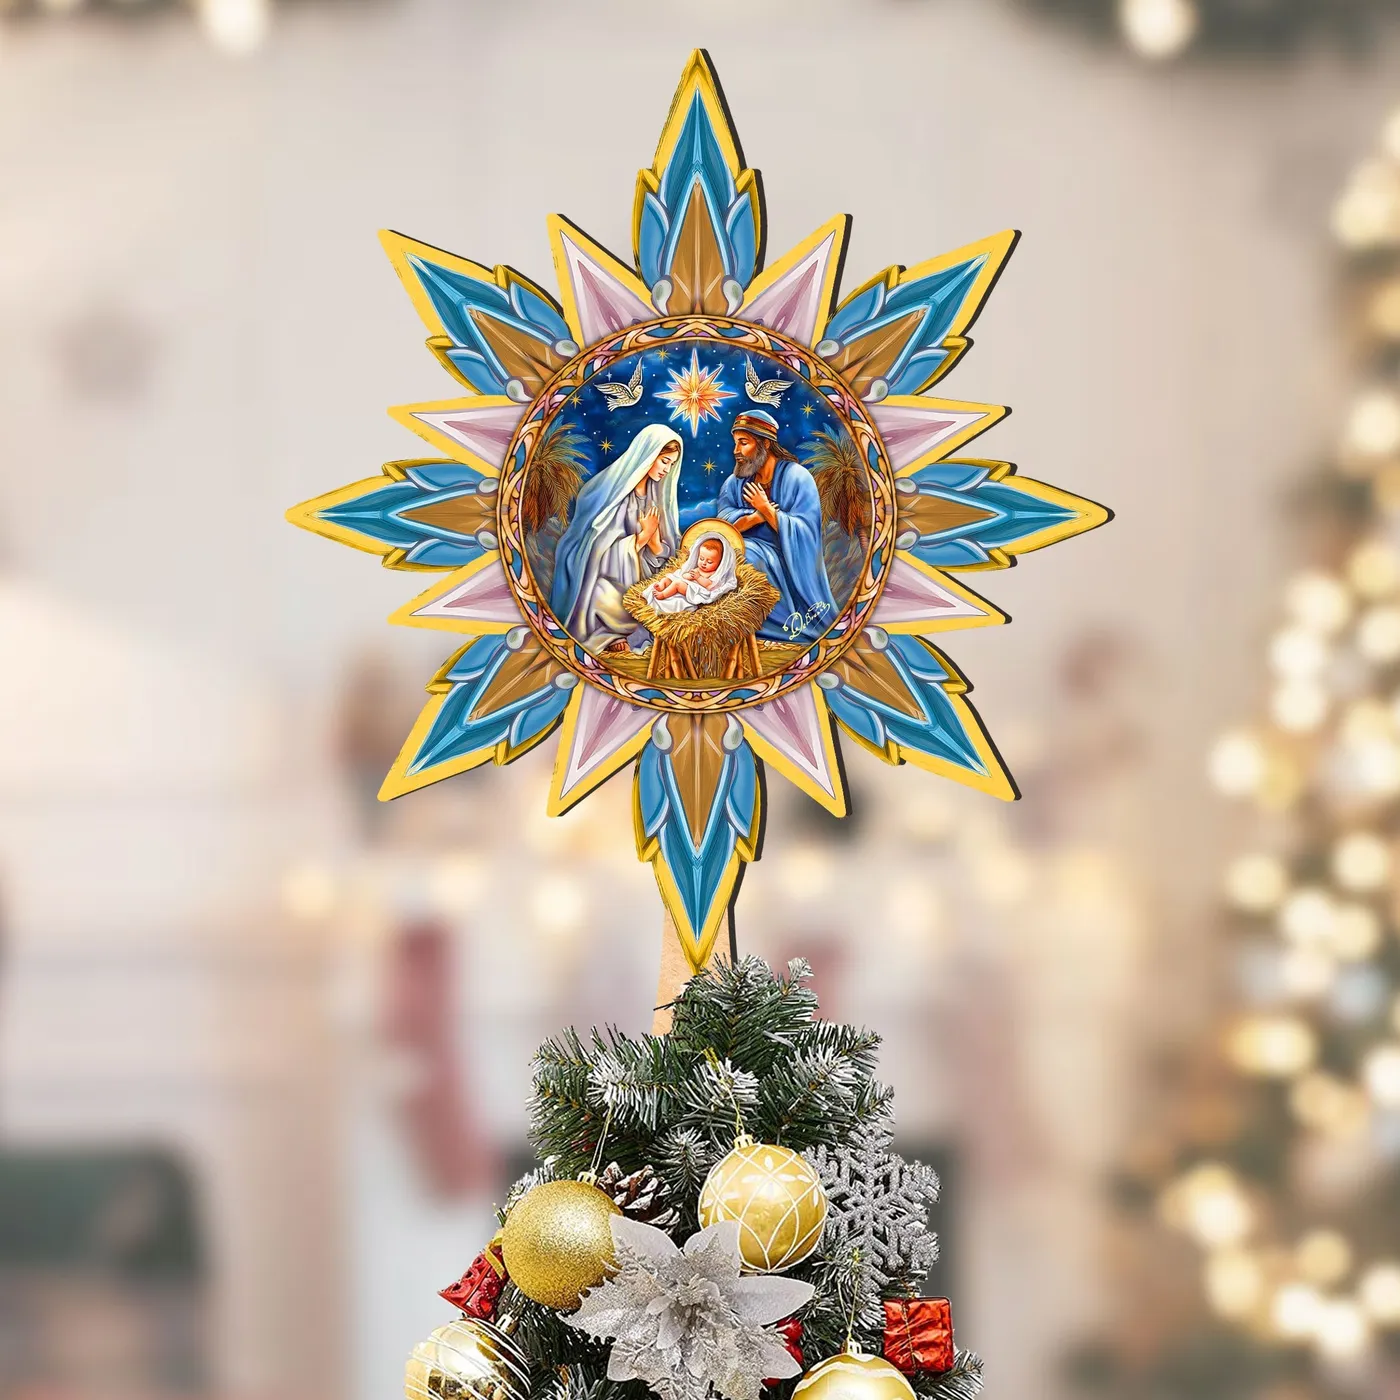
You can absolutely do this on a Walmart or dollar-store budget. The mesh skirt is the trick — it’s what gives that semi-sheer quality, and craft mesh is cheap. Punch the gold stars out of glitter cardstock with a small star punch instead of buying pre-made stickers, and use gold embroidery floss for the loops. Six angels, under $18. Hung near a warm light with frosted greens behind them, nobody’s leaning in with a magnifying glass.
20. Faux Fur Angel Doll With a Gold Snowflake
Making the fur body takes about an hour and a half, most of it waiting for glue to dry.
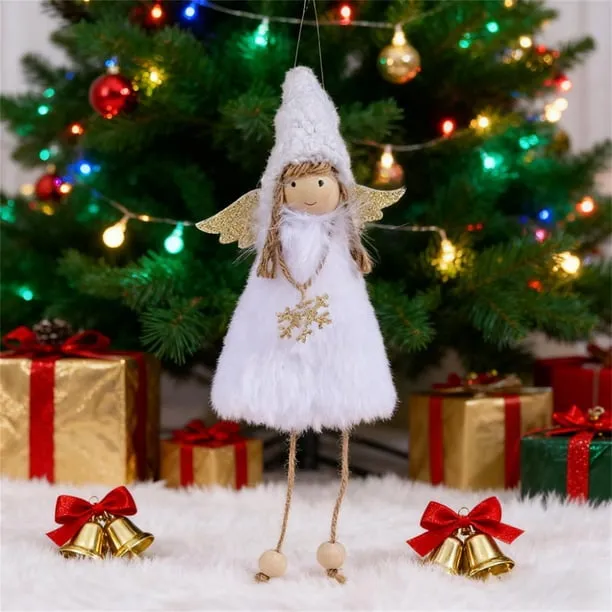
- Cut two matching fur rectangles, roughly 6 by 10 inches, for the front and back of the body.
- Glue them along the sides and bottom, fur nap pointing down, and leave the top open.
- Fill with batting until it holds its shape but still feels soft.
- Glue the wooden head into the opening, tilting it slightly forward so it doesn’t look stiff.
- Add the knitted hat, letting the braided brown hair peek out beneath it.
- Attach the gold glitter wings to the back and thread the jute cord with the snowflake pendant through the shoulders.
Materials run $12 to $25, depending on whether you already own the fur.
Hang this one at about two-thirds the height of your tree — high enough to catch the lights behind it, low enough that the snowflake pendant sits near eye level. On a small tabletop tree it will dominate, so pair it with tiny ornaments and skip the garland entirely. The knitted hat and fur body are chunky enough that anything busy nearby turns the corner into clutter.
21. Vintage Angel Figurine Holding Illuminated Candles
Textured wings are dust magnets, and sheer fabric snags on absolutely everything. Plan on a soft makeup brush or a can of compressed air every few weeks during the season, and wash your hands before you handle the dress. The candle lights are usually the first thing to fail; if they’re wired in series, one dead bulb takes the pair. A $6 replacement string from a craft store fixes it, but you’ll need to open the base, which means dedicating an evening to it.
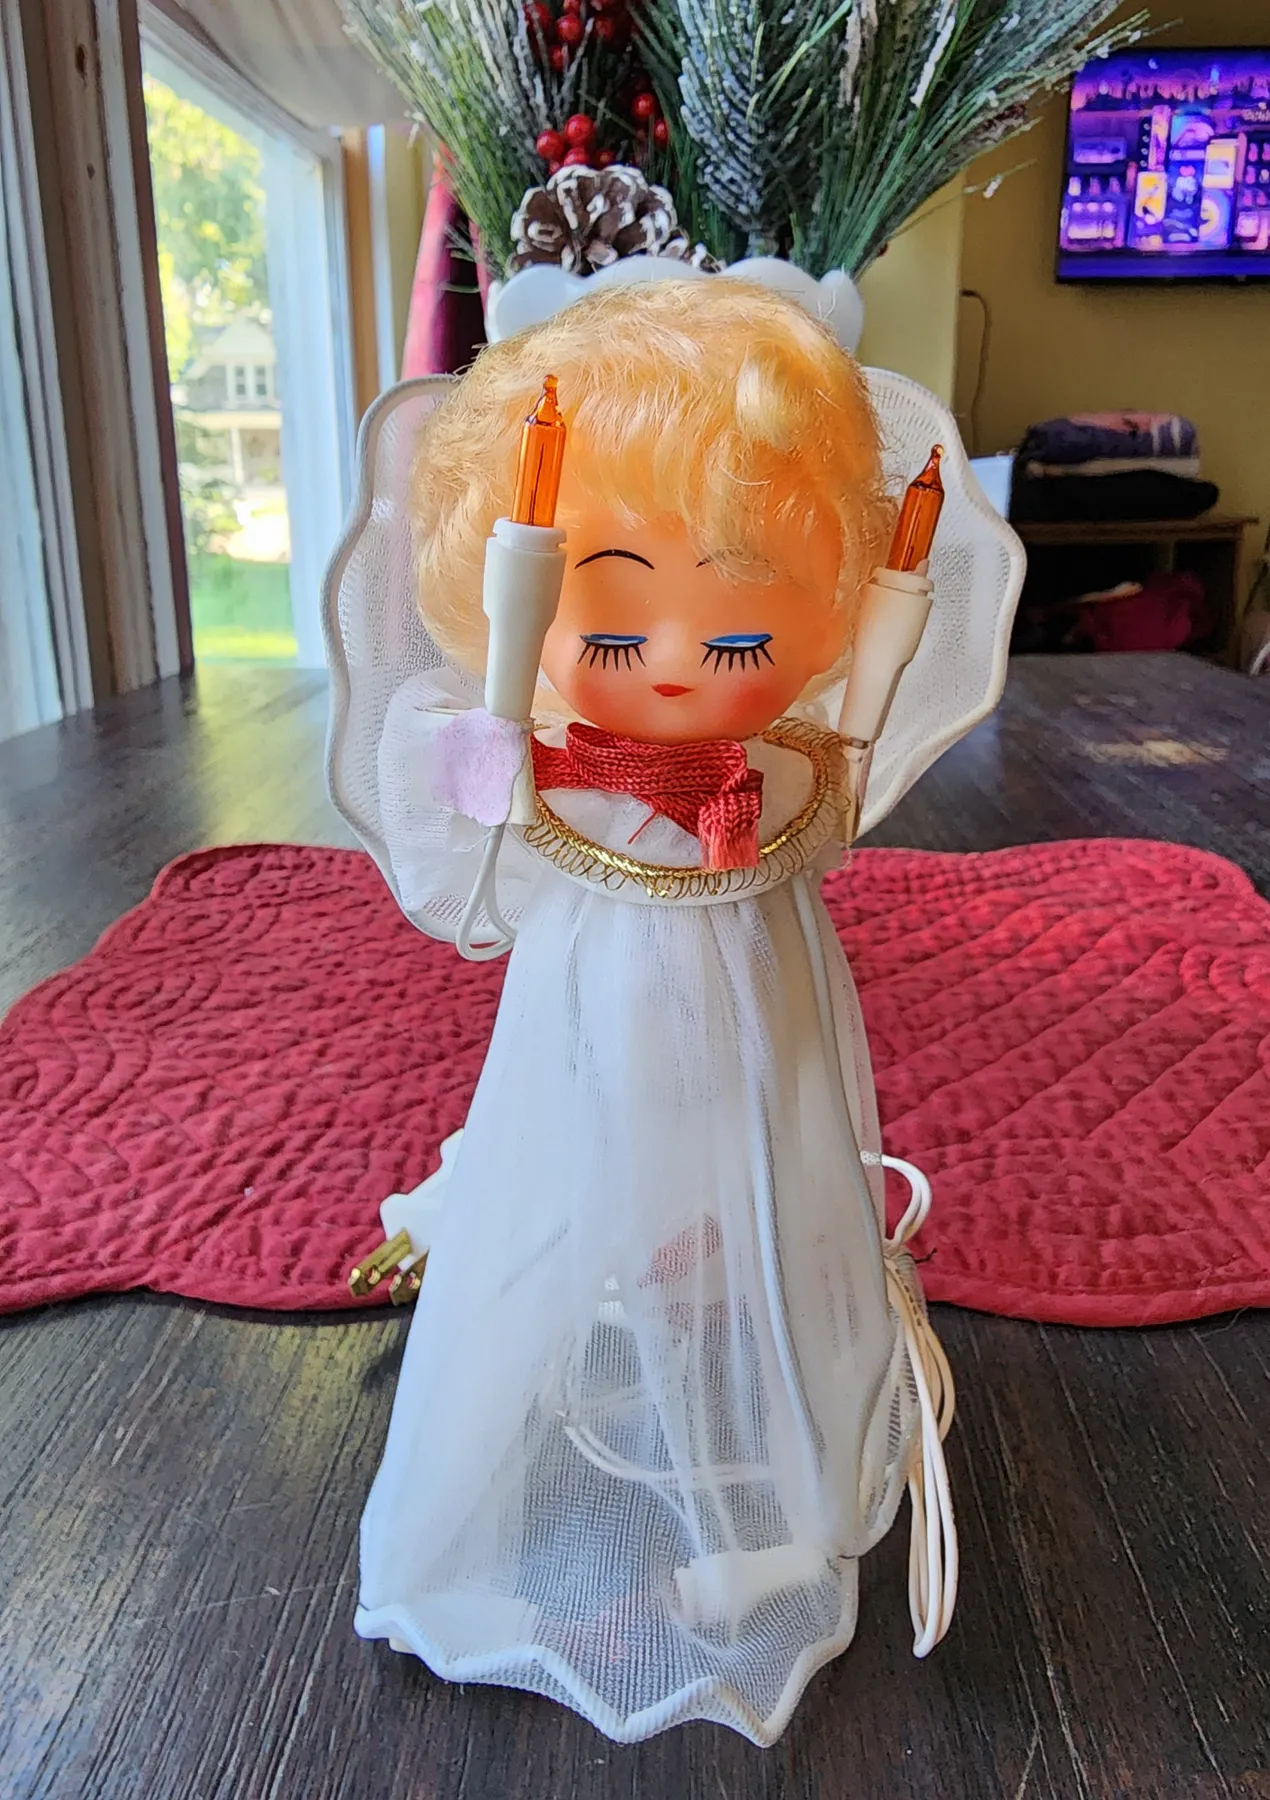
Real candles next to a fabric doll are a hard no, no matter how much prettier a flickering tea light looks. Those orange lights should stay battery or plug-in. Check the battery compartment for corrosion each December before you set it out, and keep the figure on a stable surface away from table edges. If you have a curious cat, this is a high-shelf piece, not a coffee table piece.
22. Aged Brass Angel Between Two Lit Tapers
Candlelight does something to aged metal that no overhead light can. Two white tapers at roughly the same height as the angel’s shoulders throw light up into the layered wings and body, and every embossed edge picks up a soft reflected glow. The old books behind the candle act as a riser and a texture block at once, and their brown-edged pages echo the brass. Three heights total — books, candles, angel — which is what keeps a simple tabletop from looking like three unrelated objects sharing a surface.
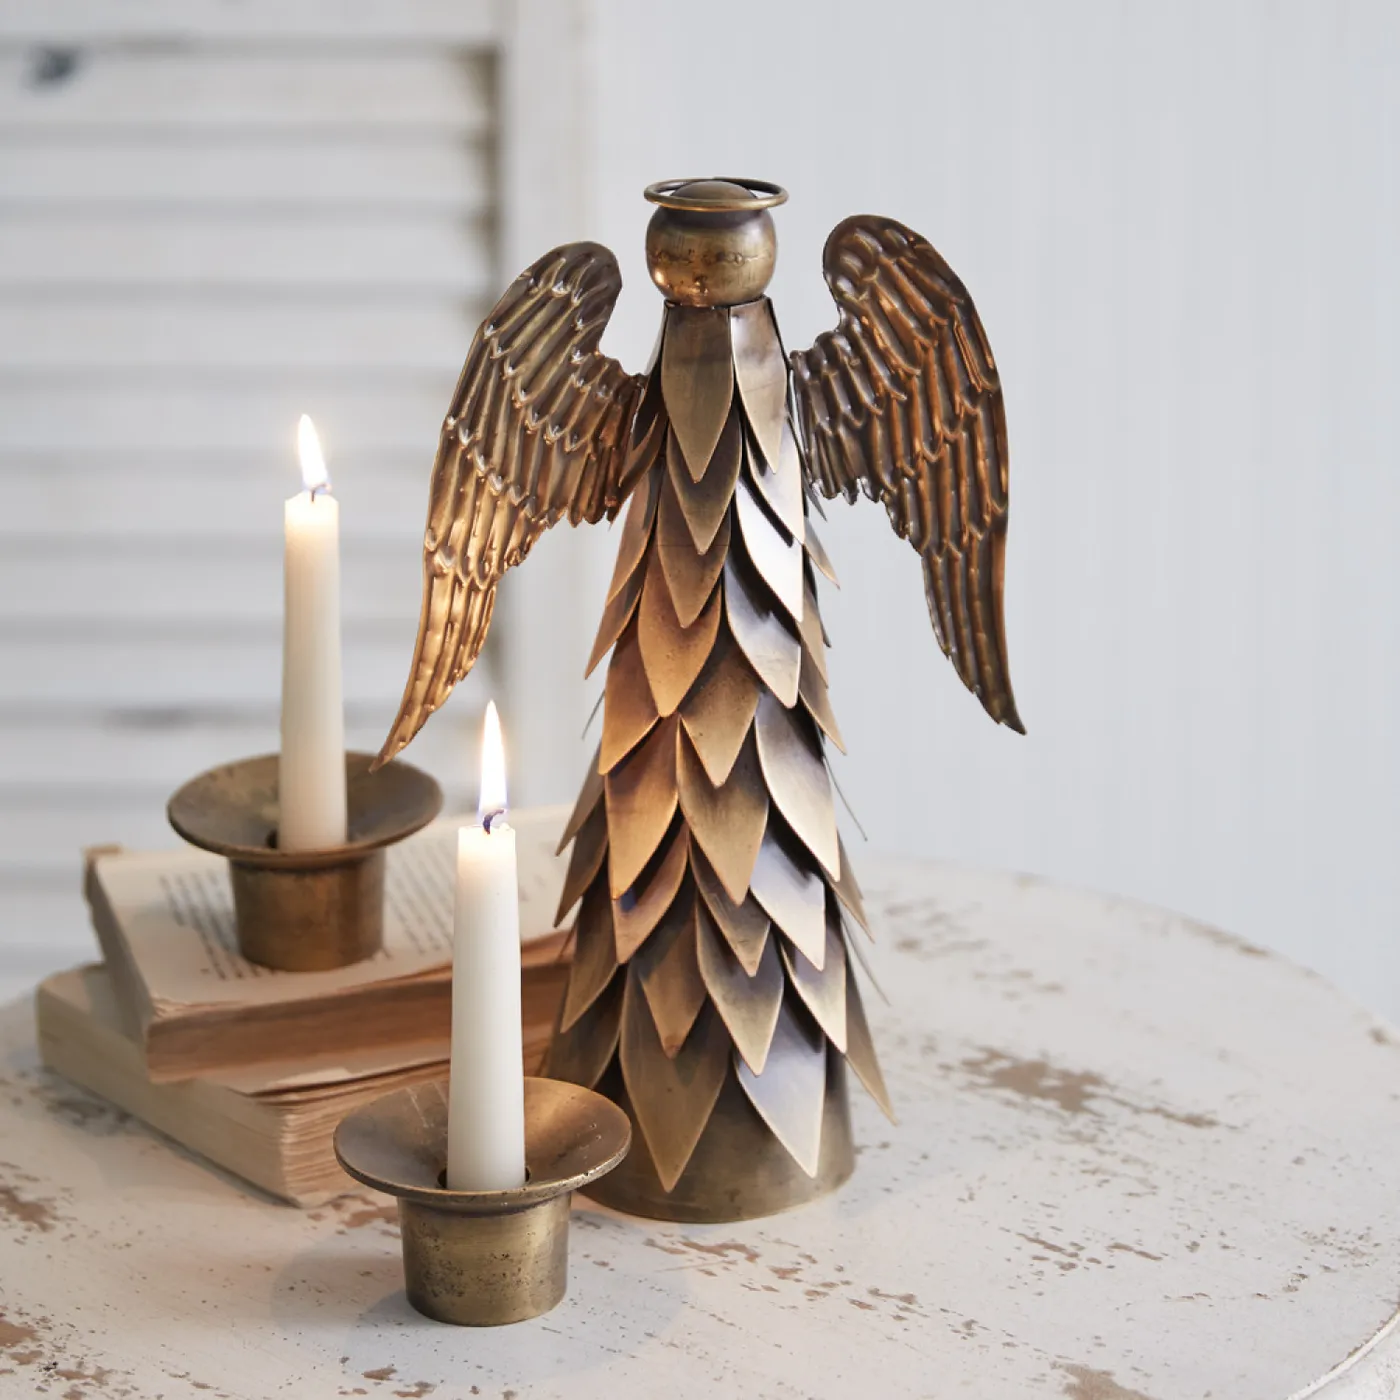
The whole thing is thriftable. Brass angel figurines from the 70s and 80s turn up at estate sales for $5 to $15, and they’re usually heavier and better finished than anything new at that price. Grab white tapers at a dollar store, and use books you already own as risers — hardcovers with worn jackets look better than anything new. Total: under $25. Compare with Idea #17, which runs the same three-height trick in wood and silver instead of brass.
23. Wooden Angel With a Twine-Wrapped Star Charm
Cost to put together this rustic tabletop vignette.
- Wooden angel figurine: $12–$35
- White pillar candles, set of three: $10–$24
- Wooden candle holder and pinecone: $8–$20
- Miniature bottle brush tree: $5–$12
- Lighted garland, 6 feet: $12–$28
- Twine, wooden beads, star charm: $5–$10
Total: roughly $52 to $129.
Skip the new candles and burn down what’s already in the cupboard, and you’re near $35.
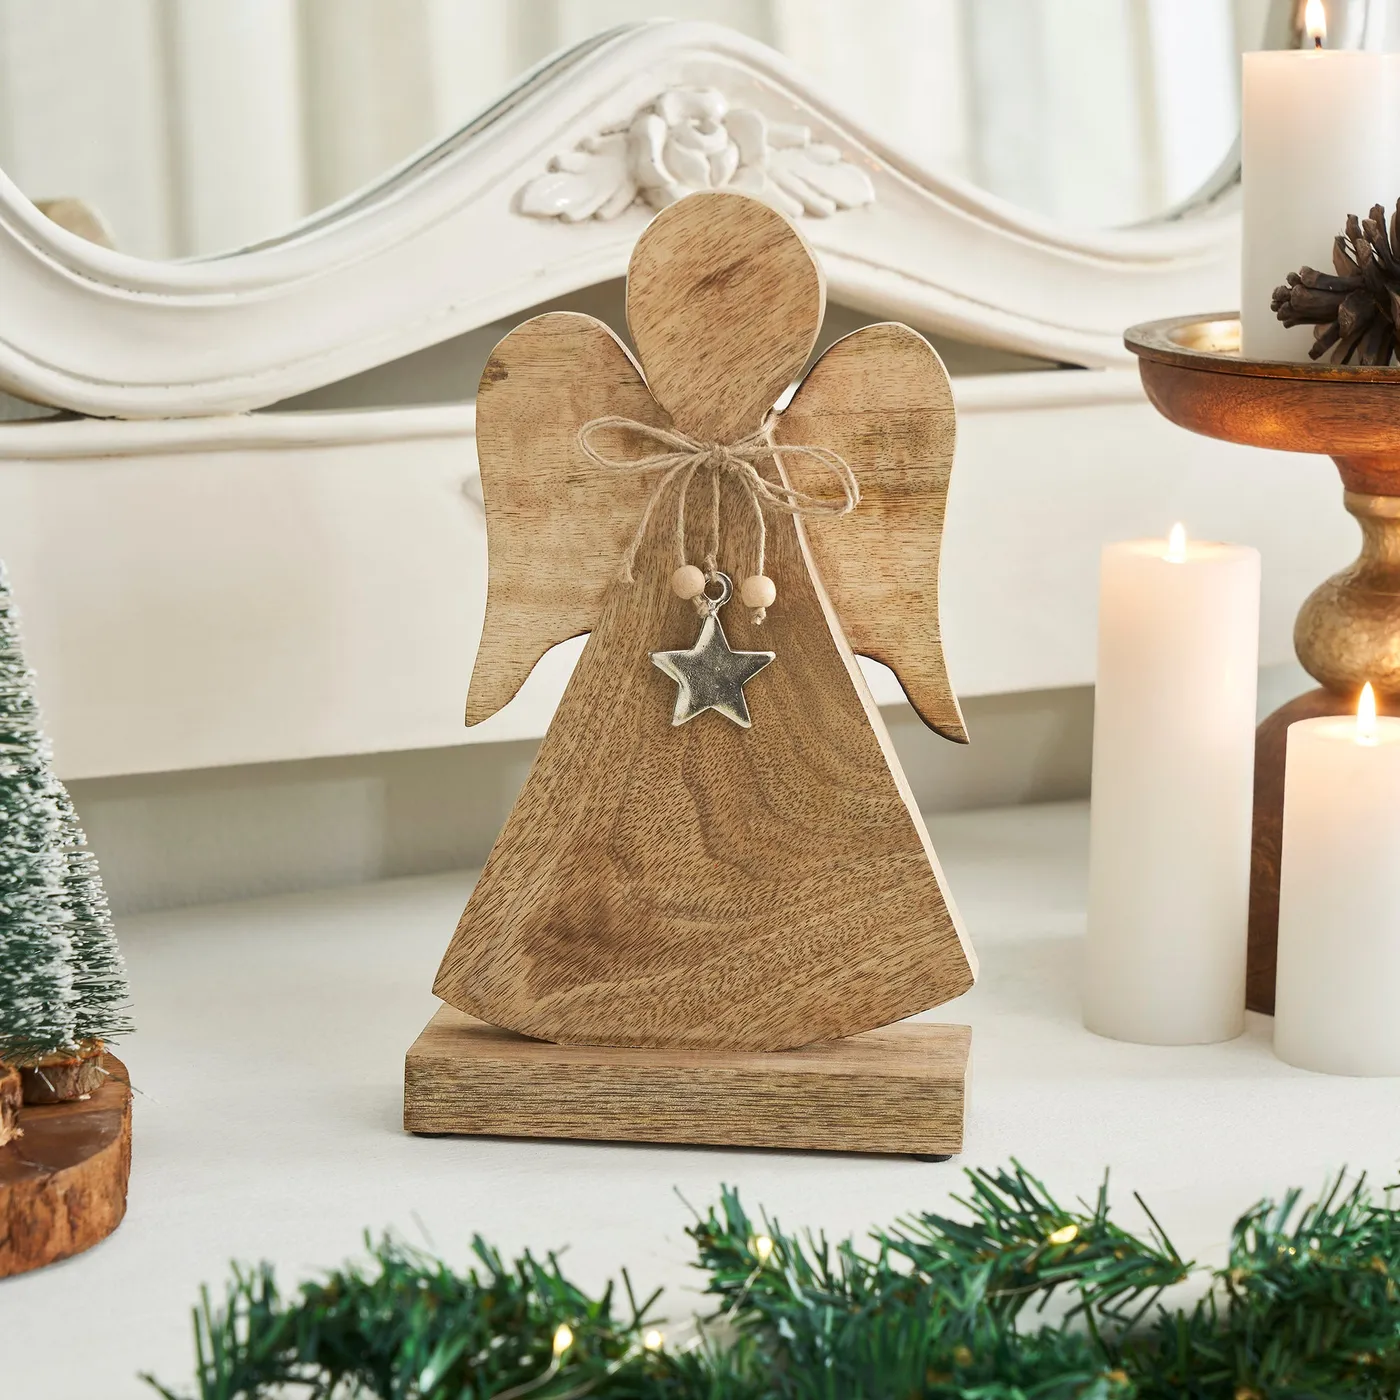
The star charm is the piece that makes it. It’s small, it’s metal against all that pale wood, and it’s tied on with twine rather than glued — which means it shifts slightly as the garland warms up, catching the light. The wooden beads strung above it do the same job more softly. Everything else is a supporting player: candles, tree, pinecone, greens. Remove the charm and you just have a wooden shape on a table.
24. Laser-Cut Wooden Angels With Red Glitter Bows
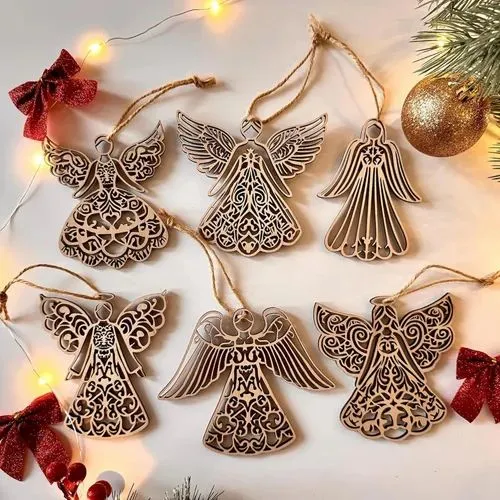
Finishing a set of six laser-cut blanks takes about an hour.
- Wipe each ornament with a dry cloth to lift cutting dust.
- Sand the flat faces lightly with 220-grit, going with the grain.
- Wipe again, then decide: leave them natural, or stain with thinned walnut so the cut-outs read with more contrast.
- Thread twine through the top hole and knot it, leaving a 4-inch loop for hanging.
- Glue a small red glitter bow near the shoulder or waist, not at the top — it competes with the hanger there.
- Let everything cure overnight before they go on the tree.
Blanks run about $2 to $4 each, and one spool of twine will last you years.
Look for 3mm birch ply if you’re buying blanks. Thinner than that and the delicate cut-outs snap while you’re threading the twine; thicker and they look clumsy hanging next to glass and fabric ornaments. Pay attention to the pattern scale too — intricate filigree reads beautifully backlit by fairy lights and vanishes entirely against a dark wall, so plan these for the lit side of the tree.
25. Carved Wooden Angel Ornament With Jute Twine
Unsealed wood plus jute equals a friendly home for dust. Once a month during the season, take it off the branch and dust it with a dry, soft brush — a cheap makeup brush works better than a cloth because it gets into the carved lines. Never wipe with a damp rag; the grain will lift and the twine will darken unevenly. If you store ornaments in a garage or attic, use a sealed plastic bin with a silica packet so the wood doesn’t swell through a humid summer.
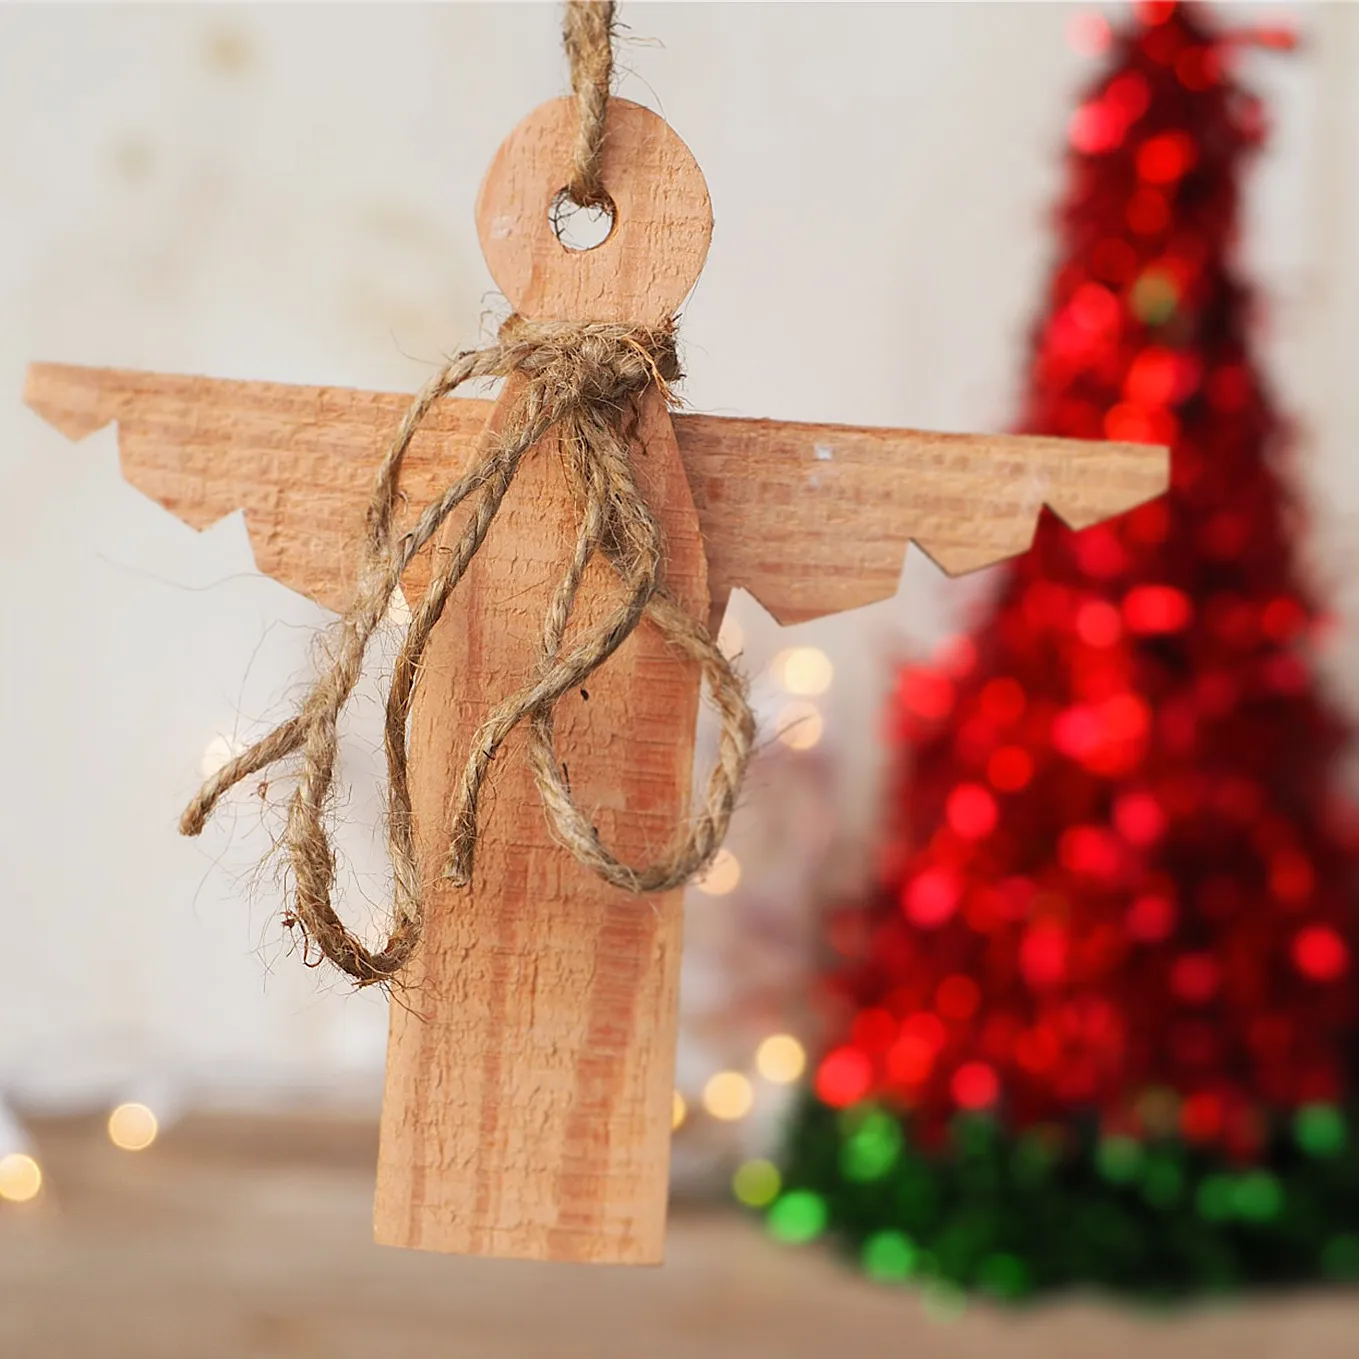
Three parts, and nothing more. A simple carved wooden body, two attached wings, a round head, and a length of jute twine tied at the neck and looped for hanging. That’s the whole ornament. It works because the material does the talking — pale wood grain against natural jute, no paint, no glitter, no ribbon. Backlit by red and green lights in a soft blur, it stays clean and readable from across a room. Sometimes restraint is the entire design.
26. Gold Star Angel Ornament With White Feather Trim
Roughly 55 percent gold, 30 percent white, 10 percent light blue, 5 percent red. The blue wings are the surprise here — they keep the ornament from turning into one solid block of metallic, and the small red bead accents in the white trim give it a single warm punctuation mark. Swap the blue wings for cream and it goes purely vintage; make them deep green and it’s full traditional. Whichever you choose, keep the red under 10 percent. It’s an accent, not a theme.
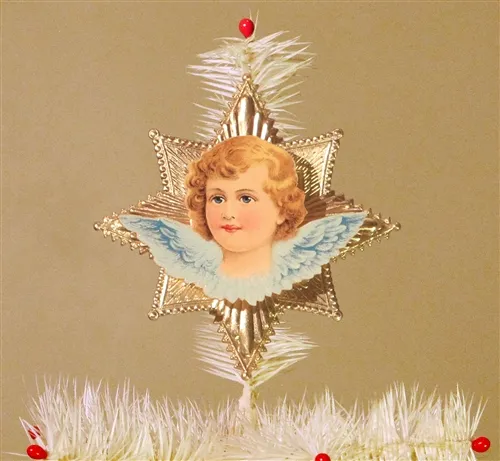
These read best on a full-size tree in a cluster of five to seven, spaced 6 to 8 inches apart so the feather trim doesn’t mat into its neighbors. Feathers need air — pack them too close and the whole branch turns into one white blur. On a small tabletop tree, one is plenty; on a wreath, use three and let them overlap at the edges. They’re light enough for a wall hook or a chandelier arm, which is where a lot of people end up putting them anyway.
27. White Angel With a Silver Tinsel Wreath
Check these before you commit to the centerpiece.
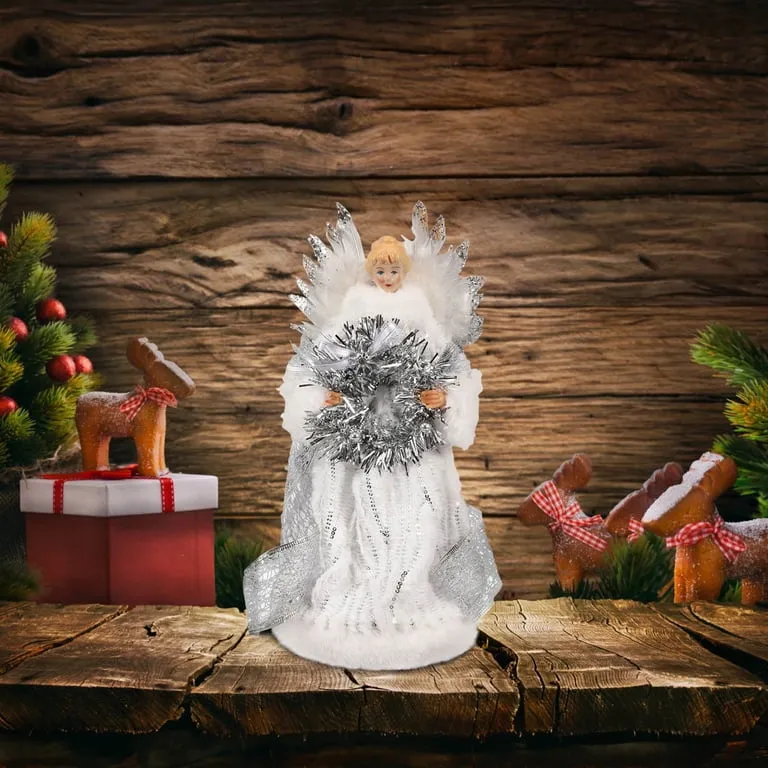
- Measure your table: this vignette wants at least 30 inches of width once the reindeer and greens are added.
- Confirm the wreath ring is lightweight — a heavy wood or metal form will pull the figure forward over time.
- Decide on real versus faux greens; real pine smells better and drops needles on your runner.
- Check your tree’s ornaments: red and silver near the angel will make it pop, red and gold will make it fight.
- Keep a lint roller handy if you’re using tinsel, which sheds on contact.
Cost breakdown for staging this rustic centerpiece.
- White angel figurine, 10 to 14 inches: $18–$45
- Silver tinsel wreath, 8-inch: $6–$16
- Reindeer figurines, set of three: $15–$40
- Red-and-white checkered bows: $6–$14
- Tree clippings or a small tabletop tree: $10–$30
Total: roughly $55 to $145.
Use one thrifted reindeer and greens clipped from your own tree, and you’re at about $30.
28. Ceramic Angel Ornament With Embossed Metal Wings
Use ribbon, not string. A 3/8-inch white satin or grosgrain ribbon knotted at the top holds this ornament straighter than a wire hook, and it lets the ribbed ceramic body hang level instead of tilting to one side — which matters a lot on a piece where the head and body are perfectly round. Cut the ribbon to 6 inches, fold it in half, push the loop through the hole, and pull the tails through. Hang it where the metal wings can catch some light; ribbed white ceramic goes nearly invisible in shadow.
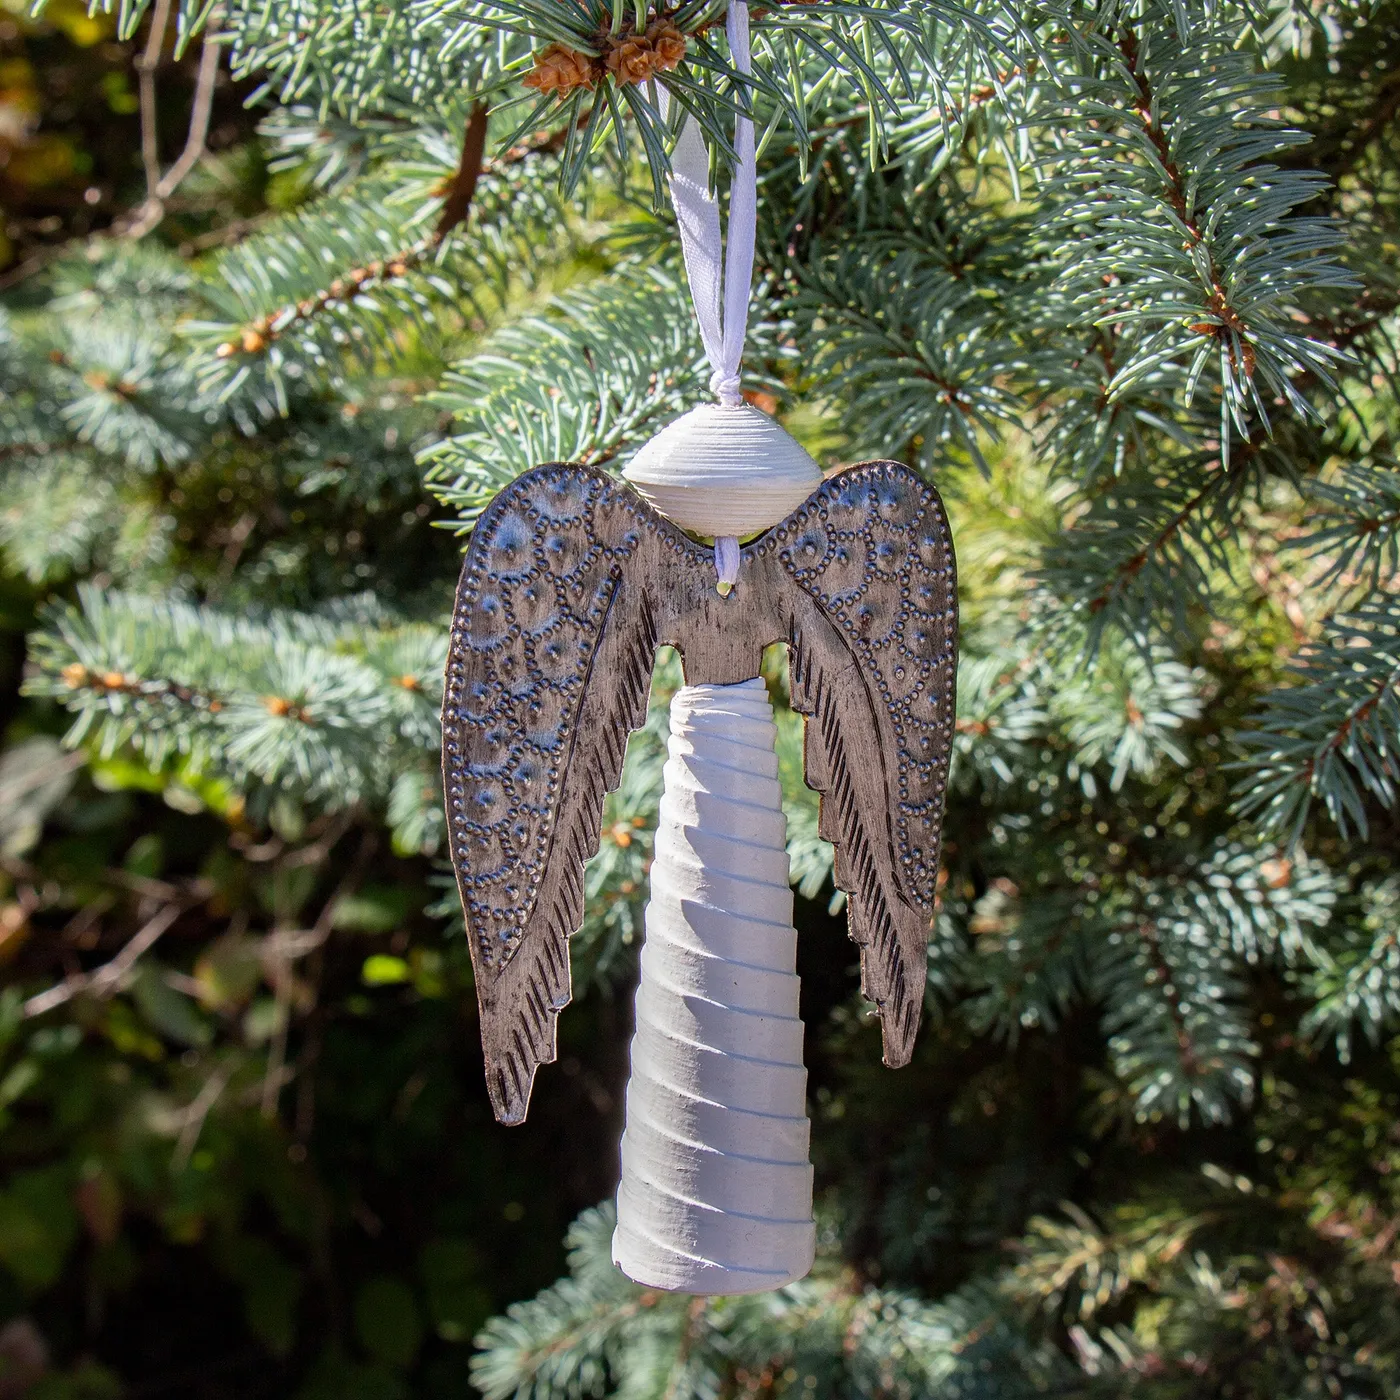
Embossed dark metal oxidizes unevenly, which is part of the charm early on and a problem if you store these in a damp basement. A dry wipe is all the maintenance either material needs. If the ceramic chips at the hanging hole — the most common failure point on a heavier ornament — a dot of white enamel paint hides it better than glue, and you can drill a new hole slightly lower if the original cracks through. Never submerge ceramic in water; the glaze crazes.
29. Cream and Gold Angel Topper With Faux Fur Trim
What an elaborate topper like this actually costs, whether you buy or build.
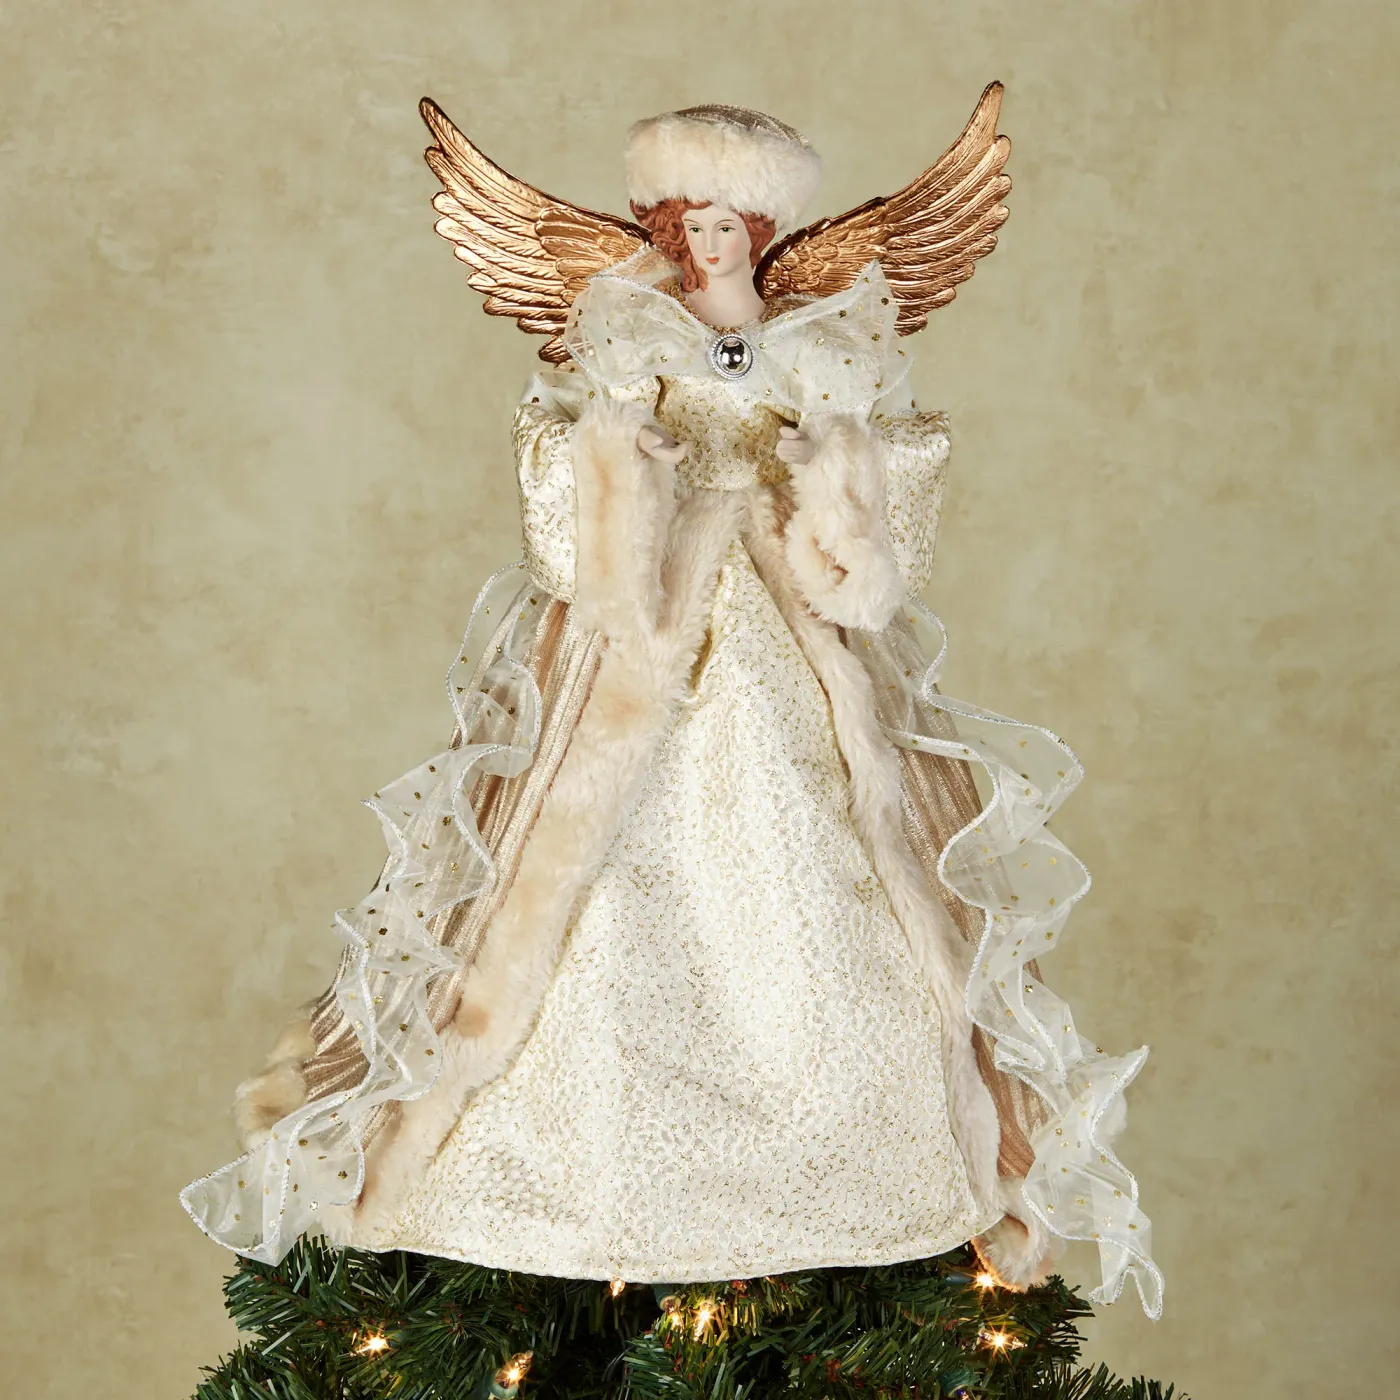
- Pre-made cream and gold topper: $45–$180
- Or: gown fabric, sheer ruffled fabric, and trim: $18–$40
- Faux fur trim, 1 yard: $8–$20
- Metallic gold wings, pre-made pair: $12–$30
- Porcelain-style doll head or a repainted craft head: $8–$20
Total: roughly $45 to $180 purchased, or $46 to $110 if you build it.
Starting from a thrifted doll and reusing last year’s fur trim is where the real savings live.
Cream and gold has taken over holiday décor the way warm minimalism took over interiors a couple of years ago — less color, more texture, and a willingness to spend on one statement piece instead of ten. It solves a practical problem too: a soft neutral topper won’t clash with any palette you use on the tree, so you can change your ornament scheme every year and keep the same angel. That’s why this style is sticking around instead of cycling out.
30. Kid-Made Paper Angel With Glitter Wings and Berries
About 20 minutes, and the mess is manageable if you lay down newspaper first.
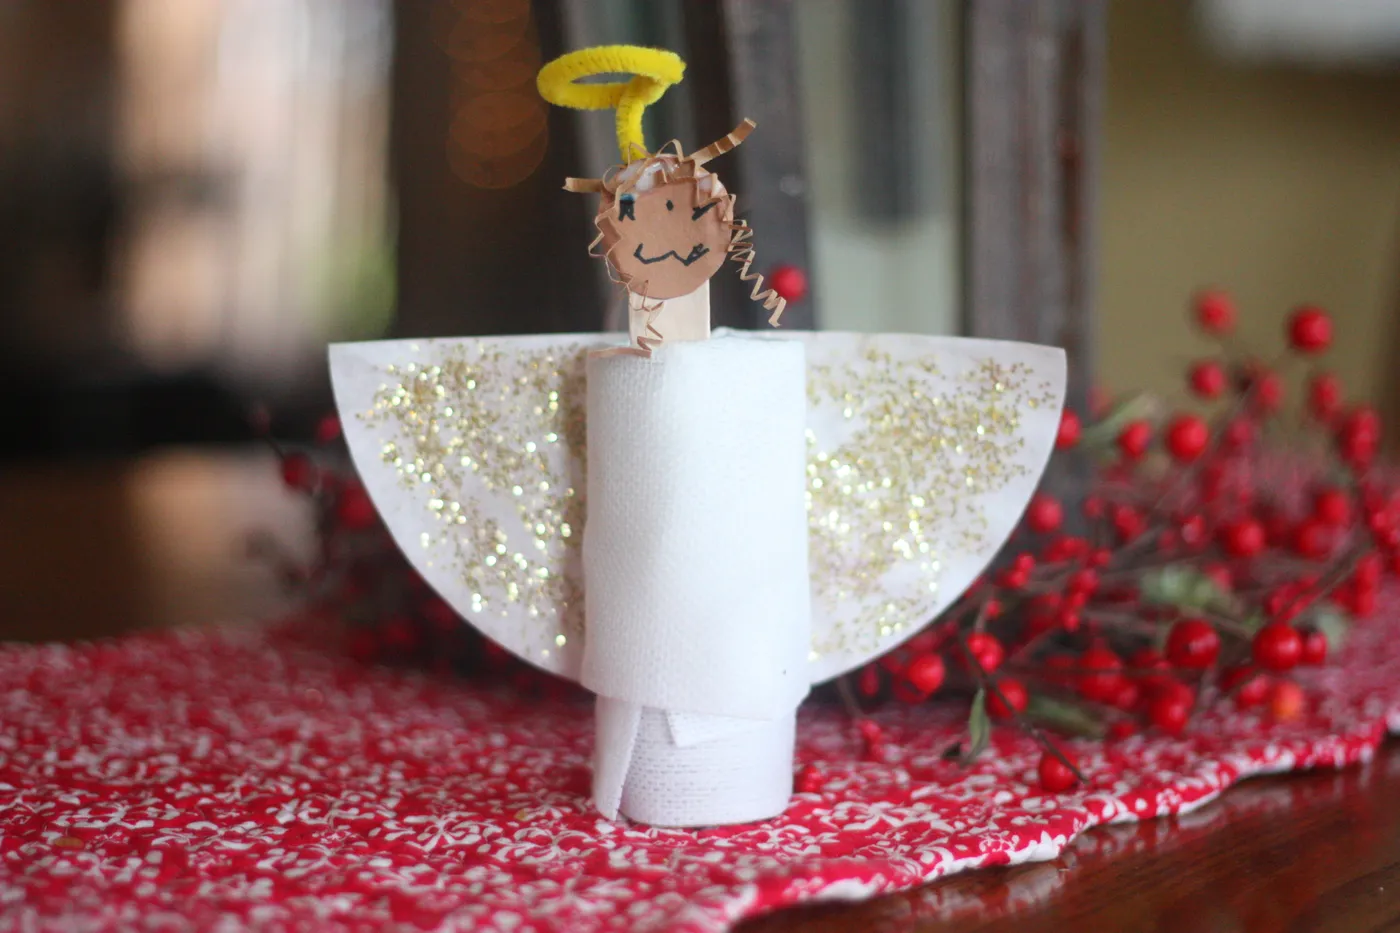
- Roll a sheet of white paper into a cone and tape the seam — that’s the body.
- Cut two fan-shaped wings from white paper and brush the edges with glue.
- Sprinkle gold glitter over the glue and tap the excess onto the paper.
- Glue a brown paper circle on top for the head, then draw the face with a marker.
- Twist a yellow pipe cleaner into a circle and tape it behind the head as a halo.
- Set it on a red and white runner and tuck faux red berries in behind.
Total materials: about $7 per angel, less if you’re making a batch of ten.
Everything here comes from a dollar store or the back of a craft drawer — white copy paper, a glue stick, gold glitter, a pipe cleaner, and a handful of fake berries pulled off an old wreath. Ten angels for roughly $15, runner included. It’s the kid-friendly version of Idea #3: same idea of giving a plain paper body one bright accent, just with a drawn smiley face and considerably more glitter on the floor.
31. Metallic Angel With Star Cutouts and Evergreen
The star-shaped cutouts aren’t just pattern — they’re light fixtures. Put a warm bulb behind this angel and the conical body throws tiny star shapes across whatever sits behind it, which is why that warm yellow wall and the small white string lights matter as much as the figure itself. The embossed wings catch light on their raised edges and go dark in the grooves, so the shape stays readable at a distance. And the pinecones tucked into the greens add a matte texture that keeps the metal from taking over.
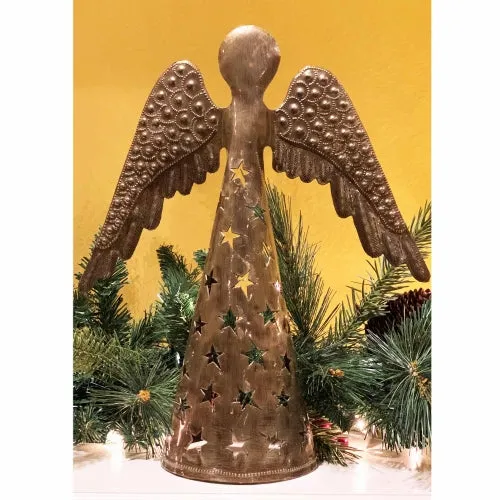
Freestanding, this figure wants a base roughly 5 to 6 inches across and a surface at least 10 inches deep so the wings aren’t hanging off the edge. On a mantel, give it the center and keep everything else low. As a tree topper it needs a sturdy top branch — the metal body is heavier than a fabric angel, so test the fit before December 20th, not on it.
32. Pleated Book Paper Angel With a Yellow Bead
Accordion-fold at a quarter inch wide and no wider. This angel is built from pleated book pages with printed text and small line drawings still visible, and the fold width decides whether it reads as a fan or a crumpled napkin. Quarter-inch pleats hold a crisp edge and stay open on their own; half-inch pleats collapse into a tube. Fold the whole page first, then pinch and glue the center before you fan it out — trying to keep pleats even while they’re already splayed is a losing battle.
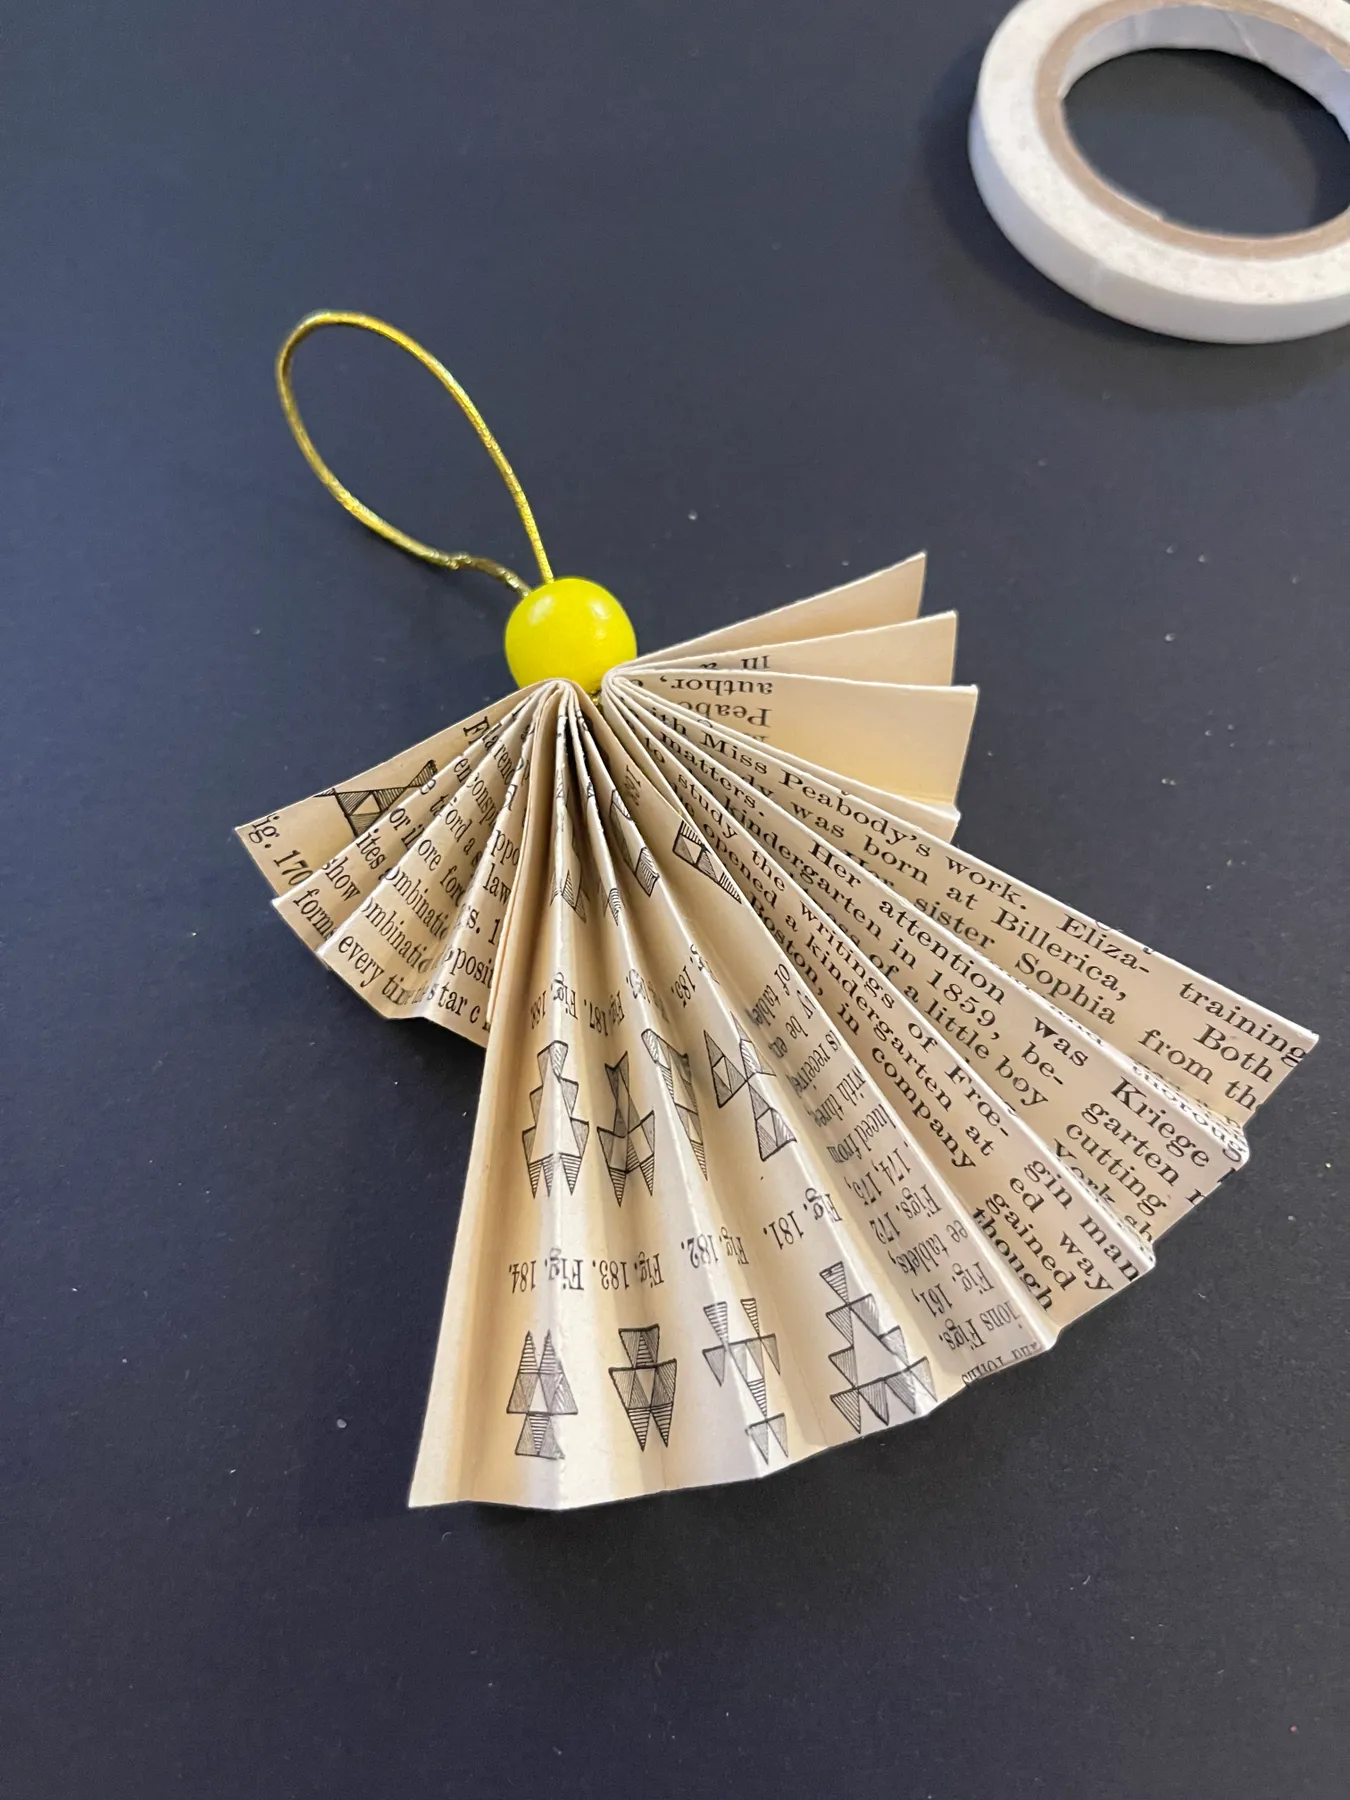
Ninety percent aged paper, ten percent yellow. That one bright bead on top does all the color work in the entire ornament, which is why the pleated pages are left completely unembellished — no glitter, no ribbon, no stars. Swap the yellow bead for a red one and it turns traditional; a matte black bead and it goes stark and modern. Whatever color you choose, keep it to a single object. Two bright accents and the printed text stops being the point.
33. Paper Angel Figure With a Red Damask Bodice
Quick checks before you cut into that patterned paper.
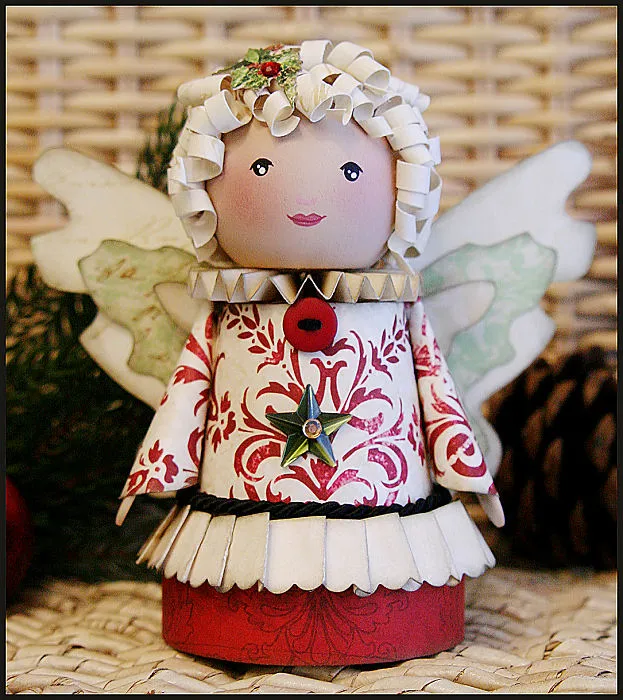
- Test the damask at scale — a print that looks delicate on a full sheet can turn busy on a 3-inch bodice.
- Decide where the green metallic star sits before you glue the pleated collar; it belongs at the shoulder, not dead center.
- Cut the pleated and scalloped trim strips with extra length — paper trim shrinks slightly once the glue dries.
- Pre-curl the white paper hair around a pencil and let it relax overnight so the curls hold.
- Keep a scrap of each paper aside for touch-ups; matching a pattern months later is nearly impossible.
Paper ornaments are the least forgiving thing on a Christmas tree. Damp air makes pleats sag, direct sun bleaches the red out of a damask print within a couple of seasons, and dust settles into every scalloped edge. Keep this one in a room without a humidifier, store it flat in a rigid box with tissue between layers, and dust with a dry, soft brush rather than a cloth. Never spray a glued pleated piece — the moisture in the spray softens the folds.
Hang Your Angel Where the Light Hits
Start with one — a single folded paper angel, a thrifted wooden figure, a doll made from fabric you already own — and watch what it does to the corner it lands in. The best Christmas angels aren’t the most expensive ones in any roundup; they’re the ones with a slightly crooked halo and a story about where the paper came from.
📌 Pin this guide now so it’s waiting for you next December, and tag us when your angel makes it onto the tree — we want to see the crooked halo.