30 Jaw-Dropping Christmas Garland DIY Ideas You Absolutely Need to Try for 2026
You know that feeling when you’ve saved seventeen garland photos to Pinterest and not one of them looks like it would survive contact with your actual staircase? We did the scrolling for you. After filtering through hundreds of options at HomeGoods, Walmart, Etsy, and Amazon — from a $6 bundle of pine to a $450 showpiece — we narrowed it down to 30 garlands that actually deliver.
Inside you’ll find the styles driving 2026: traditional red-and-green staircases, natural citrus-and-pinecone drapes, gold-and-velvet mantels, and a few gloriously nostalgic multicolor numbers. Budget and luxury versions get compared side by side, so you can see exactly what the extra money buys. And stay until the end — we break down the most common mistakes that can ruin these looks. This post contains affiliate links; if you buy through them, we may earn a small commission at no extra cost to you.
📌 Save this to Pinterest for later — you’ll want to revisit these ideas.
1. A Faux Evergreen Mantel Lit Like a Little Village
What makes this mantel work isn’t the garland alone — it’s the stack of contrast behind it. A dark gray wall and a white mantel with patterned tile give the deep green something crisp to sit against, so the greenery reads as a layer instead of a blur. The glowing house luminaries and the nine-candle candelabra then add a second band of light above eye level, which lifts the whole display and keeps it from feeling bottom-heavy.
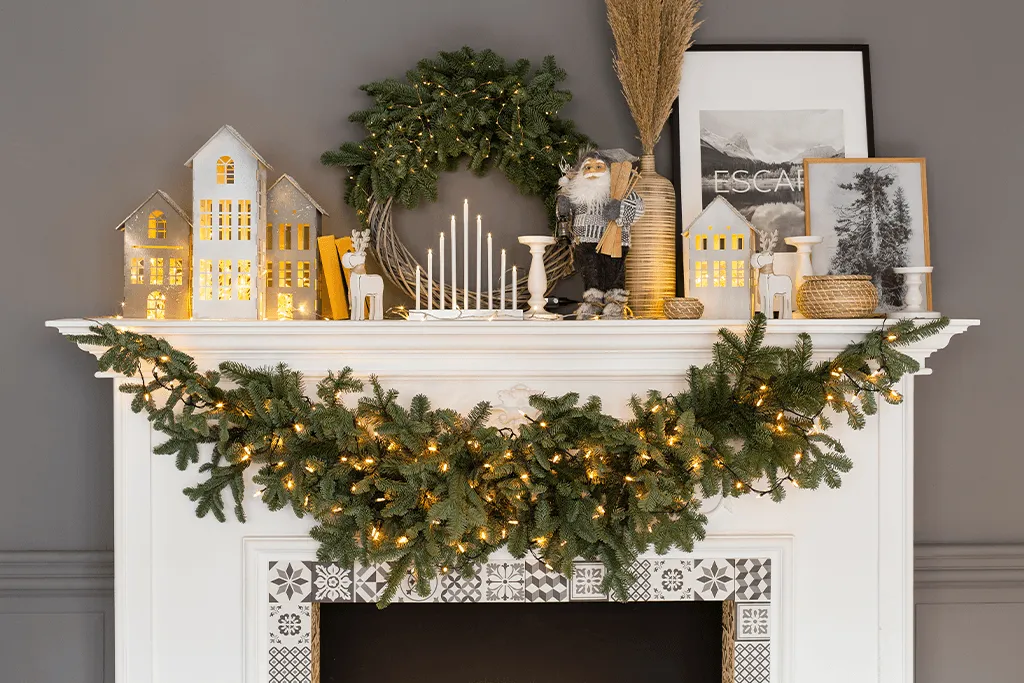
Flat garland is almost always a density problem, not a color problem. Buy a 9- to 10-inch-diameter strand, twist two of them together, then fluff from the inside out — bend each stem at the wire base, never at the tip. Run warm white lights through the center of the garland rather than across the top. Light coming from inside the needles reads as glow; light sitting on the surface reads as plastic. Two strands plus one 100-bulb set covers roughly six feet of mantel.
2. Blue Satin Ribbon and Dried Orange on the Stair Rail
The formula here is easy to steal: about 60% evergreen, 25% natural bits — dried orange slices, pinecones, dried magnolia leaves — 10% light blue satin, and 5% gold. The blue is what does the heavy lifting, and it’s only a tenth of the composition. Swap the satin for blush pink, sage velvet, or deep burgundy and the whole garland changes mood while nothing else moves. Push the naturals past a third of the mix, though, and it starts looking like a forage pile.
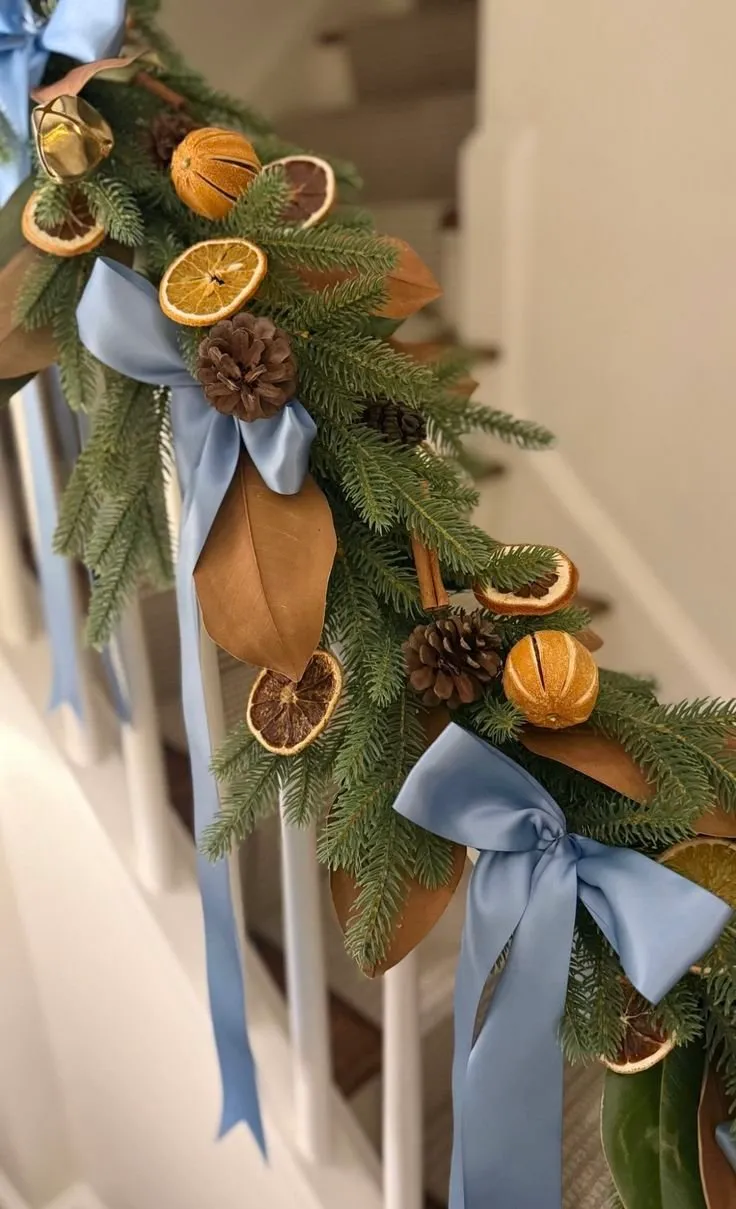
Dried citrus is beautiful and also a little bit of a commitment. Slices have to be bone-dry — bake them at 200°F for two to three hours until they’re leathery, not gummy — or they’ll mold inside a warm house. Pinecones you gathered yourself should go in the oven at 200°F for 30 minutes to kill anything living in them. And if that railing catches direct sun, satin ribbon will fade within a single season.
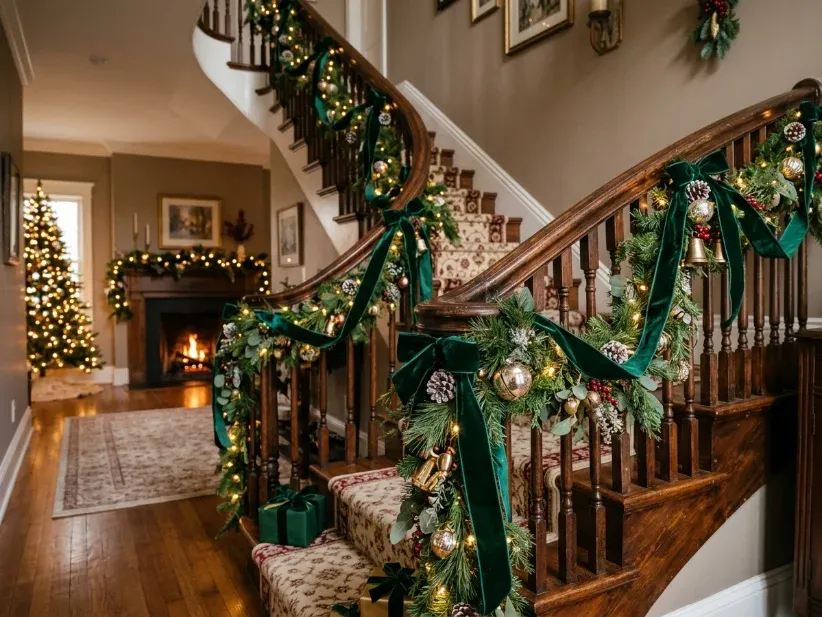
3. Emerald Velvet Ribbon on a Dark Wood Staircase
Take away the emerald velvet and you still have a nice garland. Take away the garland and the ribbon is still the whole story. That’s the test for a hero element, and here it’s the deep green velvet bows tied at even intervals down the railing — their matte texture against glossy gold ornaments and dark stained wood is the contrast the entire staircase runs on. Everything else is supporting cast.
- Faux pine garland, 9 ft, two needed: $30–$70 each
- Warm white string lights, two sets: $20–$40
- Emerald velvet ribbon, 3 in x 10 yd: $18–$45
- Gold ornaments and bells, 20 pieces: $25–$60
- Pinecones and red berry sprays: $15–$35
- Hooks, floral wire, zip ties: $10–$20
Total: $148–$340. Budget alternative: skip the ornaments entirely, use one velvet ribbon plus berries, and land around $95.
Velvet only bows beautifully if it’s wired. Look for wire-edge velvet in a 3- to 4-inch width and buy about two and a half times the length you think you need — a 10-yard spool makes four generous staircase bows with tails. Pinch the center, twist a 6-inch piece of floral wire around it, then shape the loops by hand. Velvet holds a crease, which is exactly why it beats satin at this scale.
4. A Round Mirror Draped Asymmetrically with Pine and Brass Bells
- Measure the mirror’s width and add 24 inches — that’s your garland length.
- Set a small nail or adhesive hook just above the frame at the 10 o’clock position.
- Drape the garland so one tail falls 12–18 inches past the frame, then secure it with floral wire.
- Tie the velvet bow at the highest point, then hang brass bells from the ribbon ends with twine.
- Step back and shift the bow until the two tails are clearly different lengths.
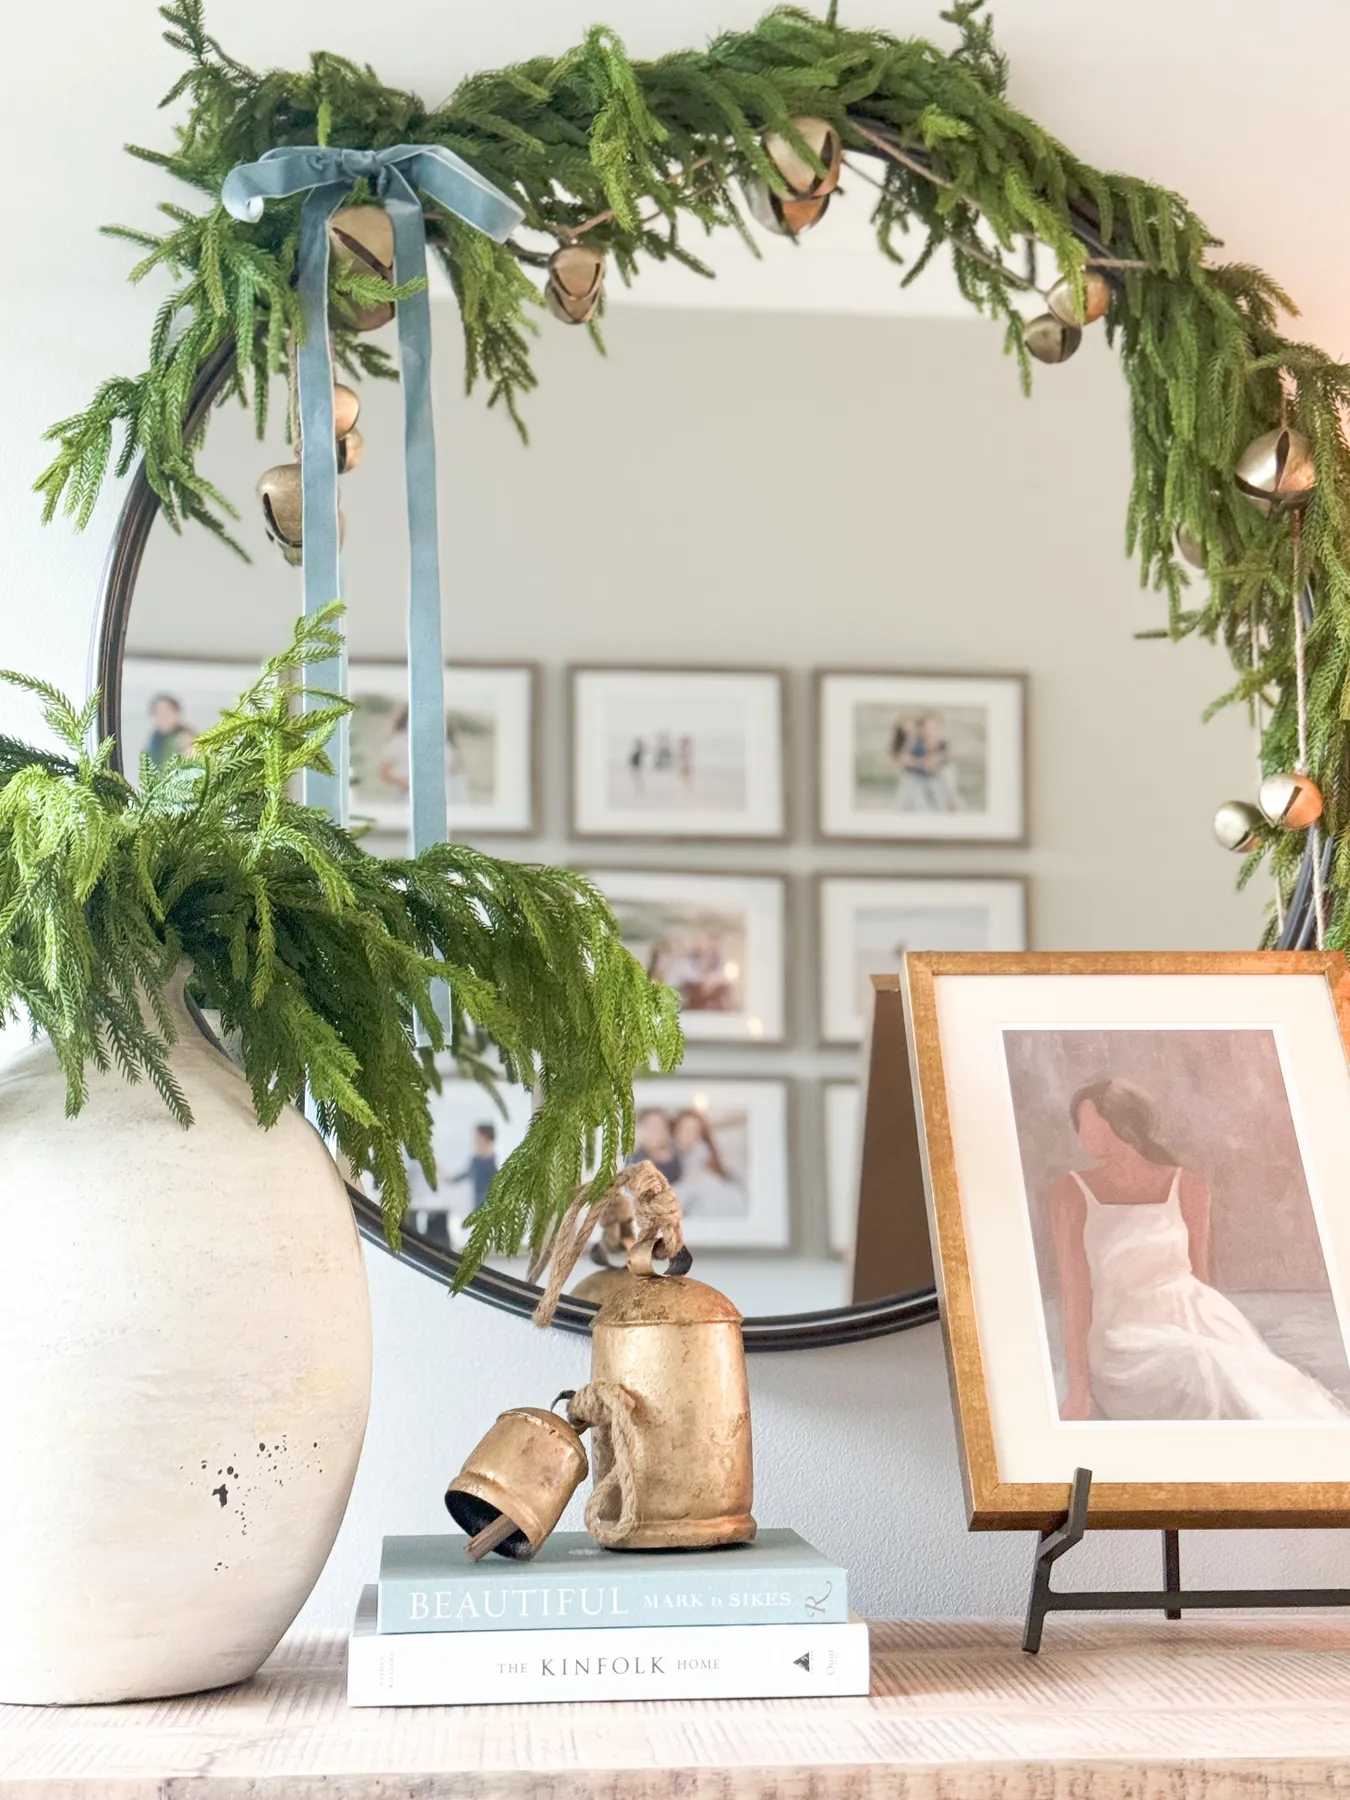
Time: about 40 minutes. Materials: $35–$90 depending on the bells.
The asymmetrical swag — heavy on one side, thin on the other — is the holiday shape of the moment, and it fits the wider move toward restrained palettes: dusty blue instead of bright red, aged brass instead of shiny gold, dried instead of glittered. It reads as quiet Christmas, which is why it turns up over mirrors and consoles rather than over mantels. Because it’s built on naturals, it also won’t look dated next December.
5. Red Velvet Bows and Fairy Lights Down the Handrail
- Measure the handrail end to end and add 20% — garland compresses as it drapes.
- Check that the greenery never sits below the handrail grip; you still need to hold it.
- Find your nearest outlet and confirm the extension cord reaches without crossing a step.
- Decide bow count before you buy: odd numbers, spaced every 4–5 feet, look intentional.
- Weigh the garland dry — anything over 12 pounds needs zip ties, not hooks.
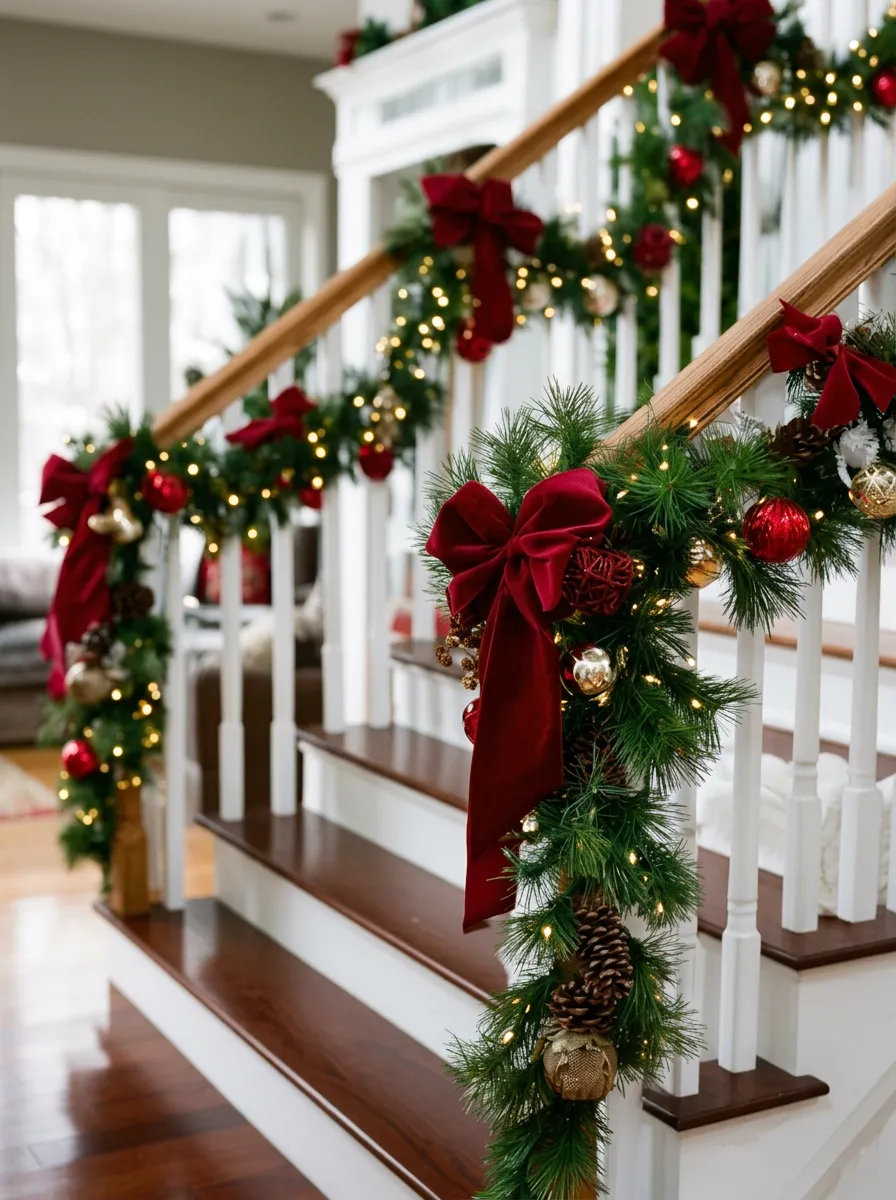
This look needs a handrail at least 10 feet long and 34–36 inches high, or the bows crowd each other and the whole thing turns into a red-and-green traffic jam. Ceiling height matters too: with 9-foot ceilings the garland sits comfortably in frame, while an 8-foot ceiling calls for slimmer bows. If your stairs are short or open-riser, look at Idea #8 instead, where all the decoration concentrates on the newel post.
6. Five Evenly Spaced Pine Swags with Sage Velvet Bows
You don’t need a custom garland for this — you need five identical cheap ones. Walmart and Dollar Tree sell small pine swags for $5–$12 each, and five of those plus a spool of sage velvet ribbon (about $12 with a coupon) gets you the same rhythm for under $75. Steam each swag over a kettle for ten seconds and it drops its factory crease instantly. Prefer the real thing? A local tree farm will often sell you trimmed branch ends for $10 a bundle.
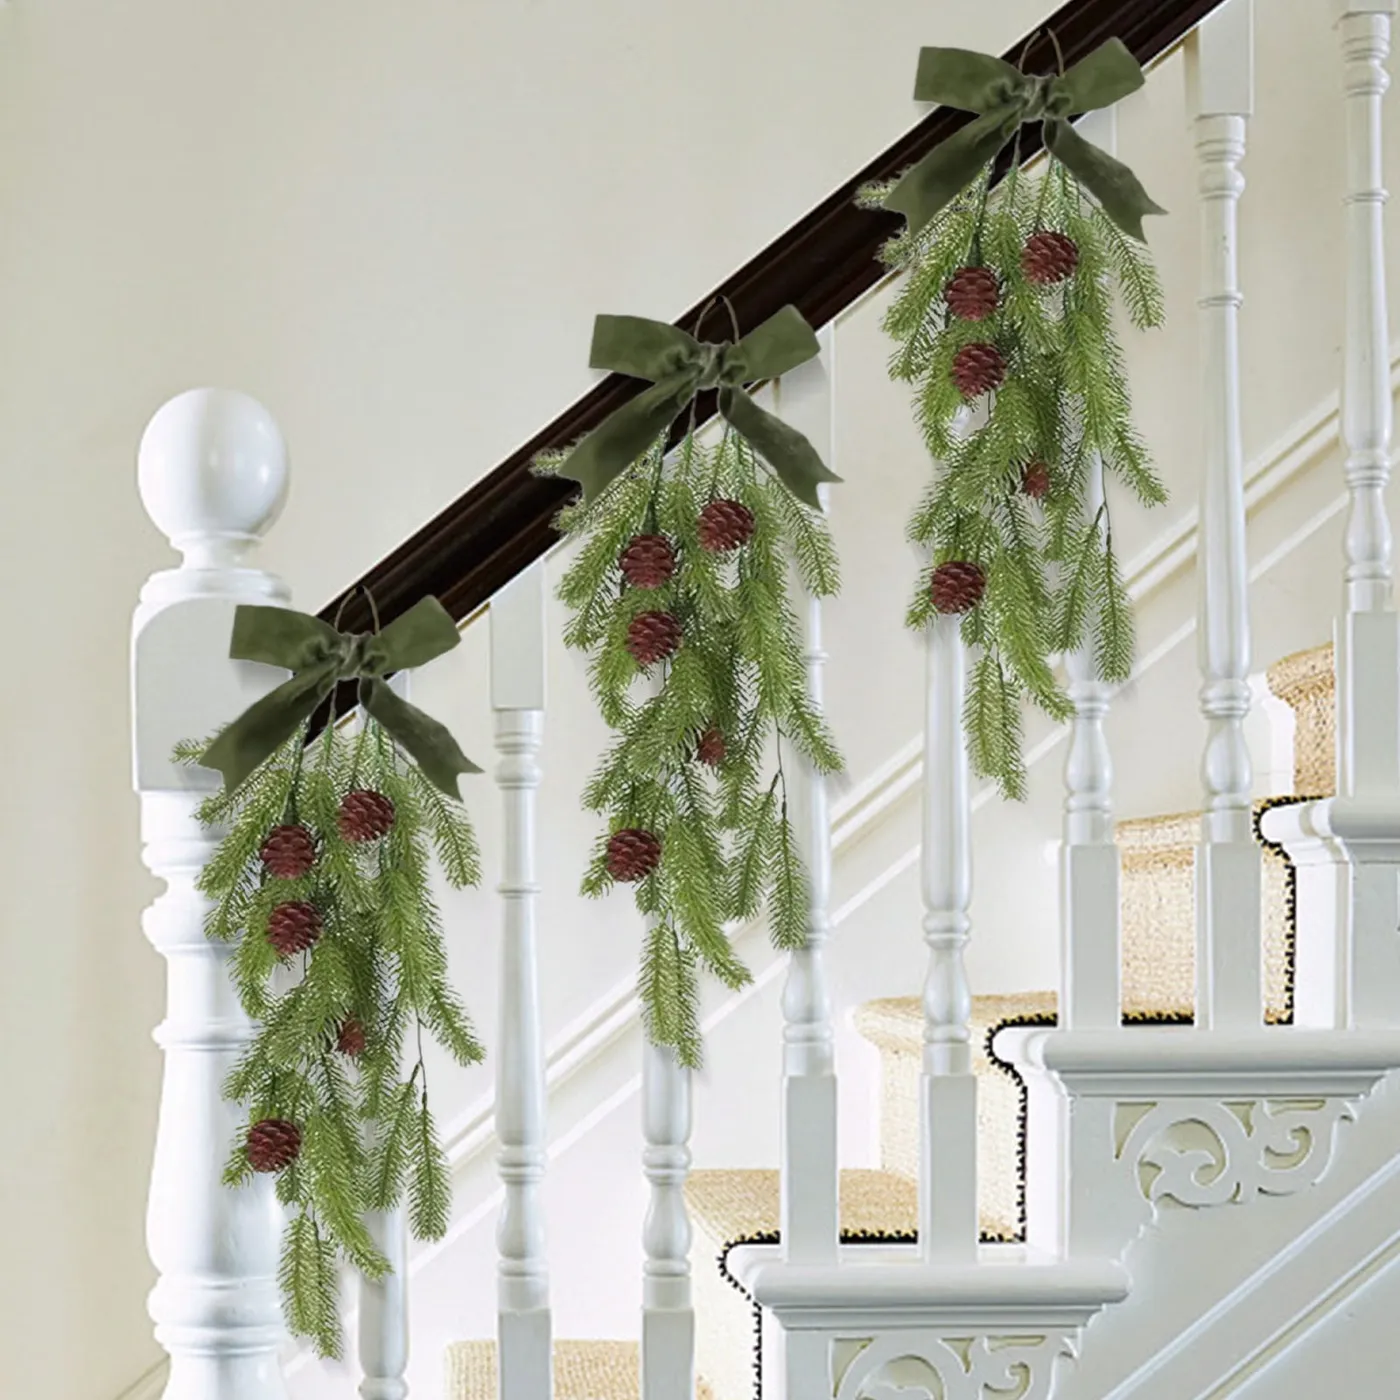
Repetition is the entire design principle here. Five swags, same size, same bow, same spacing, and the eye reads order instead of clutter. What keeps it light is the gap between them — roughly 18 to 24 inches of bare white banister. Fill those gaps and the stair stops breathing. It’s the same rhythm-over-volume idea at work in Idea #12, just with fewer, larger pieces.
7. Candlelit Gold Garland Across a Dark Mantel
If you’re mixing real candles with faux greenery, cluster them at three heights — roughly 4, 7, and 10 inches — in odd-numbered groups, and keep the tallest flame at least 12 inches from anything above it. Fluted glass votives throw a taller, softer shadow than straight-sided ones, which is a big part of why this mantel glows the way it does. Always set candles on a metal tray or a hidden ceramic tile so drips land somewhere removable.
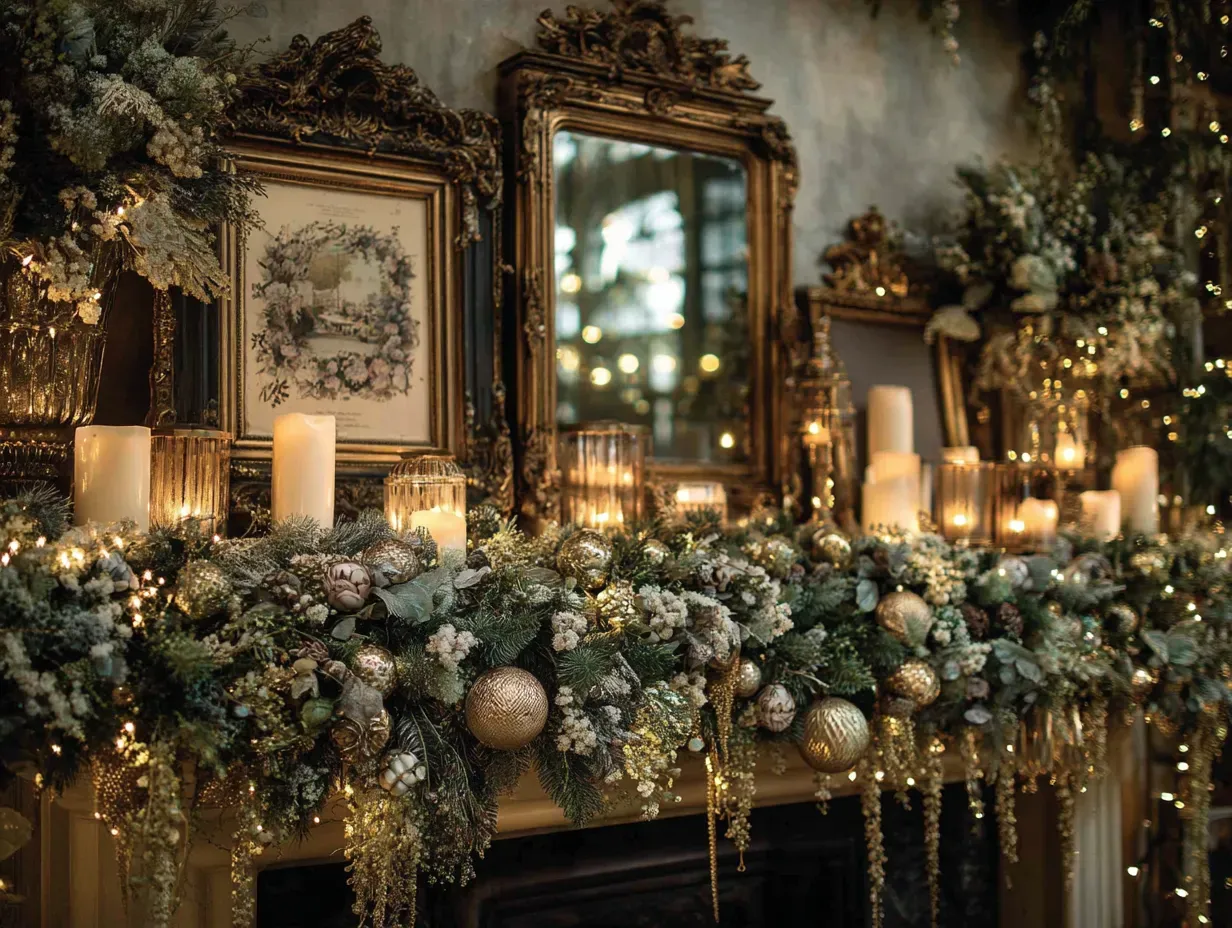
The candles are the point. Strip them out and you have a perfectly nice garland with gold baubles — the kind you walk past at 2 p.m. without noticing. But light at eye level, flickering against a dark mantel and an antique gold mirror, changes how the room feels after 5 p.m. If open flame worries you, battery pillar candles with a moving wick get you 80% of the mood with none of the risk.
8. A Newel Post Wrapped in Pine, Berries, and One Big Bow
Wrapping the newel post is the easiest garland win in the house — and the easiest one to do wrong. Keep the greenery below the top of the post so your hand still has somewhere to land; a garland that swallows the grip is a fall waiting to happen. Confirm the light cord reaches without draping across a step, and if you have toddlers or a dog who thinks pine is a chew toy, wire the berries tightly and skip anything glass.
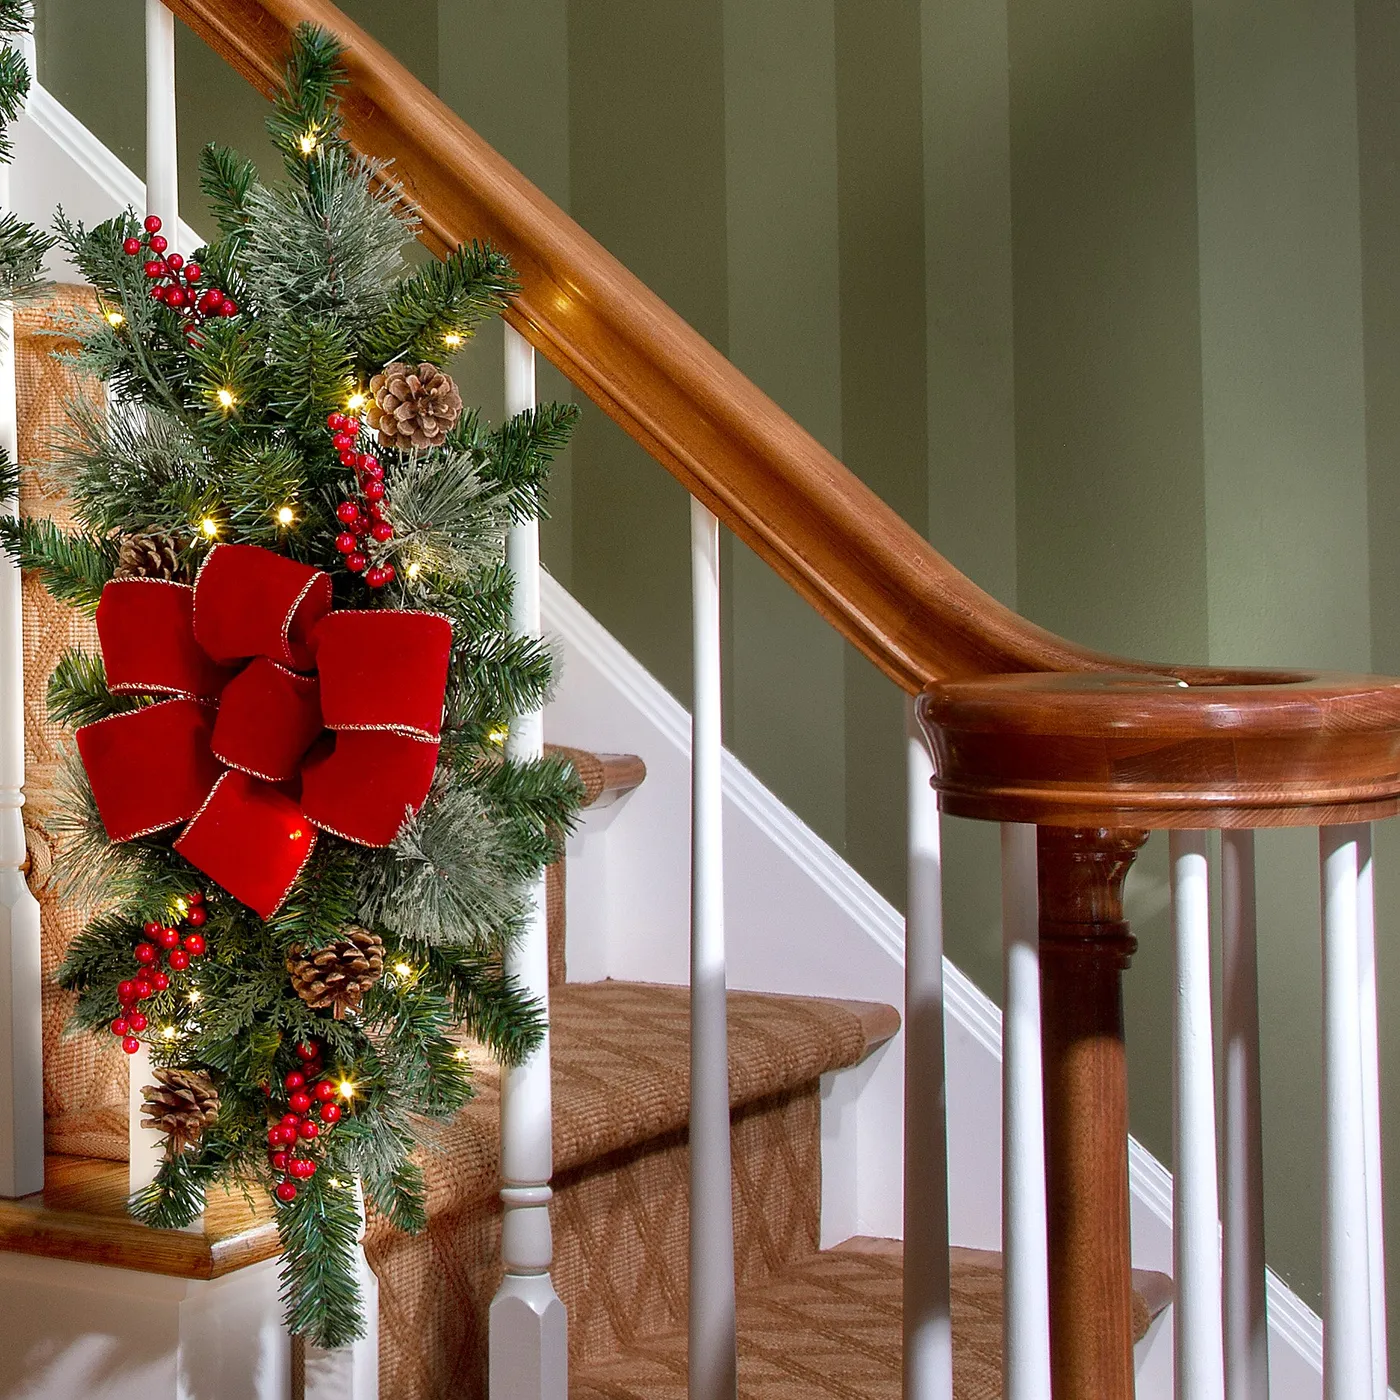
This one runs 70% pine, 15% red, 10% light, 5% gold trim. The trick is that a single large bow carries all the red, so you don’t need red anywhere else. Want a different holiday? Keep the ratio and trade the red for plaid ribbon, or for silver and white. Change the proportions instead — push red to 30% — and you get a much louder, very different decoration.
- Start at the top of the post with the garland’s end and wire it at the back, where nobody looks.
- Spiral down in loose turns, not tight coils, so light can shine through the gaps.
- Weave the string lights in after the greenery, following the same spiral.
- Wire the bow at the front of the post, just under the top cap.
- Tuck berries and pinecones into the gaps around the bow, then fluff everything outward.
Time: 25 minutes. Materials: about $30–$60.
9. A Generous Garland and Red Tapers Over a Wood Stove
- Thick faux pine garland, 9–12 ft: $45–$110
- Matching wreath, 24 in: $25–$60
- Red taper candles, six: $12–$30
- Brass candle holders and bells: $20–$55
- Red stocking with gold bells: $15–$35
- Woven log basket: $25–$70
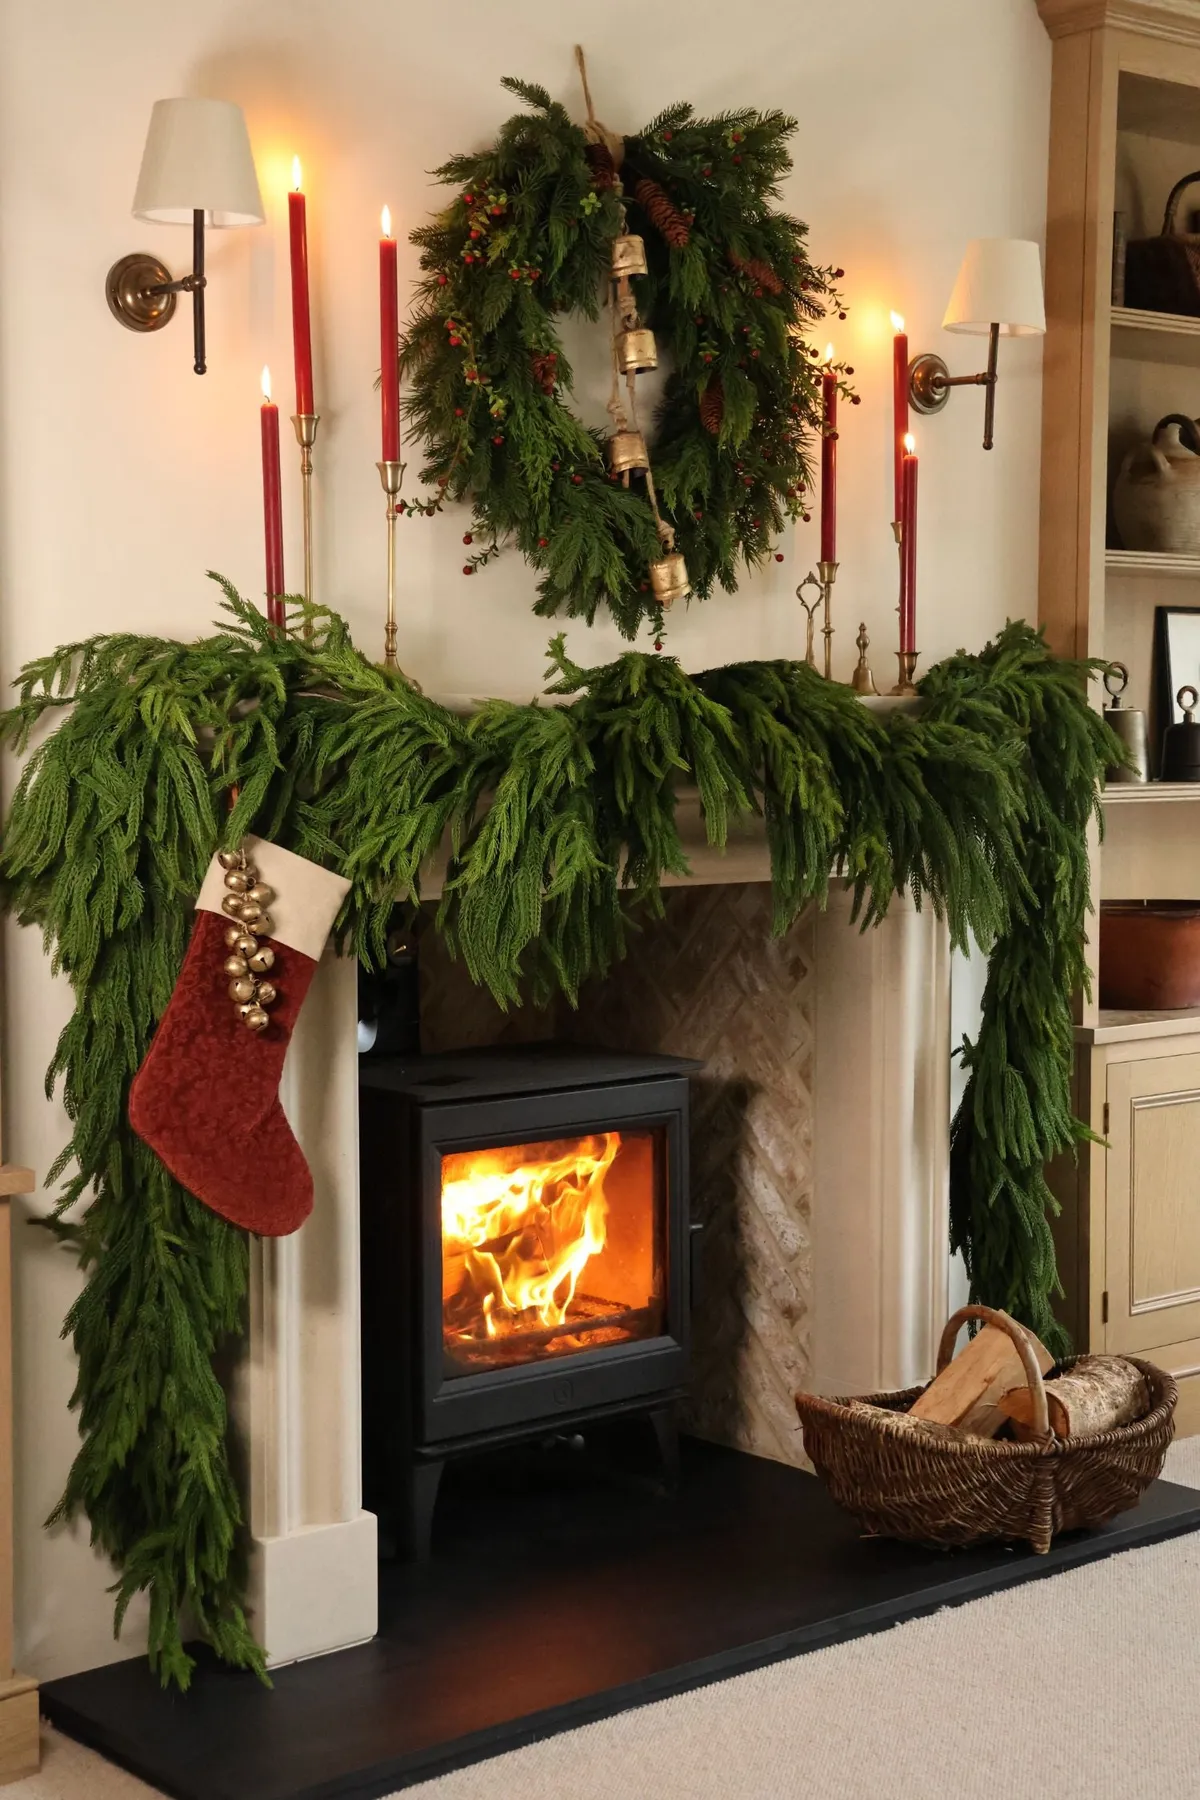
Total: $142–$360. Budget alternative: one good garland plus candles you already own lands around $70.
Faux greenery near a heat source is a slow-motion problem. Most stove and insert manufacturers want combustibles at least 36 inches from the unit, so check your manual before you drape anything — and never let a garland hang below the mantel’s edge over an active fire. Faux pine also collects dust fast in a warm room; hit it with a hair dryer on cool for two minutes each December. Real greenery in that spot dries to tinder in about a week.
10. A Vertical Swag on a Navy Paneled Door
Vertical swags live or die by proportion. On a standard 80-inch door, aim for a 48- to 60-inch swag — roughly two-thirds of the door’s height — hung so the bow sits near 60 inches, just above eye level for most adults. Anything shorter looks like it gave up halfway. This is also the format for tight entryways: no railing, no mantel, no floor space required, unlike a full staircase treatment.
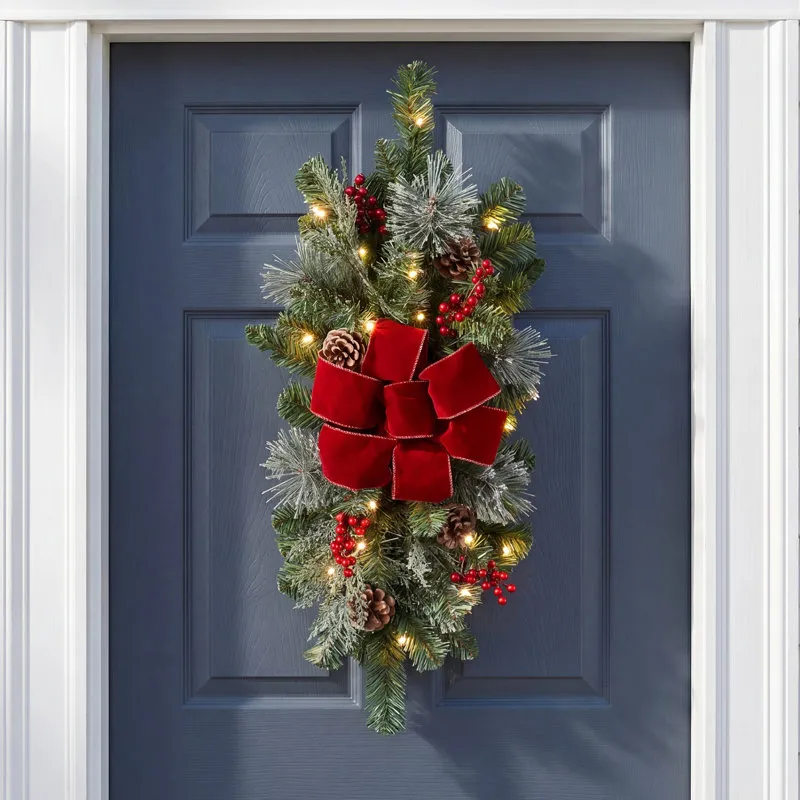
On a paneled door you can’t nail into, run a ribbon over the top edge, close the door, and let the ribbon bear the weight — a 4-inch velvet ribbon holds a 5-pound swag easily. Or use a Command hook on the hinge-side stile, which is the strongest flat surface on the door. Skip over-door hangers if your door is tight in its frame; they scratch the trim every time it swings.
11. Deep Green Garland Draped Over Rustic Stone
- Start at the center of the mantel and work outward so the garland stays symmetrical.
- Attach adhesive-backed masonry hooks to the stone every 12–18 inches, then let them cure for an hour.
- Run floral wire from the garland’s spine to each hook, not from the outer branches.
- Let the tails fall past the mantel’s edge by 12–24 inches, and check that they hang evenly.
- Add lanterns and candles last, so you don’t knock the garland loose reaching over it.
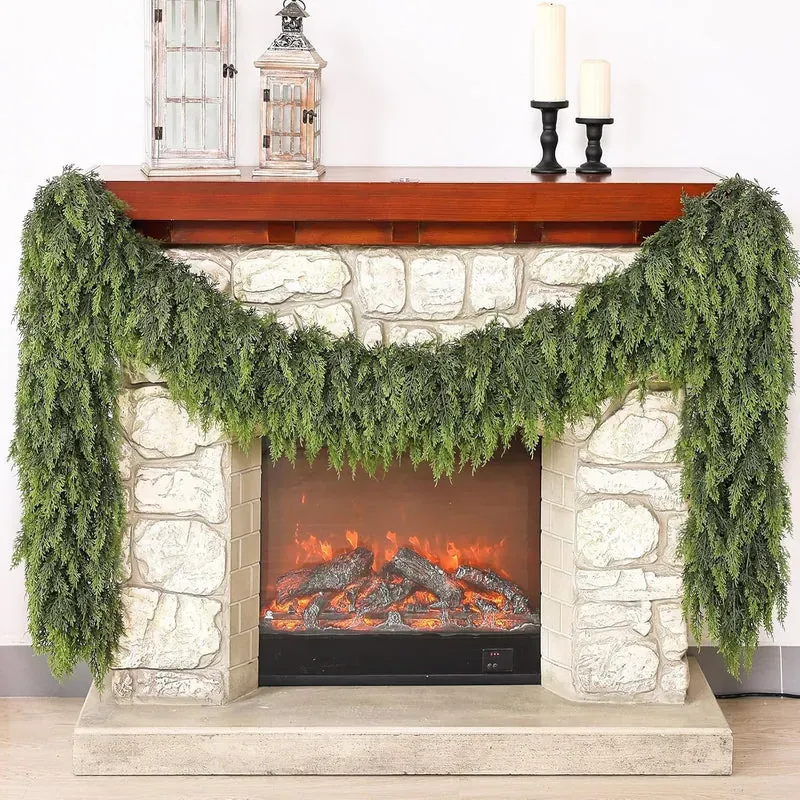
Time: 45 minutes. Materials: $20–$35 in hooks and wire.
Stone fireplaces eat garland — you need volume, and volume is where prices jump. Two 9-foot faux cypress strands at $25–$35 each, twisted together and zip-tied, read just as full as a $200 designer strand once the lights go in. Save the splurge for the mantel shelf itself: those distressed white lanterns are what people actually notice, and Facebook Marketplace turns them up for $15–$30 apiece all winter long.
12. Newel Post Swags Against a Striped Sage Wall
The striped green wallpaper is doing something the garland can’t do for itself: it makes green feel like the room’s baseline instead of a seasonal arrival. Against that wall, the swags read as a continuation rather than a decoration bolted on in December. Remove the stripes and you’d still have a lovely traditional staircase — you’d just lose the reason this photo makes people stop scrolling.
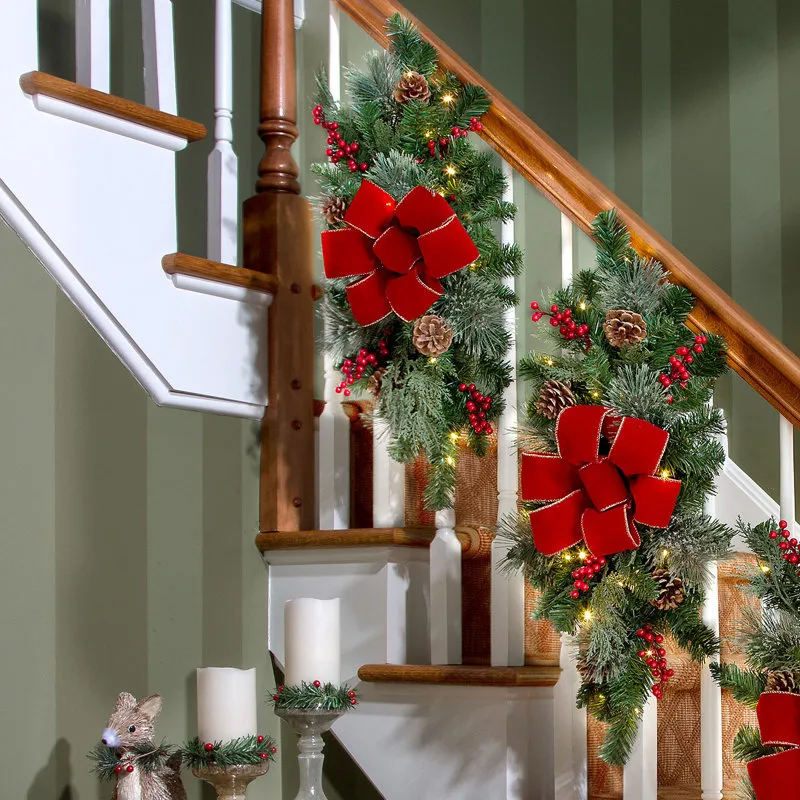
Sage and olive have been the quiet workhorses of wall color for a few years, and 2026 is the year holiday decor caught up. Instead of fighting a green room with red-and-gold garland, people are leaning in: deeper evergreens, muted berries, wood tones left alone. It’s part of the same shift that made dried naturals a Pinterest staple. Bonus — a green-on-green scheme has no obvious expiration date, so the swags can stay up well into January.
13. A Multi-Texture Swag with a Sheer Gold Bow
Texture, not color, is the formula here: roughly 50% long-needle pine for structure, 30% cedar or cypress for softness, 20% seeded eucalyptus or magnolia for contrast, then a single red berry cluster and one statement bow. When every branch has a different shape, a monochrome garland stops looking flat. Swap the sheer gold bow for matte burgundy and it turns traditional; swap it for wide linen ribbon and it turns Scandinavian.
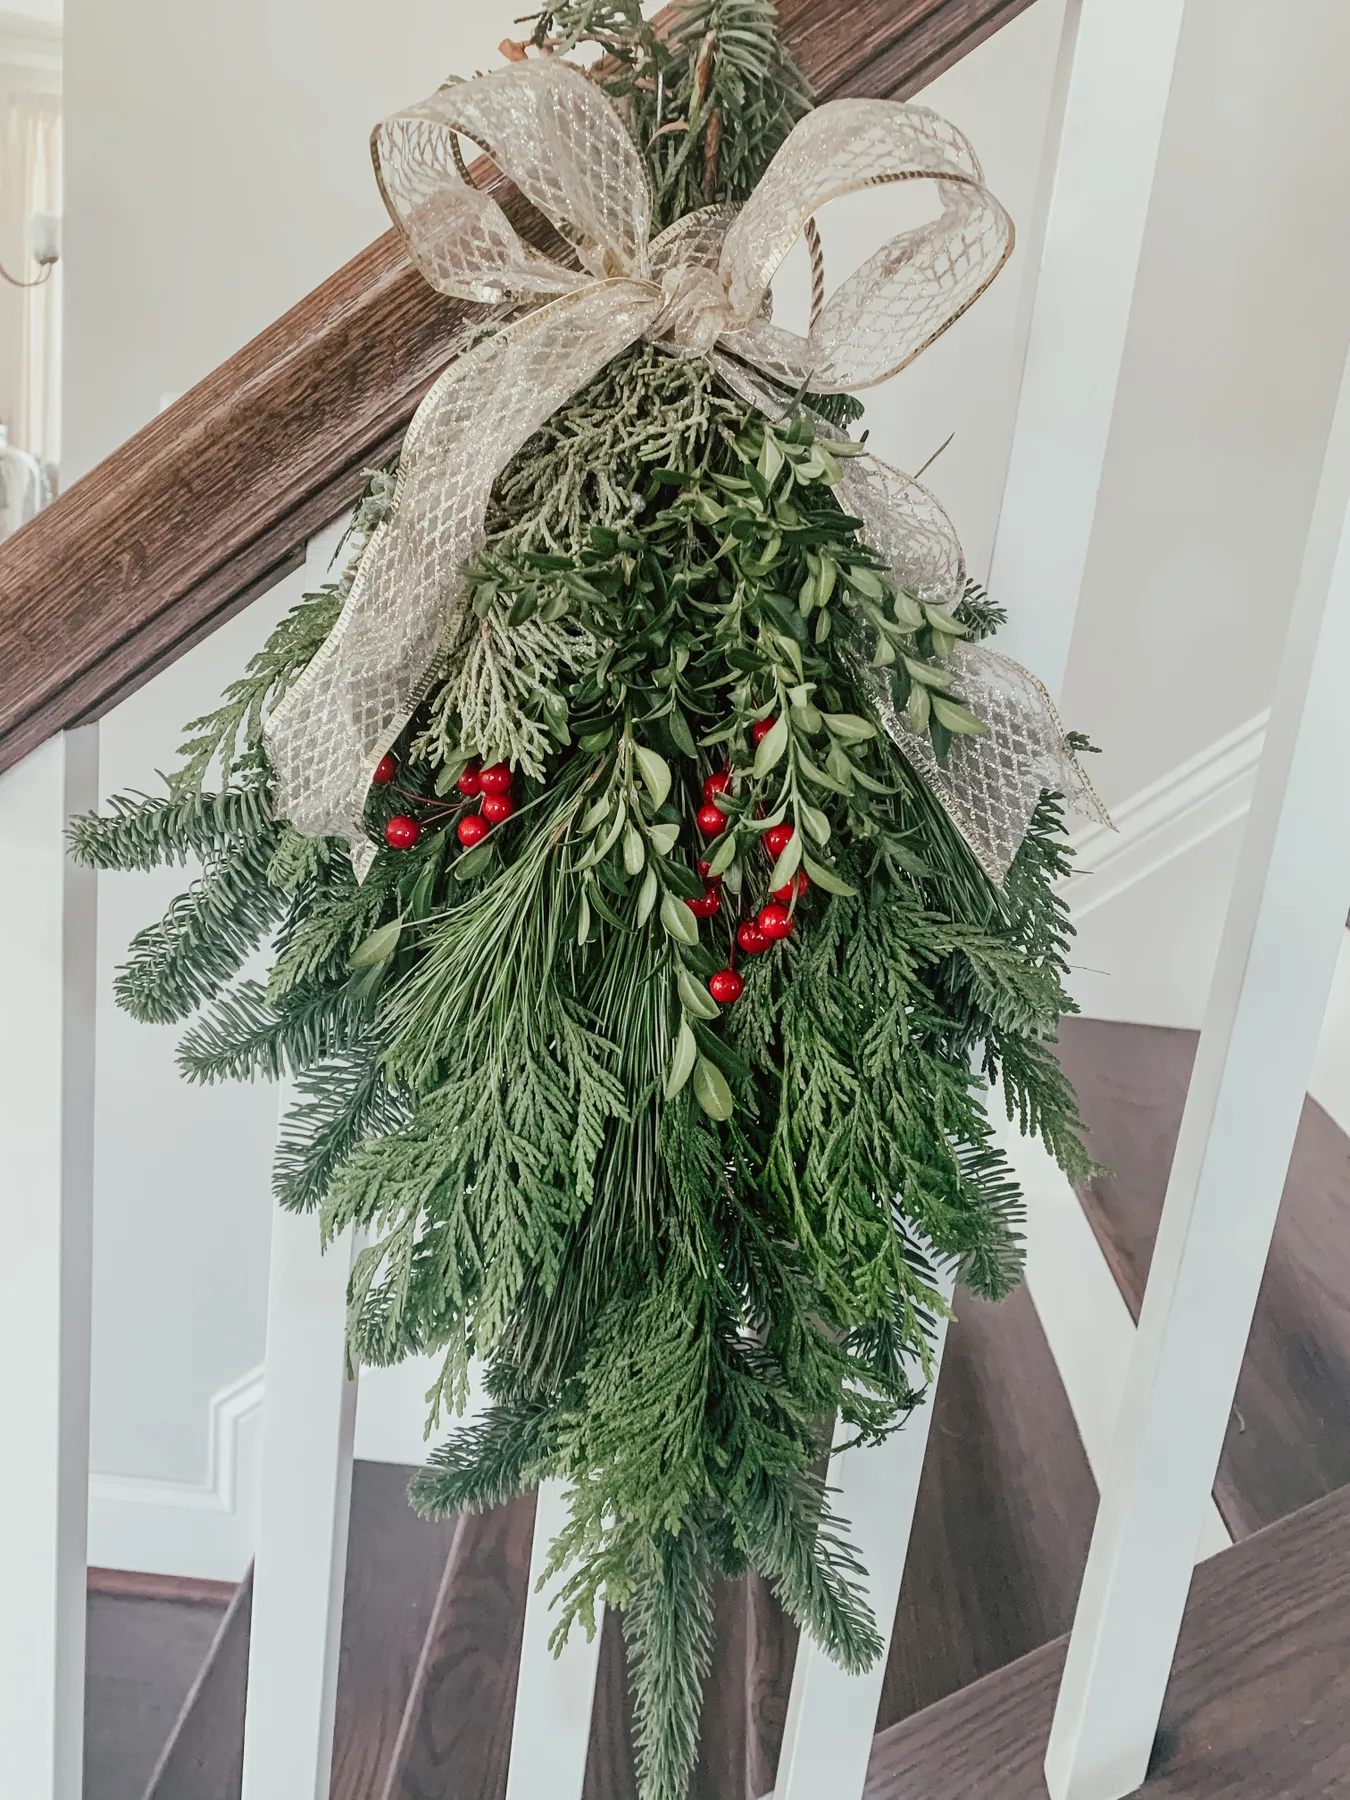
Two honest warnings. Sheer gold ribbon frays if you look at it wrong — cut the ends on a sharp diagonal and run a lighter over them for half a second to seal the weave. And when you mix real greenery with faux, the real branches dry and drop needles in about two weeks indoors while the faux stays put, so plan to pull the real stems first. Red berries can also leave juice marks on white trim, so wire them in rather than letting them rest against painted wood.
14. Mixed Greenery and Oversized Antique Bells
Three things are happening here. First, temperature mixing — cool eucalyptus greens against warm antique gold bells keeps the palette from going flat. Second, weight: the bells hang at the base of the banister, anchoring the composition exactly where your eye lands when you walk in. Third, negative space. The garland is full, but the white railing still shows through, and that’s what makes it feel fresh instead of heavy.
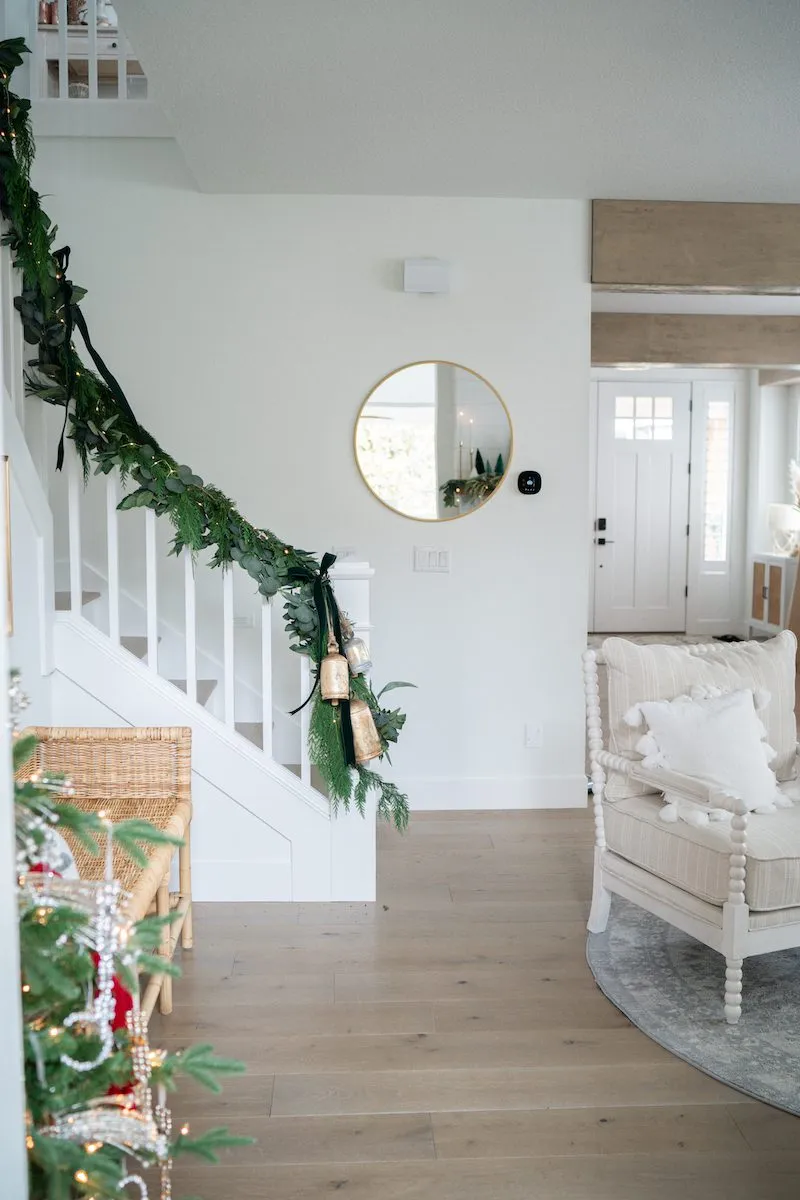
- Mixed greenery garland, 9 ft: $40–$120
- Warm white string lights: $15–$30
- Antique gold bells, three to five: $25–$80
- Black ribbon: $8–$18
- Floral wire and hooks: $10–$15
Total: $98–$263.
Now reverse-engineer it. Buy one inexpensive eucalyptus-and-pine garland, then spend your money on the bells — they’re the only piece anyone remembers, and Etsy and antique mall booths sell real vintage brass bells for $8–$20 each. Ribbon from the clearance bin, lights from last year’s box. About $60 for the same effect. It’s the identical logic behind Idea #3, where one velvet ribbon carries an entire staircase.
15. Multicolor C7 Lights and Mushroom Ornaments Over a Window
- Measure the window frame’s full perimeter — three sides only if you want an asymmetrical drape.
- Confirm there’s an outlet within cord reach, or buy a battery-operated strand.
- Check that the garland clears the window latch and any cabinet door beside it.
- Test every multicolor bulb before hanging — one dead C7 ruins the nostalgic look.
- Decide whether the garland sits on the frame or the trim; going too wide hides the molding.
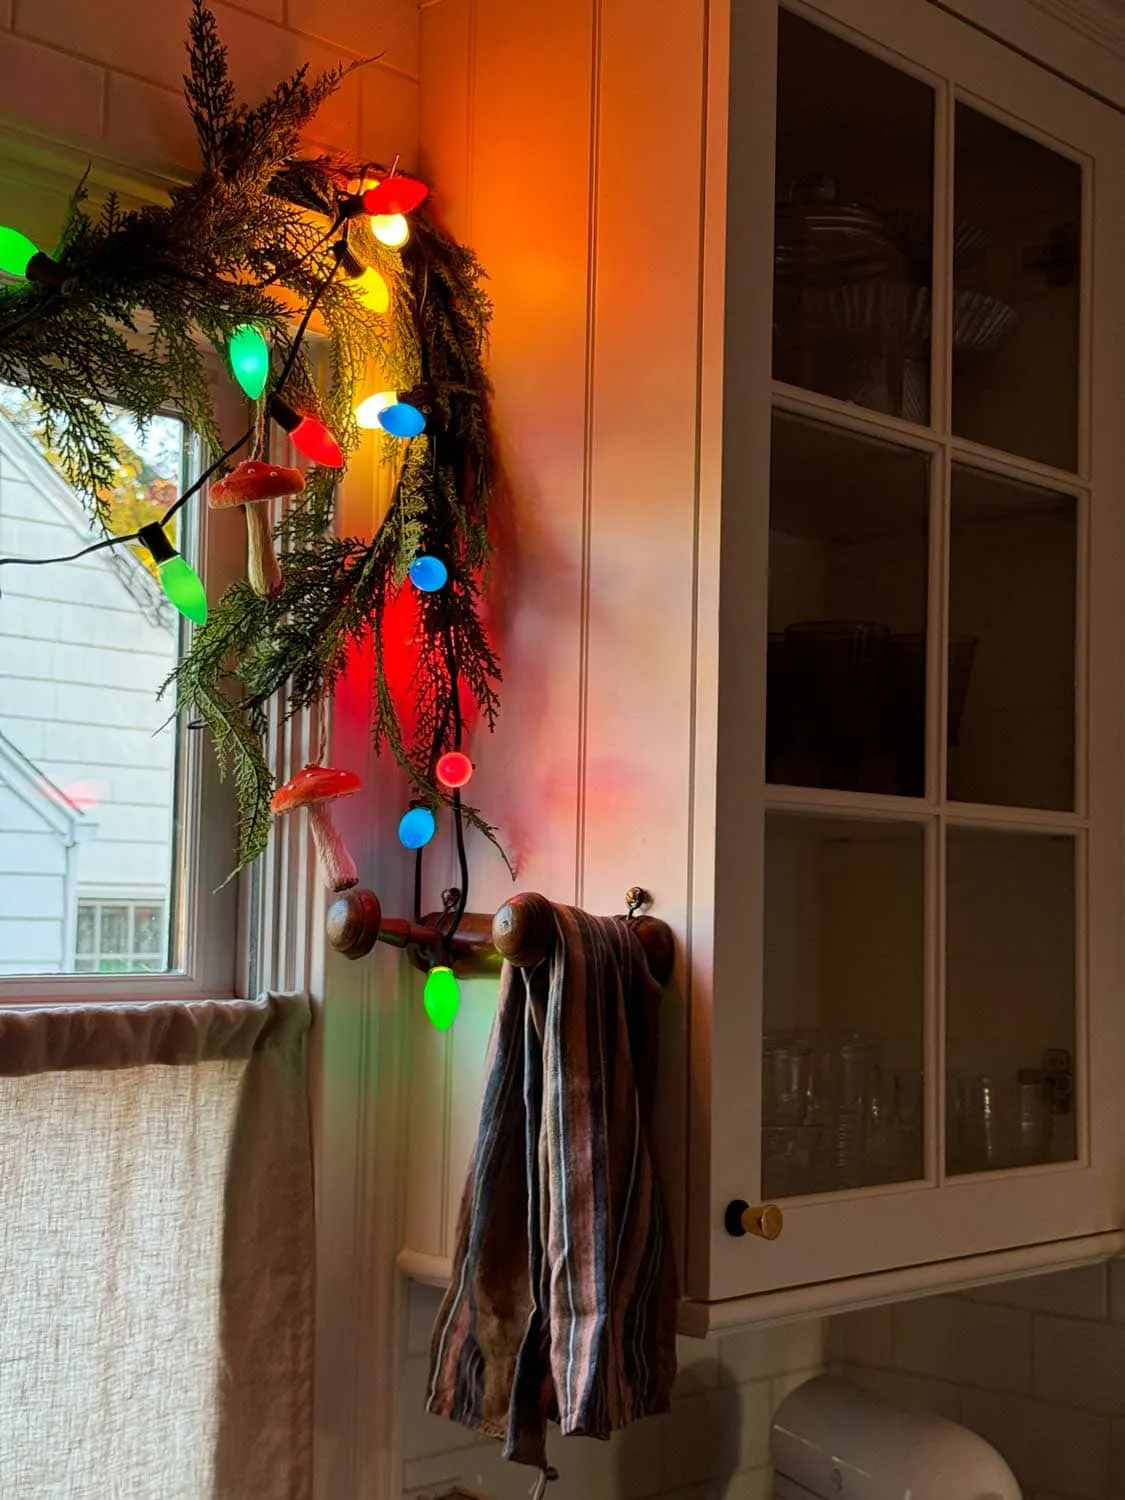
Window garlands work best on a single window at least 30 inches wide with 6–8 inches of wall above the top trim. Bigger picture windows need multiple strands and start looking like a department store, so keep this treatment for kitchens, hallways, and small rooms. If your window trim is thin or newly painted, move to a staircase or mantel setup instead — those spots offer more architectural support for heavier greenery.
16. Burgundy Velvet Ribbon with Two Brass Bells
Ribbon width should be about 40% of your garland’s diameter — a 4-inch velvet ribbon on a 10-inch strand, a 2-inch ribbon on a 5-inch swag. Any wider and the bow swallows the greenery; any narrower and it vanishes. Tie the bells with twine rather than ribbon: the rougher texture grips the garland’s wire spine, so the bells hang exactly where you put them instead of sliding down to the banister.
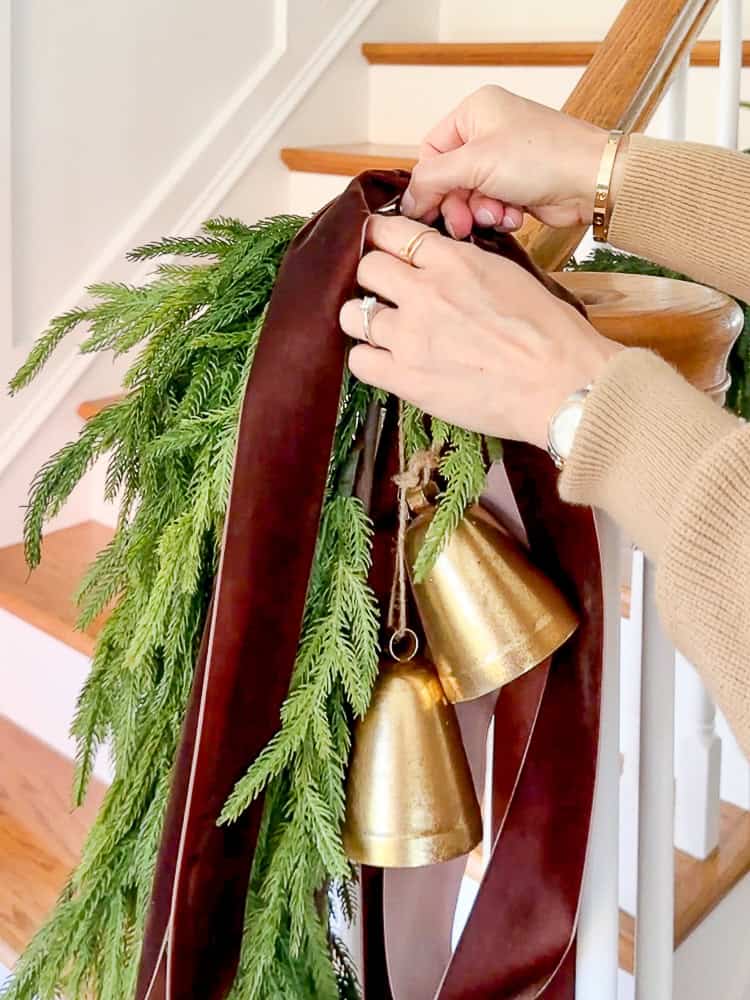
One wide band of dark burgundy velvet is the entire personality of this garland. No ornament clusters, no berry sprays, no glitter — just ribbon and two brass bells, which is precisely why it looks expensive. Remove the ribbon and you’d have an unremarkable strand of faux pine on a stair rail. The lesson generalizes: when you can’t afford volume, buy one very good ribbon and let it do all the talking.
17. Red Velvet Bows Topped with Clustered Gold Ornaments
The ornament clusters are what make this staircase look expensive, and they’re the cheapest part. Buy a $10 box of assorted shatterproof ornaments at Walmart, group five to seven by size, then hot-glue or wire them into a single cluster before attaching it. A $6 can of matte brass spray paint turns a mismatched box of dollar-store balls into one cohesive set. Total for six clusters: under $30.
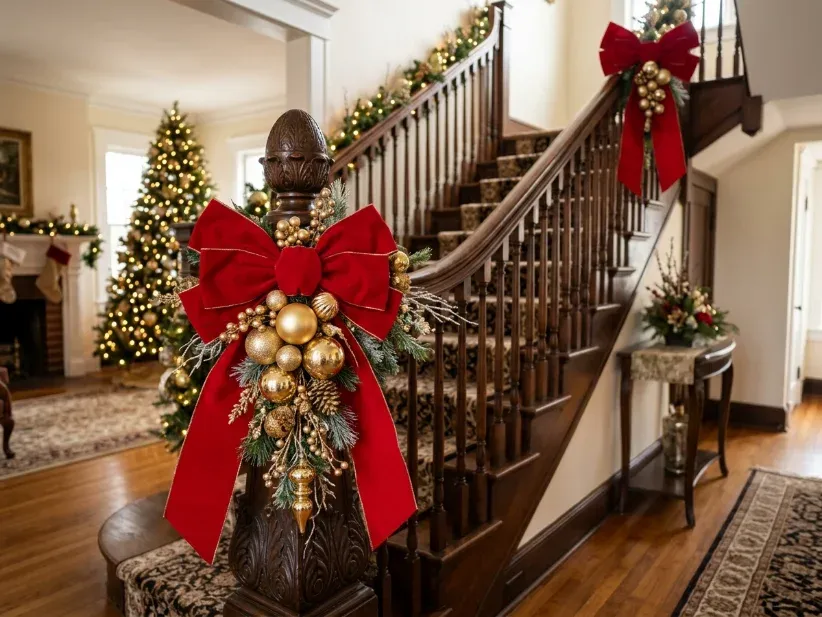
- Sort ornaments into piles by size: large, medium, small.
- Thread a 10-inch piece of floral wire through the caps and twist them together into one bouquet.
- Add one pinecone and one berry spray to the back of the cluster for depth.
- Wire the cluster to the garland’s spine right behind the bow, not in front of it.
- Fan the ornaments outward so none of them hides behind another.
Time: 15 minutes per cluster. Cost: $5–$8 each.
18. Pinecones and Warm Lights on a Plain Wooden Mantel
This is the garland you can actually keep up. Faux evergreen with pinecones needs almost nothing: dust it twice a season with a hair dryer on cool, and store it in a lidded bin rather than a garbage bag so the stems don’t crush. Pinecones shed scales over time — a light coat of clear matte sealer stops that and darkens them slightly. Expect to replace the string lights every three or four years; LED sets last longer, but the wiring is usually what fails.
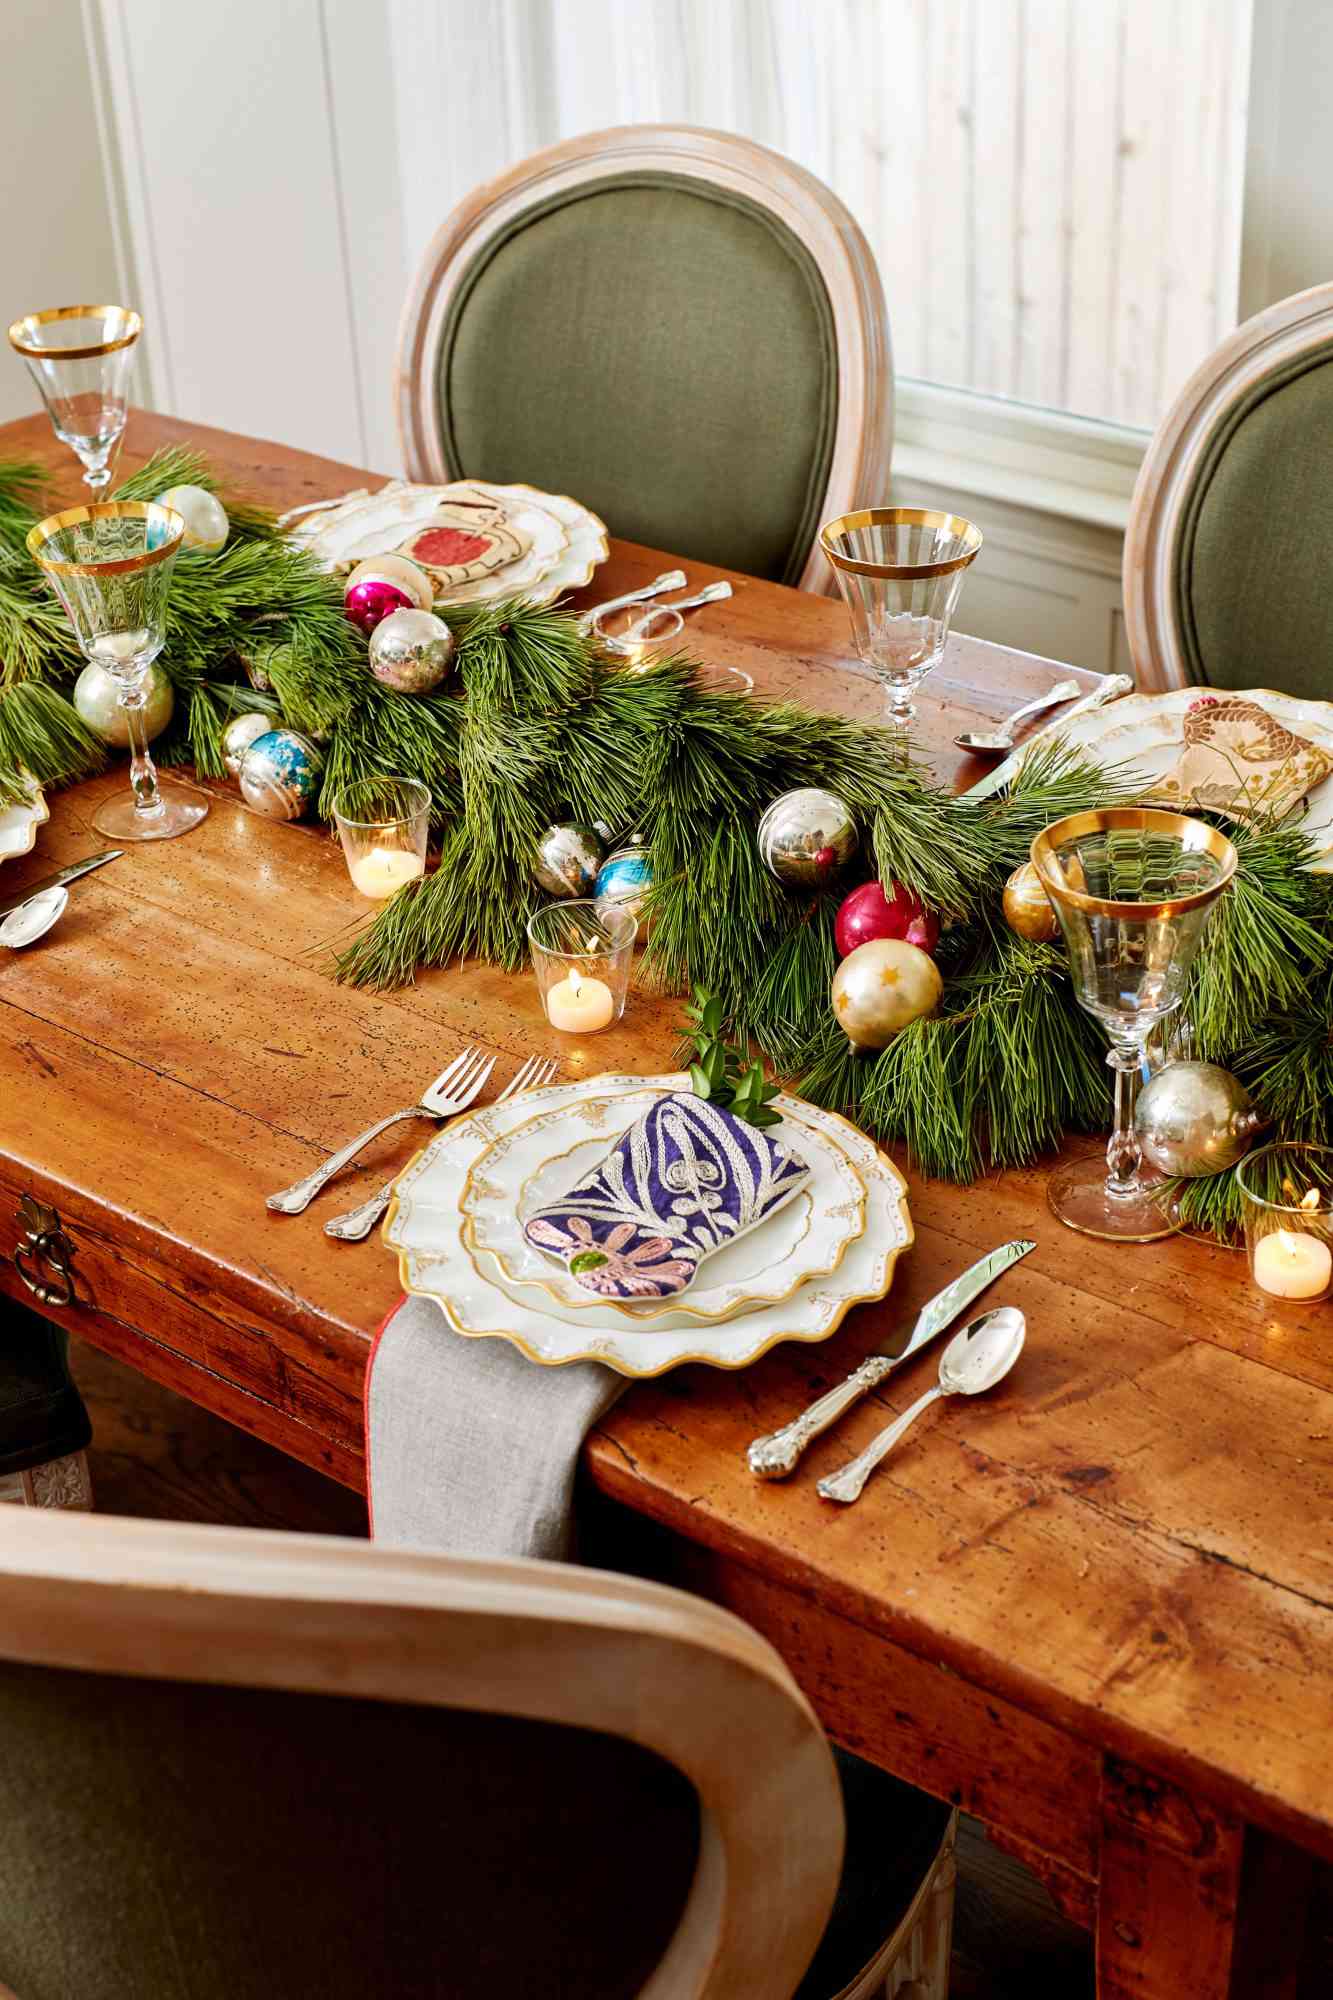
There’s no trick here, and that’s the point. A wooden mantel, a dense garland, pinecones, warm lights — three colors, all organic shapes, nothing competing. What keeps it from being boring is the density of the garland itself and the warmth of the bulbs, which sit around 2700K. Most cheap-looking holiday garlands are simply thin garlands with cool white lights.
- Dense faux evergreen garland, 9 ft: $25–$90
- Warm white LED string lights: $12–$25
- Pinecones, bag of 12: $8–$18
- Floral wire and hooks: $10
Total: $55–$143. Budget alternative: thrift a garland in November for $8 and respray pinecones you already have.
19. Cream and Gold Bows Where You’d Expect Red
Cream ribbon looks serene in photos and slightly fussy in real life — it shows every fingerprint and yellows if you store it in a hot attic. Buy ribbon you can spot-clean, or accept that these bows might be a one-season purchase. The other catch is contrast: on a dark handrail, cream reads as a bright stripe down the whole staircase, so keep the ornaments matte so nothing glares. It’s a lovely look, just less forgiving than the red version in Idea #5.
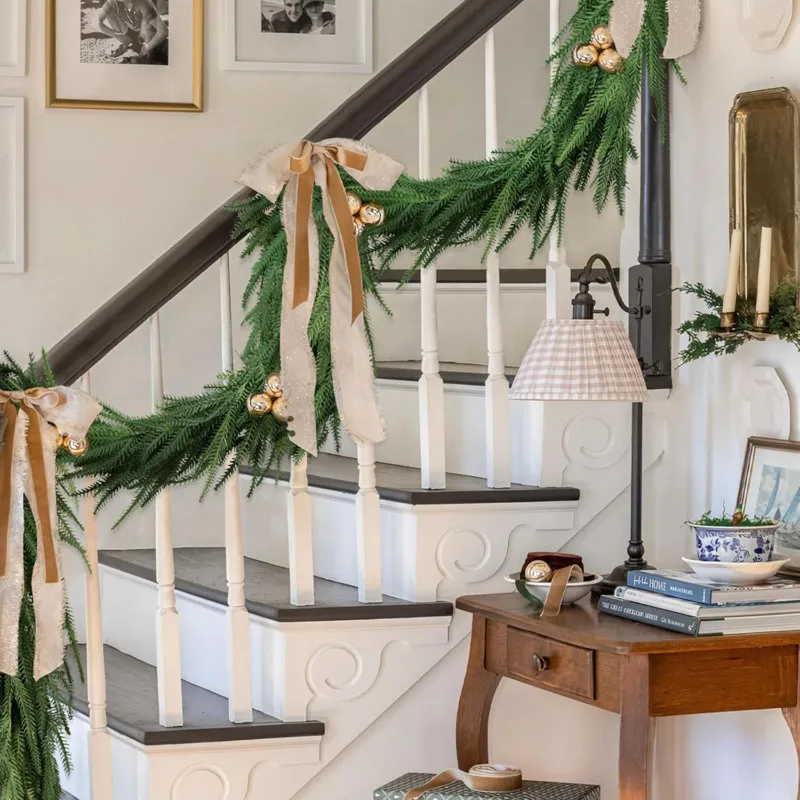
The breakdown is roughly 60% evergreen, 25% cream ribbon, 10% matte gold baubles, 5% dark wood showing through. In a low-contrast palette, proportion matters more than usual — push cream above 30% and the staircase starts looking bridal rather than festive. Swap the cream for charcoal velvet and the matte gold for pewter, and you have the same garland in a completely different register.
20. A Santa Garland and Vintage Sleigh at the Front Door
Garland around a door wants a strand about twice the door’s width plus 24 inches — roughly 10 to 12 feet for a standard 36-inch door — and it should sit far enough from the frame that the door swings freely. This narrow-entry format suits a small 5-by-8-foot foyer. If you’re working with a wide double door or a long porch, scale up rather than adding a second strand; one thick garland beats two thin ones every time.
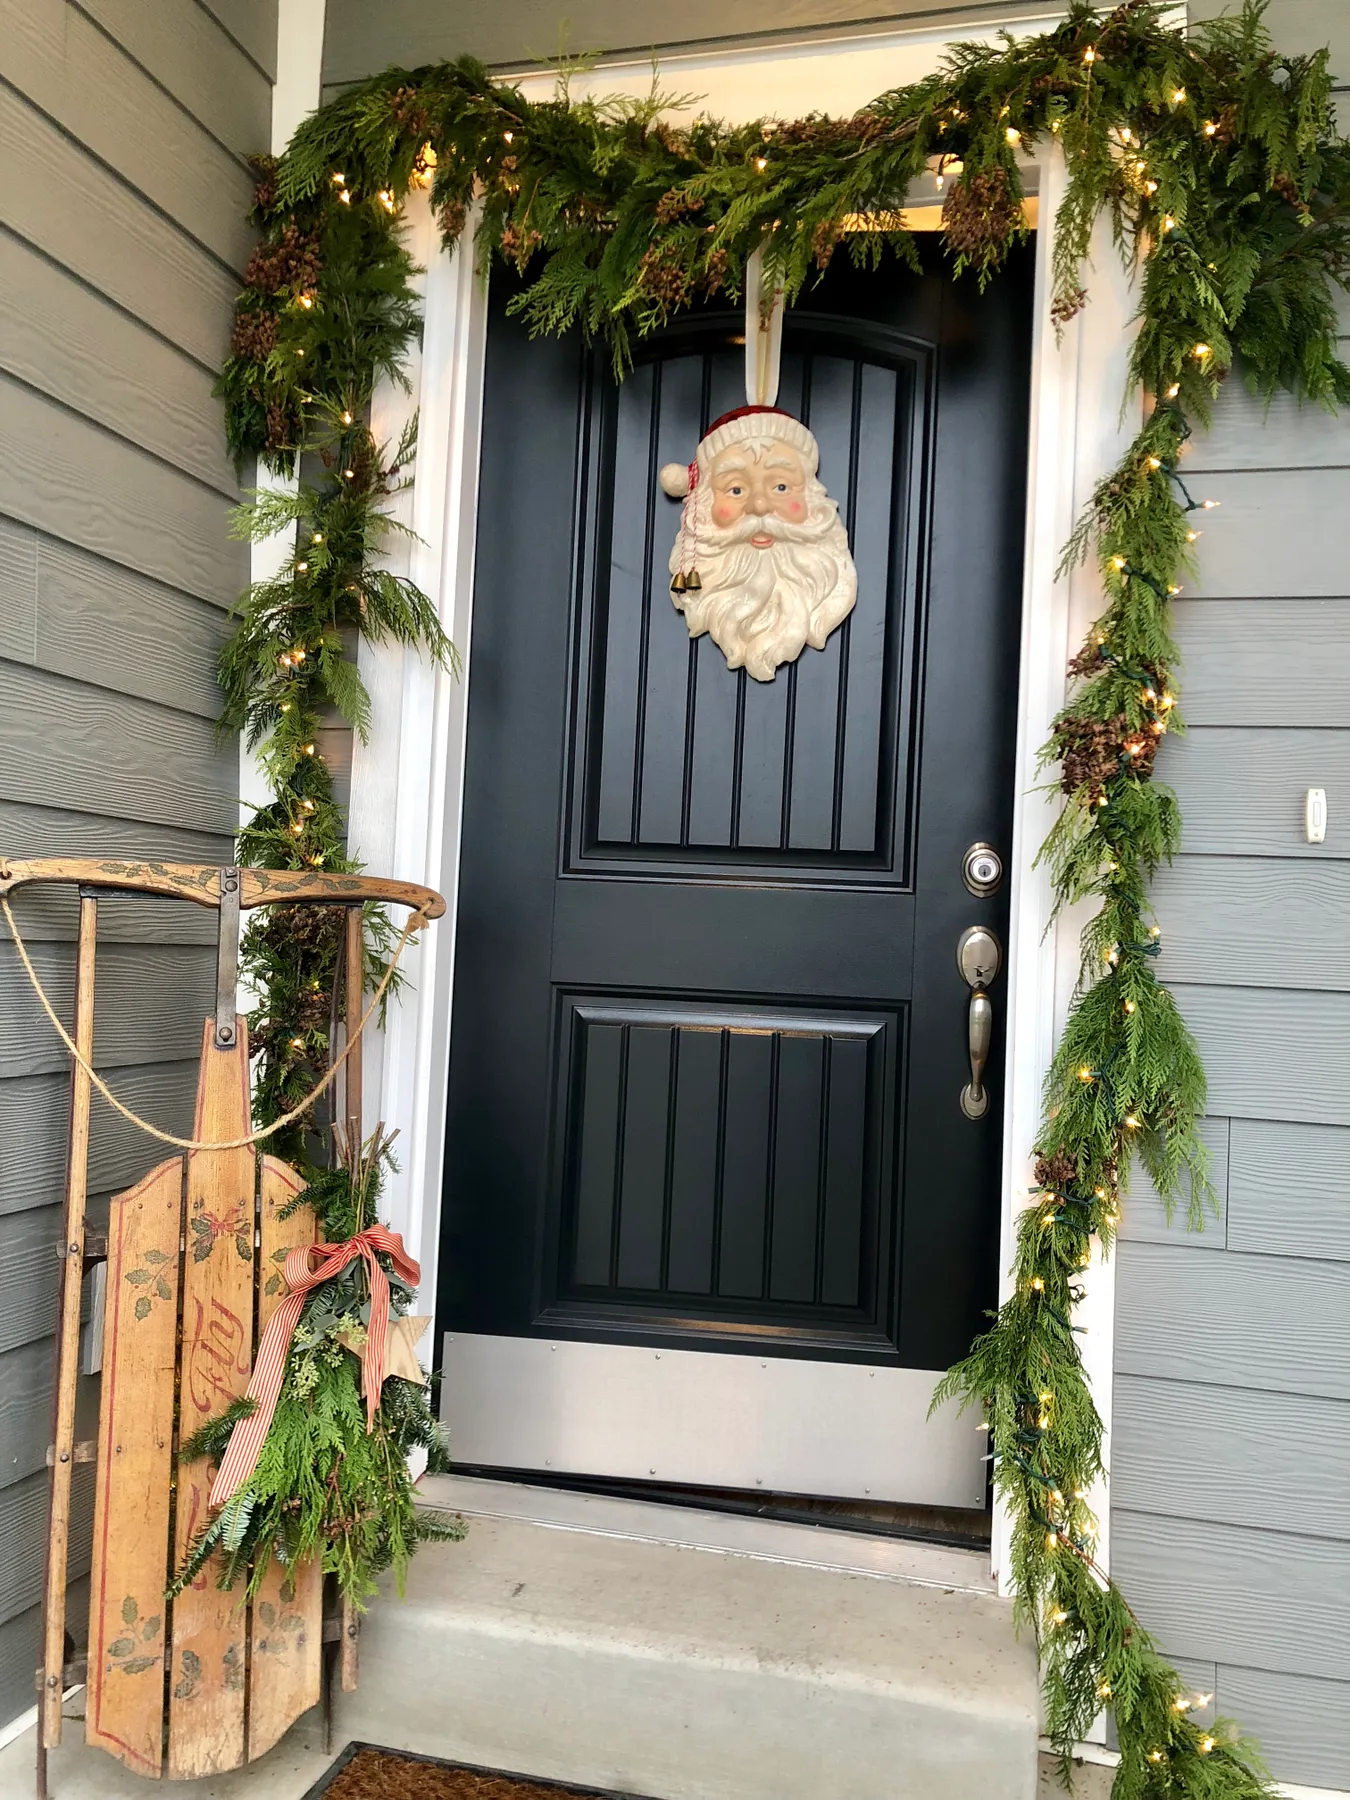
The shape matters more than the decorations. Go asymmetric, with about two-thirds of the greenery hanging down the hinge side and a short tail on the other — it’s the rule of thirds applied to a doorway, and it makes a store-bought strand look custom. For hanging weight, use two over-door hooks and run a thin wire along the garland’s spine so the load spreads evenly instead of pulling at the first branch.
21. Pine and Red Berries Over a White Marble Fireplace
- Pine-and-berry garland, 9 ft: $35–$95
- Brass-framed rectangular mirror: $80–$260
- White pillar candle and brass holder: $18–$45
- Brass bookends and books: $25–$60
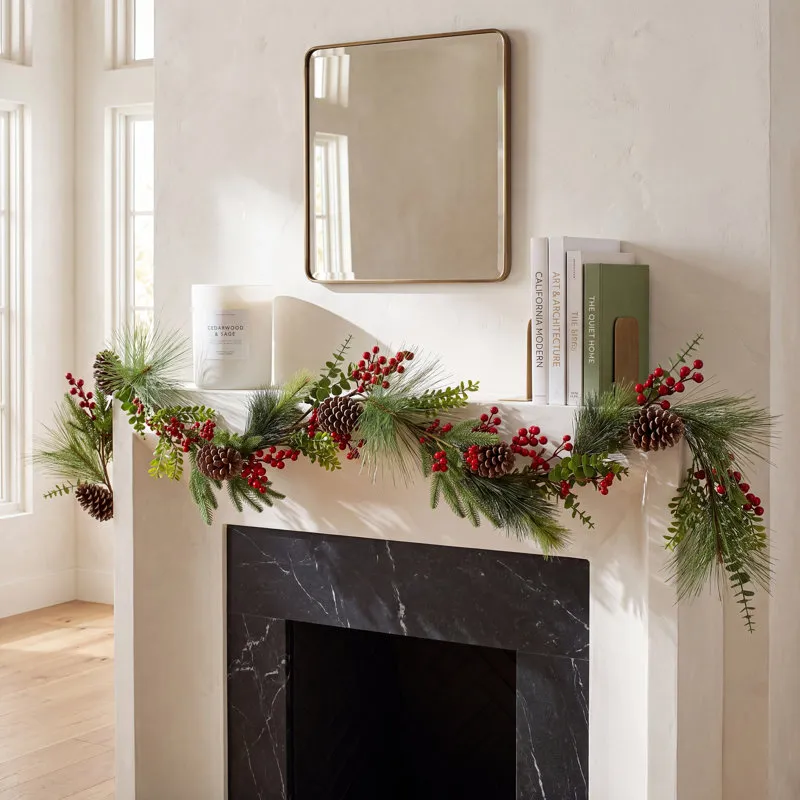
Total: $158–$460. Budget alternative: keep the garland and mirror, and shop the accessories secondhand — thrifted brass cleans up with lemon juice and a rag.
It’s a 90/10 composition: 90% restraint, 10% red. The garland carries one red accent family — berries — and everything else stays green, white, black, and brass. That’s why three tiny red clusters read as festive instead of themed. Apply the same math to a different palette: swap berries for pale blue thistle, or for clusters of small gold bells, and the mantel keeps its calm.
22. A Loose, Wispy Pine Needle Drape
The un-wired garland is having a moment. Instead of a dense, uniform strand, this look is built from long pine needles left loose and slightly uneven, so air moves through it and the shape never repeats itself. It’s part of a broader turn away from perfectly styled holiday decor toward things that look gathered by hand. The upside beyond the aesthetic: it’s nearly impossible to get wrong, because imperfection is the design brief.
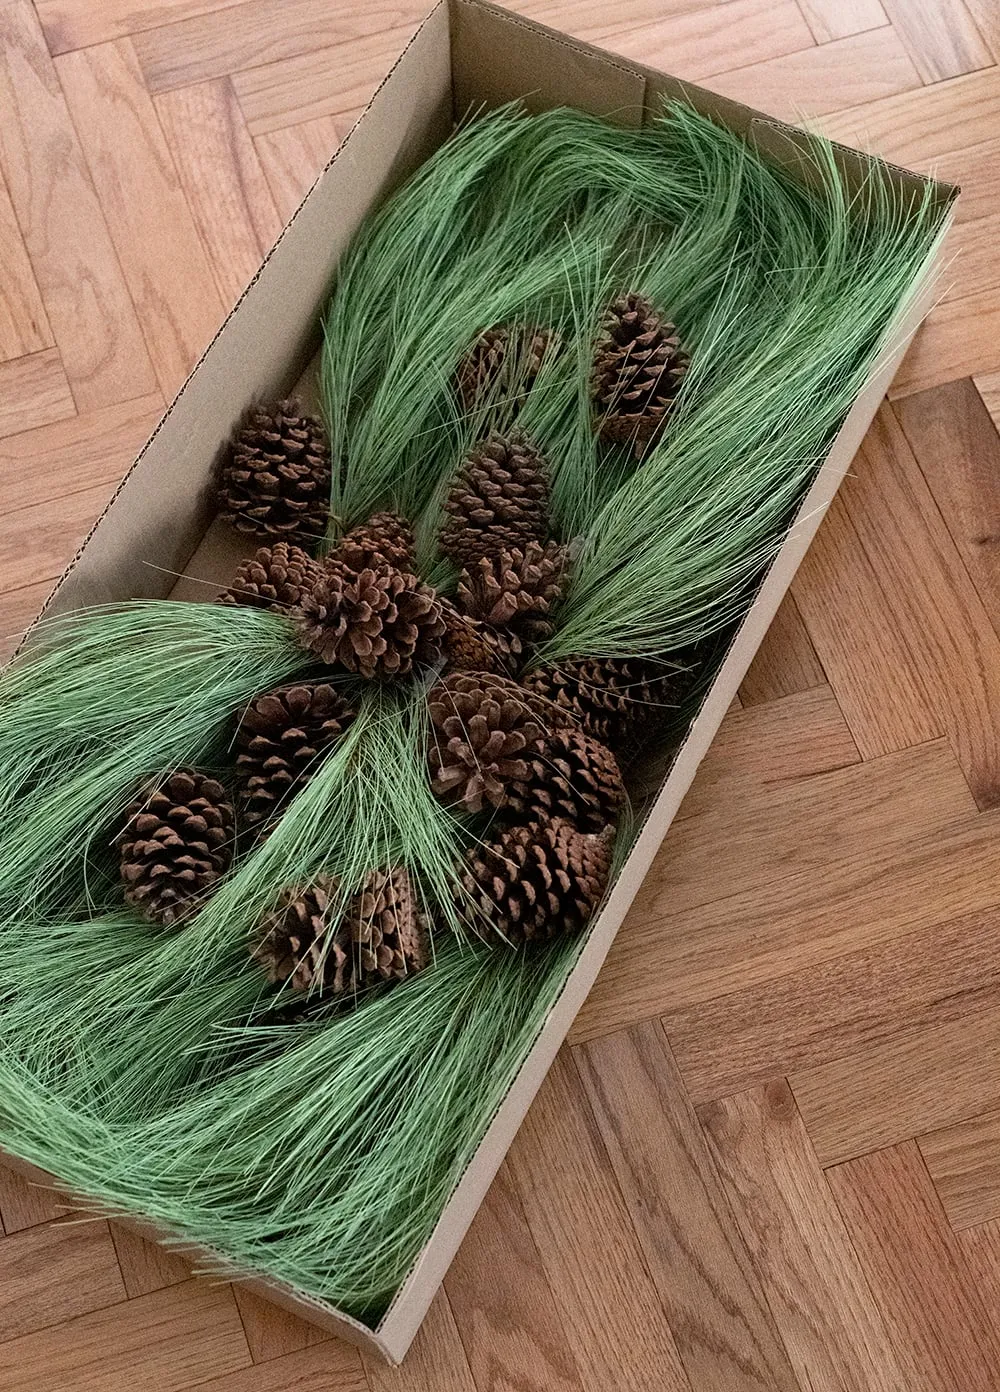
This is the cheapest garland in the entire article, because it’s mostly air. A bundle of long-needle pine from a tree lot runs $8–$15, and with real branches you can wire three bundles into a 6-foot drape in under ten minutes. Faux versions are worth it if you want to reuse them — look for wording like wispy or long needle and skip anything described as full. Two loose strands layered beat one dense one here.
23. Star Cutouts, Gold Bows, and a Cascading Blue Ribbon
- Hang the garland first, then step back and find where the cascade should begin — usually a quarter of the way in from one end.
- Pin three to five ribbon lengths at the spine, each 6–10 inches longer than the last.
- Let each length fall straight down before you release it; don’t fan them out.
- Trim the tails into soft diagonals at different heights.
- Add the star cutouts last, spacing them 4–6 inches apart along the front branches.
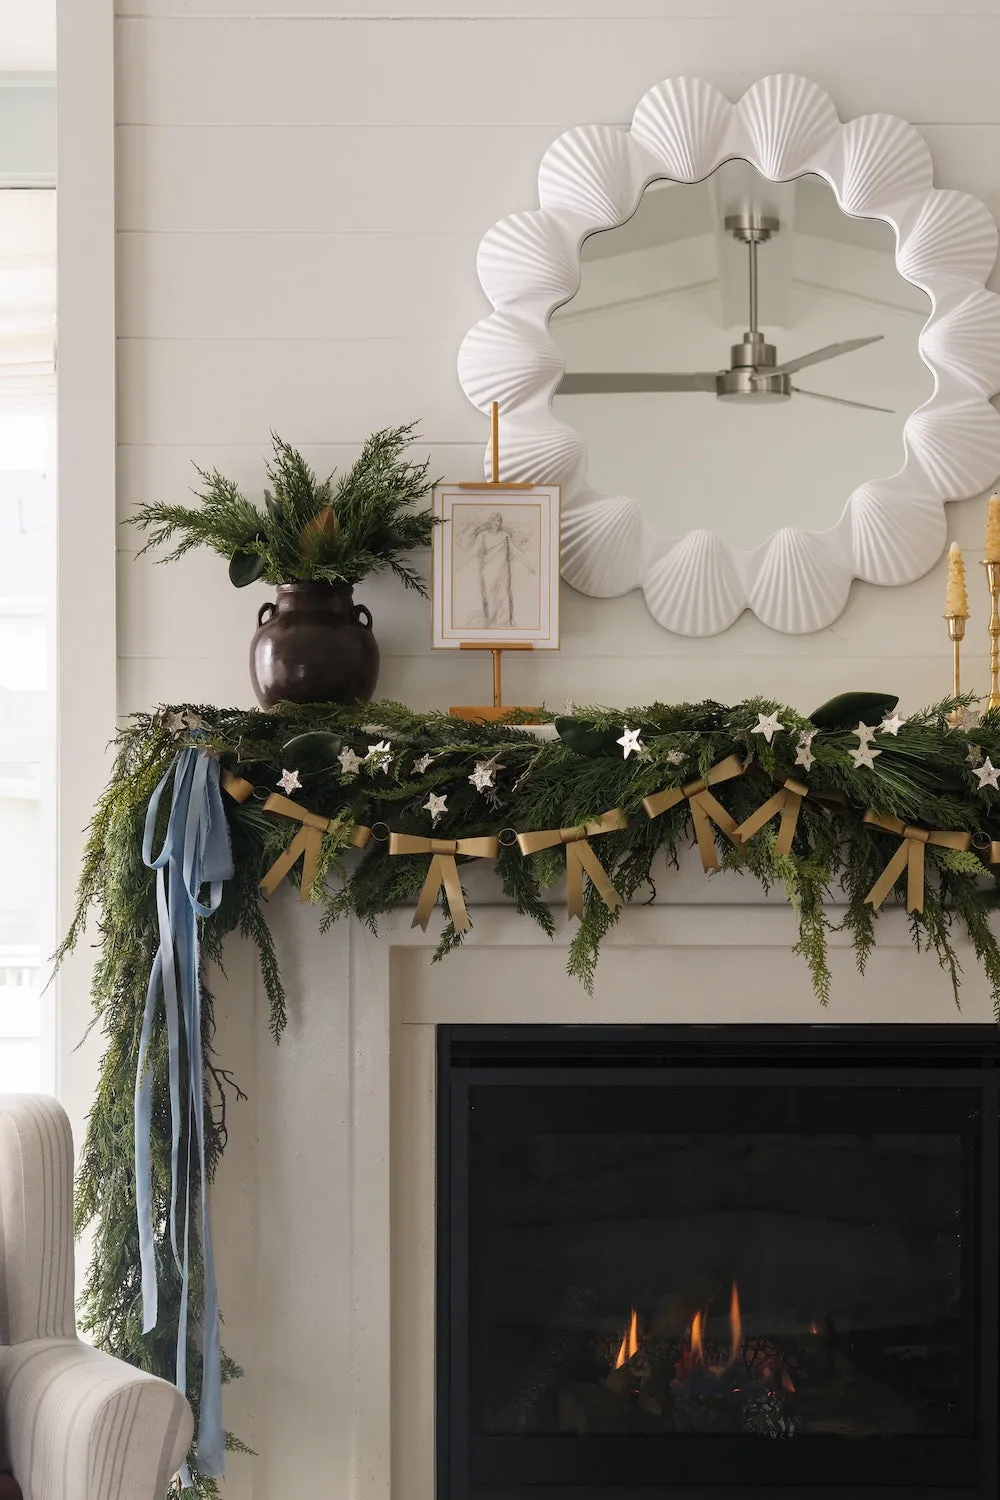
Time: 30 minutes. Cost: $15–$30 for ribbon and cutouts.
Two things to watch. First, cascading ribbons hang in front of whatever else is on the wall, so over a mirror you’re covering part of your own reflection — fine above a mantel, annoying above a console. Second, shiplap plus nails equals visible holes; use adhesive hooks rated for the weight and keep the cascade under about two pounds. Blue ribbon also photographs cooler than it looks in person, so check it under your actual evening lighting before you commit.
24. Red Velvet Ribbon and Three Gold Jingle Bells
The garland itself is simple — dense evergreen, one wide red velvet ribbon, three gold bells. What makes it work is placement. The bells hang at different heights instead of in a row, which reads as accidental even though it isn’t, and the ribbon sits slightly off-center so the composition isn’t split in half. Below, the herringbone tile inside the firebox gives the eye a second, smaller pattern to rest on while the fire does its thing.
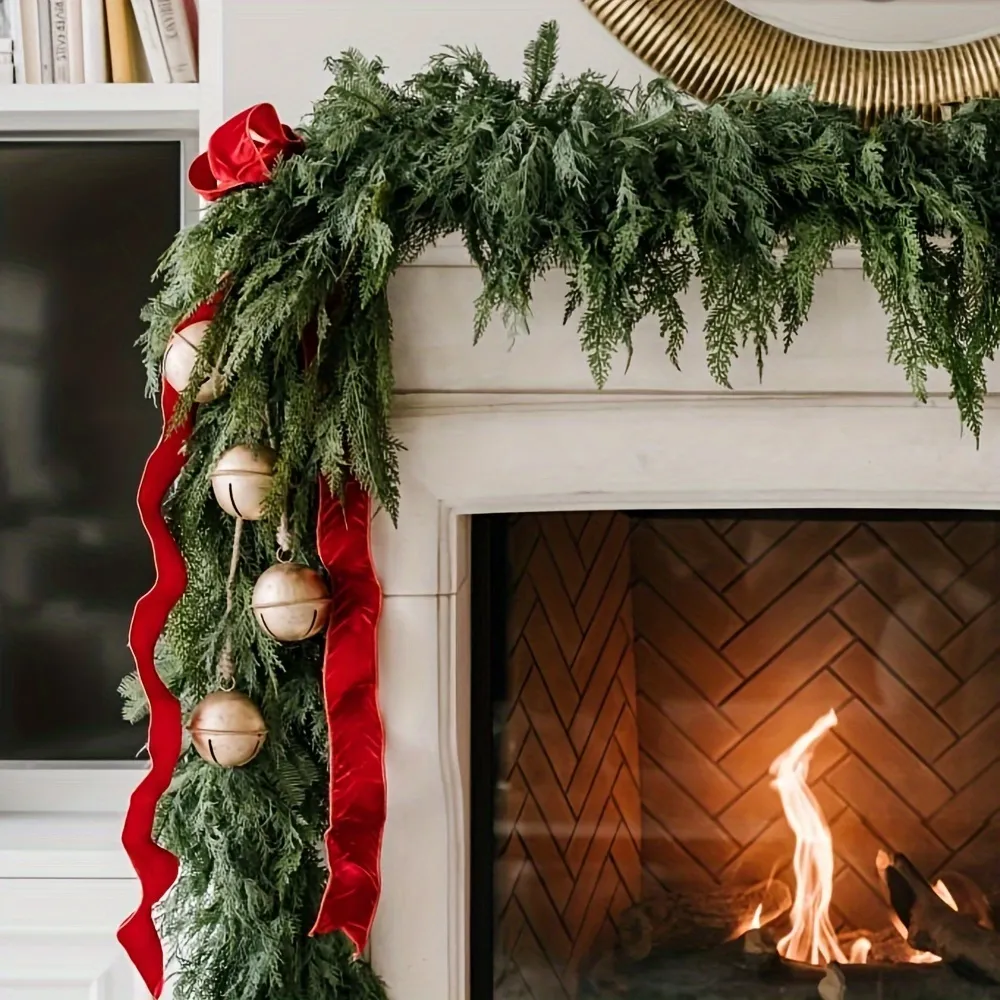
The wide red velvet ribbon is the one element holding this together. Everything else in the scene is matte — the greenery, the white mantel, the stone — and the ribbon is the only surface that catches light and shows a fold. Remove it and you still have a beautiful fireplace, just a quieter, more everyday one. Velvet behaves differently than satin here: it absorbs light instead of bouncing it, which is why it reads rich rather than shiny.
25. A Garland Running the Whole Length of the Table
- Measure the table’s length and plan for the garland to overhang one end by 12–18 inches.
- Confirm the garland is faux or sealed — sap and needles on a tablecloth is a real problem.
- Check candle clearance: flames need 12 inches of open air above them.
- Count place settings first; the garland should sit between them, not on top of them.
- Test your tablecloth color against the greenery under evening light, not daylight.
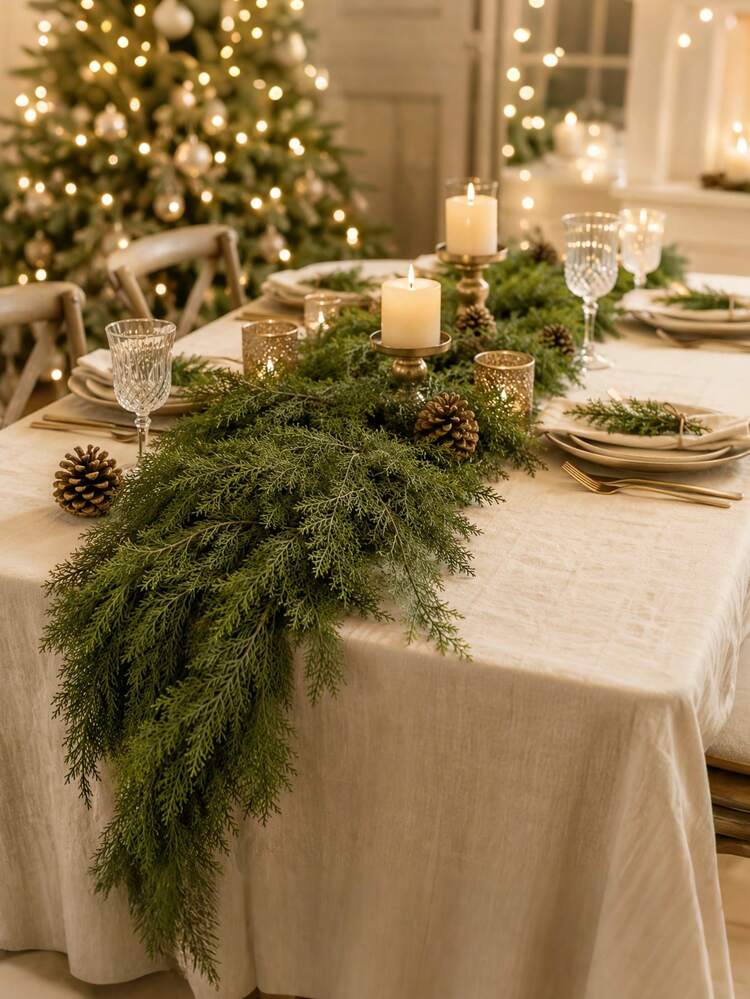
This works on any table 60 inches or longer — below that, the garland eats the place settings and nobody has room for a fork. On a 72- to 84-inch table you can run it the full length and let one end spill over; past 96 inches, consider two shorter drapes with a gap in the middle so guests can see each other. Low ceilings call for low candles, or the flames glare in everyone’s eyes all dinner.
26. Grapevine Loops with Frosted Pinecones and Berries
Grapevine is stiff, so shape it before you decorate: soak the loops in a bathtub for 20 minutes, bend them into the curve you want, and let them dry overnight. They’ll hold that shape for years. When you add pinecones and berries, wire them to the vine itself rather than the needles — vine is load-bearing, needles aren’t. And keep string lights to about a 100-bulb set per 9 feet; more than that and the rustic character disappears under the glow.
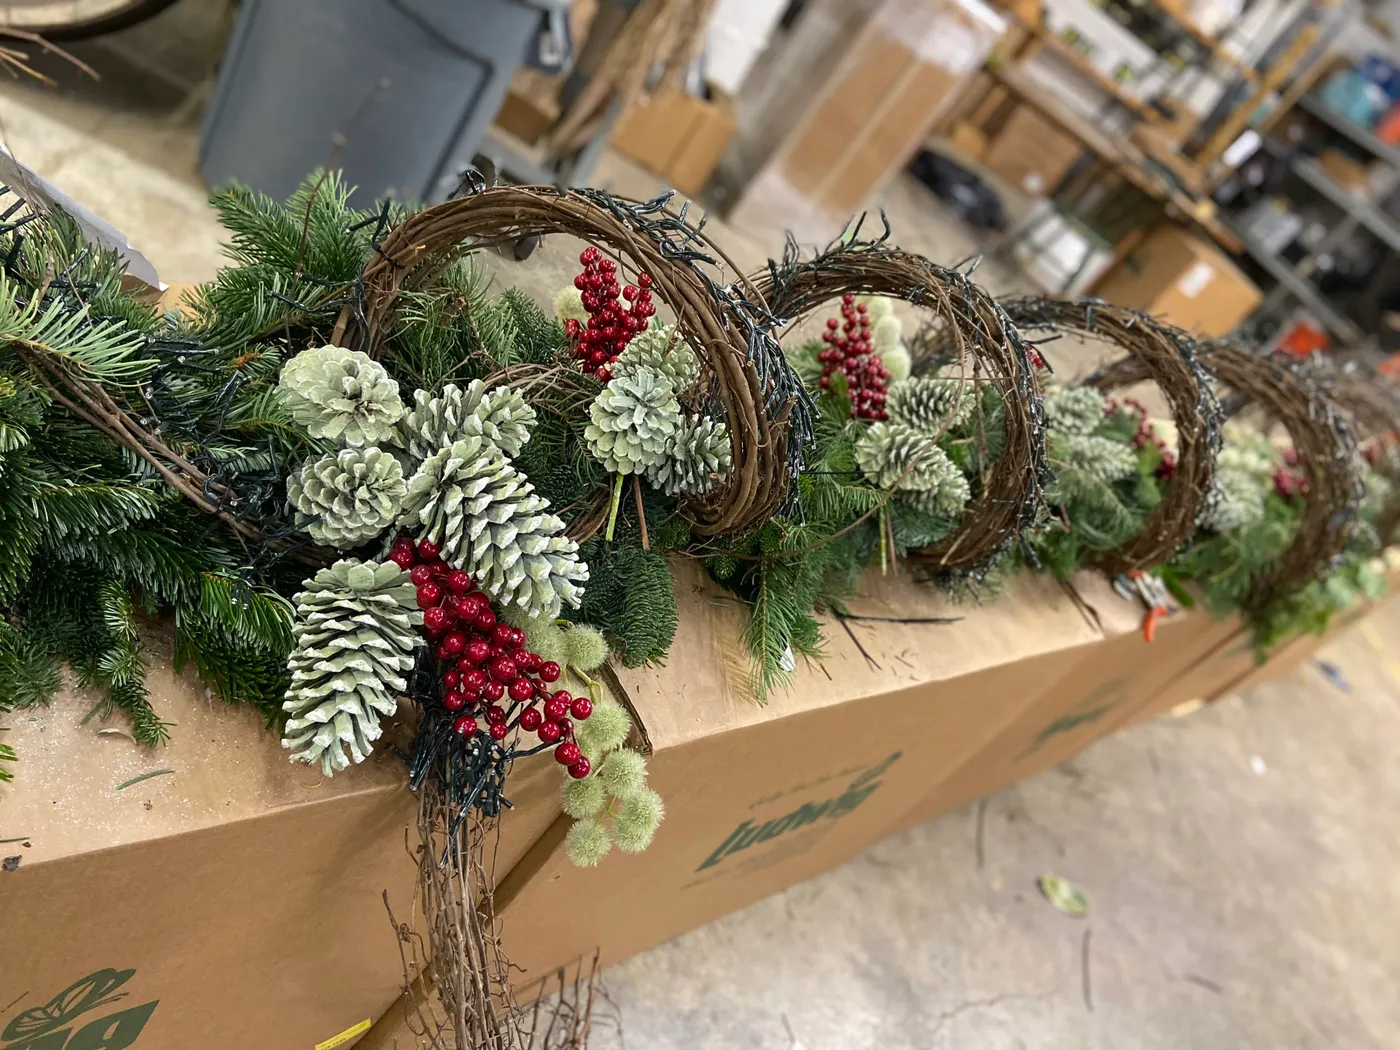
The formula is roughly 55% brown grapevine, 25% dark green needles, 10% frosted pinecones, 7% red berries, 3% fuzzy green accents, plus a light layer that doesn’t really count as color. The brown base is what makes this read rustic instead of traditional — you’d get the same ratio by swapping the vine for a thick plaid ribbon. And frosted elements give you a soft snowy white without introducing actual white.
27. One Long Illuminated Garland Across Three Mantels
- Illuminated garland, three 9-ft segments: $150–$450
- Red berry sprays, bulk pack: $20–$50
- Gold ribbon or ready-made bows: $15–$40
- Command hooks and floral wire: $15–$25
- Red berry cone decoration: $40–$120
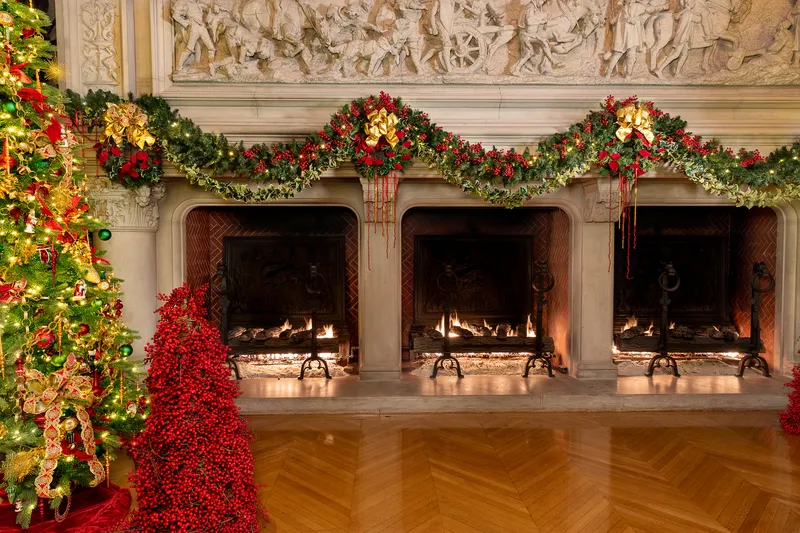
Total: $240–$685. Budget alternative: three inexpensive garlands twisted in pairs plus your own lights — about $110 total.
With three fires burning and a long run of lights, this is the most upkeep-heavy look in the article. Check every connection monthly; one failed plug kills a whole segment, and LED sets fail at the plug more often than at the bulb. Keep garland at least 36 inches from any firebox opening unless you’ve confirmed the manufacturer’s clearance, and unplug everything before bed. Real greenery here will need replacing every 10–14 days.
- Divide the run into segments matching your garland lengths, and mark each hook point with painter’s tape.
- Attach the hooks to the wall or mantel first, spacing them every 18 inches.
- Wire each segment to its hooks, then hand-tie the joints so the seams disappear.
- Add ribbon and berries only after all the segments are joined.
- Plug in and walk the full length once to hunt for dark spots.
Time: 2–3 hours for the full run. Materials: about $30 in hooks and wire.
28. Fresh Evergreen Tied Down with Dark Red Tassels
Fresh garland is cheaper than people assume if you buy it in the right place. Tree lots and farm stands sell 20-foot bundles for $25–$40 in the first two weeks of December — roughly a third of what a florist charges for the same length, because you’re doing the tying. Add a spool of dark red tassels or ribbon for $10 and you’re done for under $50. Bonus: the whole thing goes in the compost in January.
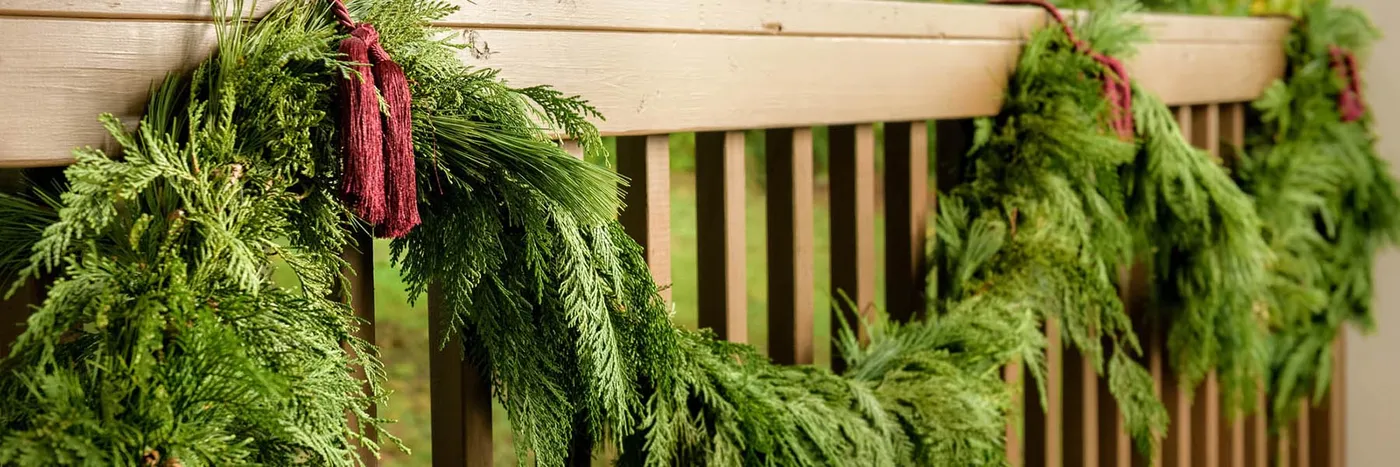
The tassels are a smarter choice than they look. Because fresh garland has to be tied down every 18 inches or so to keep its shape, most people end up with visible zip ties or twine — this design turns the fastening into the decoration. Same story with the mixed foliage: long pine needles give height, feathery branches give softness, and the contrast between them is what makes it read as gathered rather than purchased.
29. Stockings, Warm Lights, and a Lit Tree by the Fire
The classic setup has one real hazard: stockings hung right over an active fire. If that fireplace is going to be lit, either move the stockings to another wall or keep them well above the firebox opening — most stockings in photos like this are on a mantel that isn’t actually in use. Mind the tree, too: a live tree needs to stay at least three feet from any heat source, and a dry tree near a fire is the fastest way to ruin December.
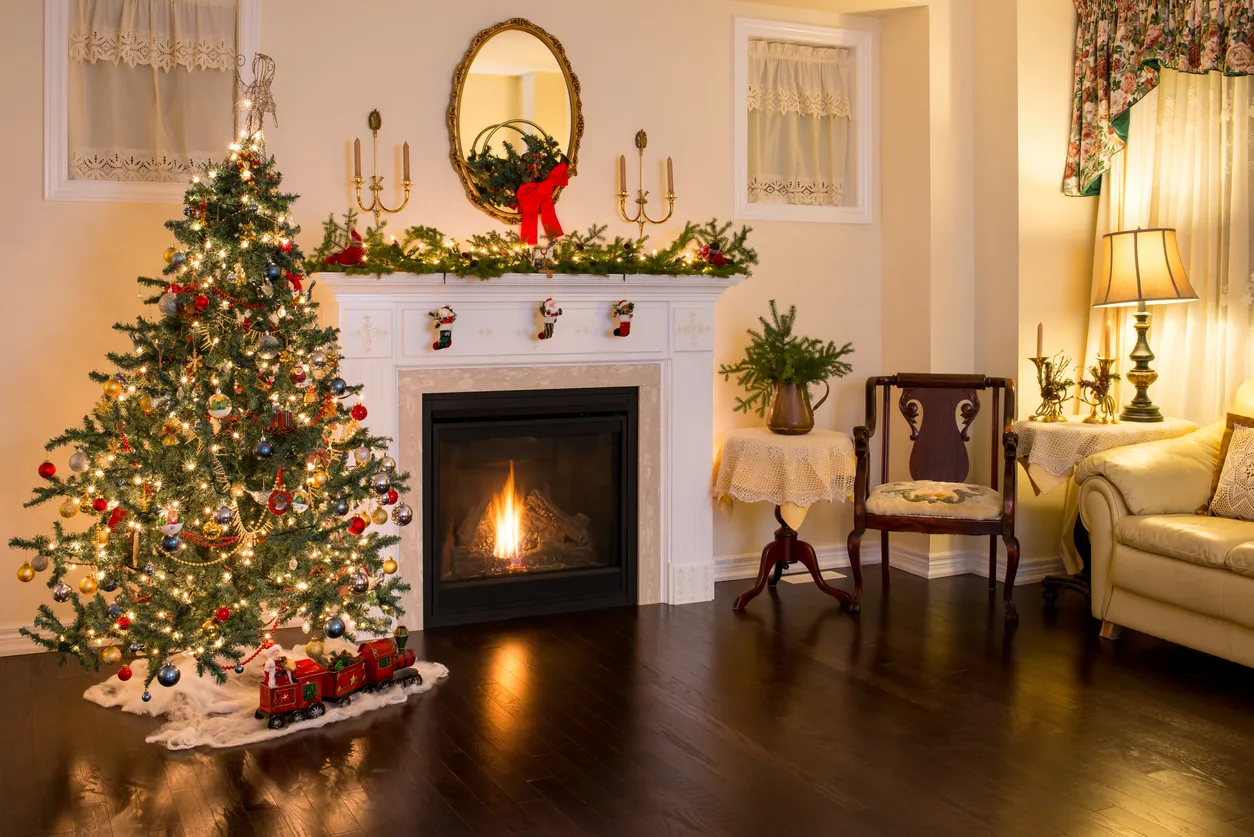
The reason this mantel looks full instead of cluttered is that the garland, the lights, and the stockings all sit at different depths. Push the greenery back against the wall, let the lights sit mid-depth, and hang the stockings so they’re the closest thing to the camera. Three planes, one composition. When everything sits flush, the mantel flattens into a single stripe no matter what you spent on it.
30. Frosted Stems and Golden Velvet Ribbon, Added by Hand
This is the upgrade path for a staircase you’ve already decorated. A pre-lit 9-foot garland handles a railing up to about 12 feet; past that, join two with wire and hand-tie the seam. Frosted stems and ribbon add roughly 30% more visual bulk, so keep this treatment on staircases with at least 34-inch-wide treads and open sightlines — in a narrow stairwell it starts to feel crowded in a way the slimmer garland in Idea #16 never does.
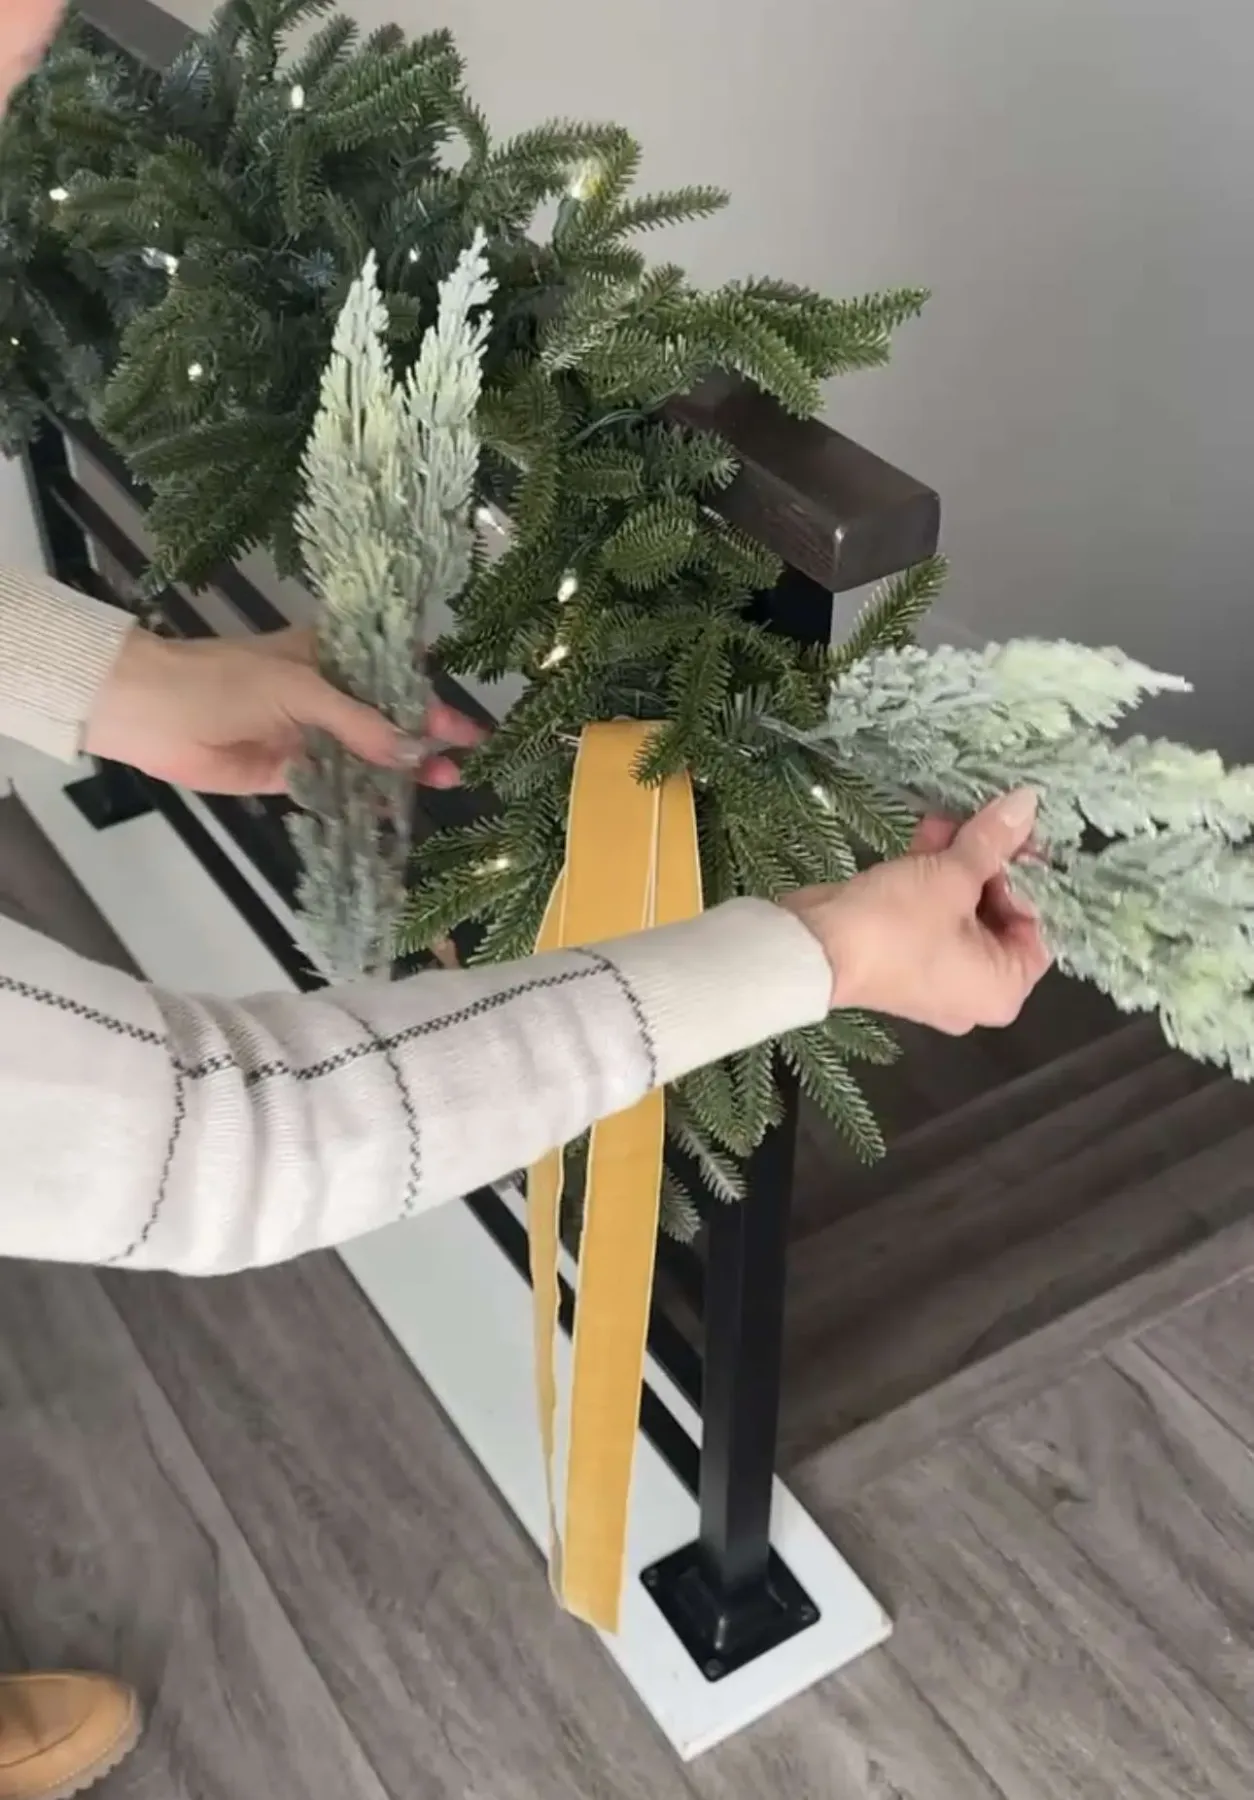
If you’re adding one thing to a plain garland, make it the golden velvet ribbon. Frosted stems make a garland look fuller and more wintry, but ribbon is what gives it shape — it creates the vertical lines your eye follows down the railing, and it’s the piece you can swap next year when you want a different holiday. Everything else on this staircase you’d have to replace or repaint. Buy the element you can reimagine.
One Strand, Thirty Ways to Drape It
Here’s the honest truth about garland: the difference between the ones you screenshot and the ones you actually hang almost never comes down to money. It’s density, light placement, and knowing when one good ribbon should carry the whole staircase. Start with the mantel or the newel post — the smallest patch of your home that everyone walks past — and build from there.
Pick one idea from this list, gather your materials this week, and give yourself the full afternoon. 📌 Pin this guide now so it’s waiting when you’re standing in the aisle with a cart full of pine.